Useless JokeBot
A joke-telling machine that always gives you the wrong punchline.
A joke-telling machine that always gives you the wrong punchline.
To make the experience fit your profile, pick a username and tell us what interests you.
We found and based on your interests.
useless_jokebot_video_square.mp4Video of the Useless JokeBot in actionMPEG-4 Video - 46.86 MB - 08/08/2019 at 17:38 |
|
|
useless_jokebot_video.mp4Video of the Useless JokeBot in actionMPEG-4 Video - 47.23 MB - 08/09/2019 at 02:25 |
|
|
Useless_JokeBot.inoCommented code for the Useless JokeBotino - 5.87 kB - 08/08/2019 at 16:48 |
|
|
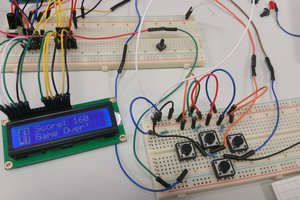
jokebot_components.jpgPhoto of the board layoutJPEG Image - 1.73 MB - 08/08/2019 at 18:22 |
|
|
boardlayout.pngDiagram of the board layoutPortable Network Graphics (PNG) - 95.24 kB - 08/08/2019 at 18:23 |
|
|
Here’s how to build your own Useless JokeBot:
Here’s the programming rationale behind the code, which you can download from the project files. The main idea is to generate a punchline that does never matches the joke. This makes the whole sentence not particularly funny, and probably confusing.
To achieve this, we placed each joke and its corresponding punchline on two different arrays and picked the unmatching elements of both. The code is written so that they never appear together in the same sentence. This is achieved by generating two different random numbers, which are used as the location index on each array. The rest of the code takes care of the display and the responses to the button state.
/*
 Useless Joke Bot
 Creates messed up jokes that are not funny.
 */

 /*
 The circuit:
 * LCD RS pin to digital pin 12
 * LCD Enable pin to digital pin 11
 * LCD D4 pin to digital pin 5
 * LCD D5 pin to digital pin 4
 * LCD D6 pin to digital pin 3
 * LCD D7 pin to digital pin 2
 * LCD R/W pin to ground
 * 10K resistor:
 * ends to +5V and ground
*/


// include the library code:
#include <LiquidCrystal.h>

// === ARDUINO CONNECTIONS ===
// initialize the library by associating any needed LCD interface pin
// with the arduino pin number it is connected to

// initialize the library with the numbers of the interface pins
const int rs = 12, en = 11, d4 = 5, d5 = 4, d6 = 3, d7 = 2;
LiquidCrystal lcd(rs, en, d4, d5, d6, d7);


// === CONSTANTS AND GLOBALS ===
//set button variables and pin numbers:
const int buttonPin = 7;     // constant number of the pushbutton pin
int currState = LOW;
int prevState = LOW;

//set variables to hold a random number generated by the random() function
int randomNumberOne;
int randomNumberTwo;
int arr[2];     //initializes an array of 2 integers//writing coordinates: it will write to the upper most line

//Define the Jokes arrays. The first is the joke and the second the punchline
const char *array1[] = {
"How do you cut the ocean in half?",
"What has no legs but can do a split?",
"What kind of shoes do frogs wear?",
"What do you get when you cross a pig and a Christmas tree?",
"What do you call a lazy kangaroo?",
"What foods are good for young people?",
"What is a mummy's favorite food?",
"What building has the most stories?",
"What kind of tea cannot be taken into space?",
"What did one triangle say to the other triangle?",
"What happens when you cross a singer and a rocking chair?",
"What do you call a pig that does karate?",
"What goes tick-tock, woof-woof?",
"Why is a bad joke like a bad pencil?",
"Why do fish always sing off key?",
"What do you call a pile of cats?",
"What kind of tea is the hardest?",
"What did one campfire say to the other?",
"Why is a pancake like the sun?",
"What room can no one enter?"
};
const char *array2[] = {
" With a sea saw.",
" A banana.",
" Open toed.",
" A porcupine.",
" A pouch potato.",
" The pro-teens!",
" Wraps.",
" The library.",
" Gravity.",
" Let's get together and square dance.",
" You rock to the beat.",
" A pork chop.",
" A watch dog.",
" Because it has no point.",
" Because you can't tuna fish.",
" A meowtain.",
" Reality.",
" Let's go out one of these days!",
" Because it rises in the yeast.",
" A mushroom.",
};


void setup() {
  //Set up the LCD's number of columns and rows:
    lcd.begin(16, 1); //We define the LCD as having only one row as we will only display on the top row
  //Serial monitor
    Serial.begin(9600);
  //Initialize the pushbutton pin as an input:
    pinMode(buttonPin, INPUT);
}

void loop() {

    currState = digitalRead(buttonPin);
    delay(5); //delay a little bit to avoid debouncing (i.e. noise reading from a button)

   // Serial.println(currState); //To DEBUG

    //Display "Press button" text the first time
    lcd.print( "Press button    ");

   // -- Read the state of the pushbutton value and displays text --
   if (currState != prevState && currState) // rising edge
  {
          //Changes the values inside the array or random ints
        rndNbr(arr);
          //Generates and displays rnd text
        rndText(arr);  //the 'arr' has been modified by the previous function
        //Displays "Press button" text
        reset();
   }

  //Save the current state as the last state, for the next time through the loop
    prevState = currState;

}

void rndNbr(int arr[]){
 // -- generate a random number and changes the value of the array passed--

 //Set rnd seed
  randomSeed(millis() + analogRead(A0) + analogRead(A1) + analogRead(A2) +
             analogRead(A3) + analogRead(A4) + analogRead(A5));

   //Size of arrays
   //The first call will tell you how much memory the whole array is using. The second will tell you how much memory one element is using. The division then tells you how many elements in the array.
   //Keep in mind that this method can not be used in functions, since the function receives a pointer to an array, so it can not possibly determine the size of the array.
    const int arrLen1 = sizeof(array1) / sizeof(array1[0]);
    const int arrLen2 = sizeof(array2) / sizeof(array2[0]);

  //Generate rnd numbers
  randomNumberOne = random(0, arrLen1);
  randomNumberTwo = random(0, arrLen2);

  //Check whether they are different
  do {
    randomNumberTwo = random(0, arrLen2);
  } while (randomNumberOne == randomNumberTwo);

  arr[0] = randomNumberOne;
  arr[1] = randomNumberTwo;

}

long  rndText(int arr[]) {
  //:inputs: arr[] is a Ref to an array of integers (arrays are always passed by Ref)

  // -- generate random sentence --
  String TEXT = String(array1[randomNumberOne]) + String(array2[randomNumberTwo]);

  // -- print sentence on the LCD --
  lcd.clear();           //Clear screen first time
  lcd.setCursor(16, 0); //Right most space as we will scroll to the left
  lcd.autoscroll();    //Scrolls the chars from right to left

  //Need to print one char at a time
  for (int iChar = 0; iChar < TEXT.length(); iChar++) {
    lcd.print(TEXT[iChar]);
    delay(400);
  }

  delay(400);           //give ppl time to read
  lcd.noAutoscroll();  // turn off automatic scrolling
  lcd.clear();        // clear screen for the next loop

}

void reset(){
//Displays text on screen

String TEXT = String("Press button   ");

// -- print sentence on the LCD --
  lcd.setCursor(16, 0); //Right most space as we will scroll to the left
  lcd.autoscroll();    //Scrolls the chars from right to left

  //Need to print one char at a time
  for (int iChar = 0; iChar < TEXT.length(); iChar++) {
    lcd.print(TEXT[iChar]);
    delay(300);
  }

  lcd.noAutoscroll();  // turn off automatic scrolling

}
Create an account to leave a comment. Already have an account? Log In.
Become a member to follow this project and never miss any updates

 Devlin Macpherson

