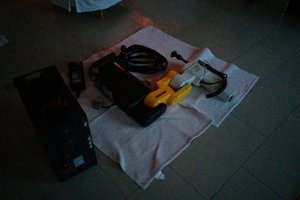
Epson Artisan 725 printer sourced from a goodwill
CISS (Continuous Ink Supply System) sourced from ebay
Taking a thrift shop printer and a cheap Continuous Ink Supply System kit to make a economical inkjet printer for hackerspace use.
To make the experience fit your profile, pick a username and tell us what interests you.
We found and based on your interests.
Epson Artisan 725 printer sourced from a goodwill
CISS (Continuous Ink Supply System) sourced from ebay
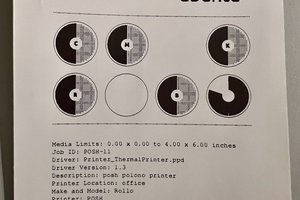
ColorCard.pdfA super handy test sheet to print out to make sure everything is working! Sourced from http://cream.sourceforge.net/ColorCard.pdfAdobe Portable Document Format - 1.45 MB - 12/03/2019 at 21:50 |
|
|
The kit and the printer (Before anything else was done)
CISS Kit as received from ebay:
The kit was made to work with a unmodified printer, but in a rather clunky way.
The ink supply tubes from the tank were to snake up the printer, go into the space between the scanner and the printer, and from the looks of it be pinched by the lid, or at least make the scanner clunky to use.
Instead of that, and as I have no "real" investment in this printer, and the warranty is non-existent, I hacked out a chunk of the right side of the printer case. I do not like how they managed to make it into a puzzle of panels, but that's what the engineers who made this thing did.
So with the chunk taken out with a hacksaw, and the rough sharp edges knocked down with a file, I proceeded to fit it back together. I also found a project box which I unceremoniously double side sticky taped to the side of this panel. I took the old cartridges out, and secured the bottom bits with strapping tape just in case we need them later down the road (there is still ink in them, and who knows)
The idea being that if ink gets spilled, I want a place for it to be contained, and also I want the tanks to be with the printer, and there to be no reason to move the ink tanks higher or separate them from the printer (That would be bad!)
Now I installed the ink carts, and I ran cleanings until I got full flow through the ink supply lines. This might not have been necessary, but it helped my OCD a bit. I don't want any stinking bubbles in my stinking ink supply lines, you hear me?!
I just kept on with the cleaning cycles until there were no bubbles left.
A quick test print after making sure the new ink got to the heads confirmed I was on the right track.
It was at this time I should have gone home instead of borrowing and abusing one of our hackerspace's labelmakers.
At least initially I am happy with the result, and we shall see how far we can push this printer. I highly suspect that the printer mechanism or the head will fail before we run out of ink. The kit I ordered came not only with the tanks pre-filled, but 100ml bottles of each ink color as well, giving us like 200ml of ink to start with. Compared to the original cartridges that this machine runs, it might as well be a swimming pool of ink.
I can't wait to see what this is like to run, and if it fails or not. I figure this is a pretty cool experiment for less than the cost of a set of cartridges for most printers, and that's including the printer, the CISS kit, and the ink it came with.
I'm not sure if it's considered a hack by most people, I just bought stuff off the shelf and threw it together, but it's sure hacky! To add an interesting layer also the CISS kit I ordered has chips on the replacement cartridges that are supposed to "auto reset" or "never run out". It will be interesting to see what happens.
That reminds me, I need to put a note on it somewhere warning people to NEVER EVER under any circumstances update the firmware. I've heard horror stories where many printer companies are locking out third party ink, so that's not something I want to have happen to this machine.
If anyone's wondering about the "name" I gave it, it's first big task will be to print pages (on hopefully nice paper) to make/bind into books. We have a color laser printer that I cobbled together on what was supposed to be a tear-a-part night (For some reason I ended up bucking the trend and had a "Put it together night" with 2 corpses of printers) under similar sleepless and questionable conditions which I named BobRoss. Perhaps we will rename it depending on how reliable or not it ends up being.
I hope to update this once we put it through it's paces, and after I hack something together to print weekly or more than weekly test prints to make sure the heads don't clog.
Overall this build was really fun, and I really enjoyed having an excuse to order one of these crazy kits and install it on a printer.
After going through many printers that I could not test at the thrift shops, and after going through many with clogged heads, I found one that worked! This ended up being an Epson Artisan 725. It can do 2 sided prints, print on specialized DVDs/CDs, and is a 6 color system (so hopefully photos will work okay). Before purchasing said printer, I made sure that there was an affordable (and comprehensive) continuous ink supply kit for the printer.
I purchased the printer, purchased the CISS, and now I am deciding how to put them together while documenting the process.
The kit I ordered was under $40, came pre-filled, and also came with extra ink in bottles.
First thing you want to do is find a suitable printer. Generally it will be a slightly older model, and you will want it to be for a few reasons.
1.) The ink "security/drm" will likely be defeated
2.) There will be support from these CISS kits for them
3.) There may be aftermarket supplies of things like the printheads or the sponge material used in the Service Station.
I can't stress this one enough, make sure the printer actually works prior to you modifying it. If it's new in box and never has had ink within it might be the only time to ignore that. If the printer has been used, make sure using whatever means necessary that the heads in the printer are not clogged. You don't want to start out with failure. Don't waste good money chasing printers that ended up in a thrift shop for a reason, it's not worth it!
Not all CISS kits are the same, be on the lookout! If your kit includes a drill bit attached to a screwdriver handle, avoid it like the plague! That means they are going to have you drill into an original cartridge to supply the ink. These kits are generally even cheaper than other full kits. Look for the most well polished one that has the most favorable reviews, it will improve your chances of success
Create an account to leave a comment. Already have an account? Log In.
My plan had been to get a wide format printer to start with for the next phase. I do not know what you could do without making your own drivers and control board. That's beyond the scope of what I know I can accomplish for now to be honest!
Do not drink. Not Kool-aid. Taste very bad. Did you empirically verify that last claim? 😁
Just kidding. Good to hear it's still pumpin' strong. 👍👍👍
Do not want to verify that last claim to be sure. Someone who doesn't value their life or current tongue color may indeed verify that independently, however they would be doing so at their own risk and without my permission.
This project was a primer for me to get my foot in the door of modifying inkjet printers and provide a useful thing in the process.
A long term goal for my hackerspace is going to be to try and build up a budget (meaning CHEAP!, like less than $100 in the thing when a modified supposedly turnkey <HAH!> printer from China goes for $2,000+ US) flatbed DTG (Direct To Garment) printer for shirts or whatever else.
Almost all of them I see from china use special ink (generally UV curing) and CISS systems to dispense it. They also often use a piece of software known as a RIP to do fancy things like be able to print on black t-shirts by first printing and curing a white layer so the other colors can then be printed, and have some magic to help fool the printer into thinking that everything is normal, when in fact it's whole paperfeed mechanism has been replaced with other electronics and stuff. This also means that there has to be a head that used to dispense a different color to repurpose for that use (so a 4 color printer will not cut it for DTG use for an instance)
So far the main obstacle is getting a printer that functions and is cheap enough for me to not care about what happens if the project fails. I mean a lot of things have to go right for it to work, I'd rather wash my hands of it should it turn into a disaster. Though my hands could be quite stained to be honest, and that ink isn't easy to get off!
The model I wish to modify shows up from time to time at thrift shops, however so far all 5 I've seen so far either have super clogged nozzles, physically broken parts that prevent them from working, or have had a botched attempt at repair/refilling ink carts which has left it unusable and also covered with ink in all the wrong places(yuck!).
Looking forward to it as well. Long term in this case probably means at least a year away if not more. I've decided to be at the mercy of parts acquisition. Should be interesting to see also if anyone tackles it and documents it before I can get to it. Many who have started on this journey offer their work as "open" or "free" and then you find out you have to send money to their paypal for blueprints. The boards you can get for certain printers that take place of the paper feeder/detection often have chips that have been ground down to prevent reverse engineering. Reminds me of the original reprap days!
Wanted to post an update, 02/16/2020, the printer is still going strong, no clogged heads or malfunction yet.
Still no clogs, 07/06/2020, and it still is working well, however it has not had much use since March for obvious reasons, and the world has very much turned on it's head since I last thought about this. Hope everyone stays safe and informed throughout this thing.
Where did you purchase your ciss kit? I'm fed up with Canon. My printer cannot reliably feed paper without shifting the angle. Attempting to do full page cutouts of stickers on my cricut and it never works. Also, always scales my prints even with everything turned off. I've read epson printers are the easiest to modify. Canon heads are not capable of adding abciss if trying to use sublimation inks because they heat as they apply.
Thanks for posting this project. Knowing the steps and gotchas is useful in case I ever do anything like this.
But these days I hardly print anything on my mono laser even, maybe 5 pages a month. Currently they are mostly schematics to follow while assembling on breadboard. In the past they were things like job contracts where I printed the Sign Here page, signed, scanned and replaced the page in the PDF file. Of late I only had to sign the electronic document on my mobile phone.
Yeah, I looked for an excuse to build one of these for a while. Since we use our printers a lot at my hackerspace, I figured this would be the closest I could get to the environment one of these would be required in to keep costs down! We need an inkjet because when we tried to bind books with our color laser, we got page to page toner transfer when things were pressed together. Not ideal for a book!
>page to page toner transfer when things were pressed together
Useful to know, thanks!
@Mike Szczys It was great seeing you too! I had a heck of a lot of fun at Supercon and intend to be there next year, I'll try to bring something like I bring to Defcon this time around.
@Dan Maloney They are still CMYK, this has Light Cyan and Light Magenta alongside the regular C M Y and K. It's something that happens a lot in photo printers.
Come to think of it, I've seen large-format plotters with a rainbow of ink cartridges too. Guess it makes sense, and cool that you found a way to supply ink in bulk.
Hey, it was great seeing you at Supercon this year!
This is the first I've heard of a continuous ink supply, makes a lot more sense than tiny catridges when the printer gets heavy use.
So the original printer was RGB and CMYK? Sounds like a scheme by Epson to maximize profits from cartridge sales. I like how you worked around that - stick it to the man!
A lot of photo printers have more than 4 colors, especially professional inkjet units. In this case what you are looking at is still CMYK, but it has both light cyan and light magenta as well as the regular colors. The reasoning I was told by a printer person was that you can put more dots per inch of light magenta (or light cyan) as opposed to regular or vivid magenta when you want a certain lighter color color. Coverage is better, so your picture will look better as opposed to using say half toning on a full strength color. (More dots is more better!) Hope that clears it up!
Become a member to follow this project and never miss any updates

 coder
coder
 Malte Schrader
 Ralph Bacolod
 Federico Virdia
Have you considered anything to do with ripping the printer apart to make a larger print area? ie. Replacing all the shafts with longer shafts and the drive system for the ink head with a longer belt/chain and longer tubes? I'm very interested in getting a printer similar to yours and making the same modifications but don't go know how to go about updating the programming of the printer. The hardware isn't too difficult (other than the paper will be heavier as it's wider and coming off a roll).