Close
0%
0%

Burning Pictures on a Compact Disc Surface

No LightScribe, no LabelTag. No hardware hacks or gimmicks. A regular CD-RW drive and a regular compact disk.

Similar projects worth following
The first compact disc was sold in 1982, that is to say 40 years ago. This project is my anniversary tribute to this technology. No, we are not going to use it as data storage. It’s obviously impractical nowadays. Well, if you turn it this way, actually we will store some data... Not digital but rather visual and not exactly on CD but on its surface... Pick up your old CD-RW drive and some compact discs from your garage. Because we are going to burn images on a compact disk surface. With an incredible rainbow effect. No LightScribe, no LabelTag. No hardware hacks or gimmicks. A regular CD-RW drive and a regular compact disk.

This entry is submitted to 2022 Hackaday Prize (Challenge 3: Hack it Back).
According to Wikipedia, by 2007, 200 billion CDs had been sold worldwide. Apart from some niche use cases, it's mostly garbage nowadays. This is an attempt to make them useful again. Or at least beautiful. :) Since "the beautiful is as useful as the useful".

How could it be used?

Initially there were no practical reasons for this project. But…

1. You could make a souvenir or an original geek gift with some photo or other image. For example, burn the Discworld map. :)

2. Alternatively you could make an item for your quest or escape room with some riddle. You could supply your participants with CD Player for misdirection and make them figure out that they should look, not listen. 

3. I’m not sure but maybe some holographic applications are possible. However, we are likely speaking about the infrared, not visible spectrum. 

4. It might be possible to implement a copy protection algorithm. Since all compact discs are slightly different, you should be able to use timeouts between particular areas readings to ensure that a compact disc is the original one. Even an exact copy is not exact geometrically speaking. I believe such algorithms have existed during the CD era. Maybe this trick is possible with modern optical discs.

If you have other ideas, let me know.

Project's Origins and Credits

I know of at least two successful attempts to implement a similar technique. One was accomplished about 15 years ago by [argon] Instructables user. That code was more proof-of-concept than the universal method, but it was impressive! I suppose there was a huge amount of work behind it. Another attempt was made by a user with nickname [unDEFER] (no English documentation unfortunately). These two projects inspired me some time ago. And in fact my coordinate conversion code is mostly based on [unDEFER]’s implementation (distributed under GNU GPL). I also used geometric parameters of some compact discs from that project. I acknowledge and am grateful to these developers for their contributions.

I played with color shades and different compact discs with moderate success and created a GUI with visual preview mode. I tried to implement a user-friendly solution but finally abandoned the project in 2008 due to a problem of calibration for every particular brand and type of compact disc that will be described further. Recently I found my old code and decided to share it. More as a tribute to the compact disc era, as I said. But maybe you will make some use of it. I brushed the code up a little and ported it to modern Qt6. I considered porting to Python, but I still need C++ because audio track generation takes some time even on modern hardware. This project is distributed under GNU General Public License v3.0, so feel free to modify the code for your purpose.

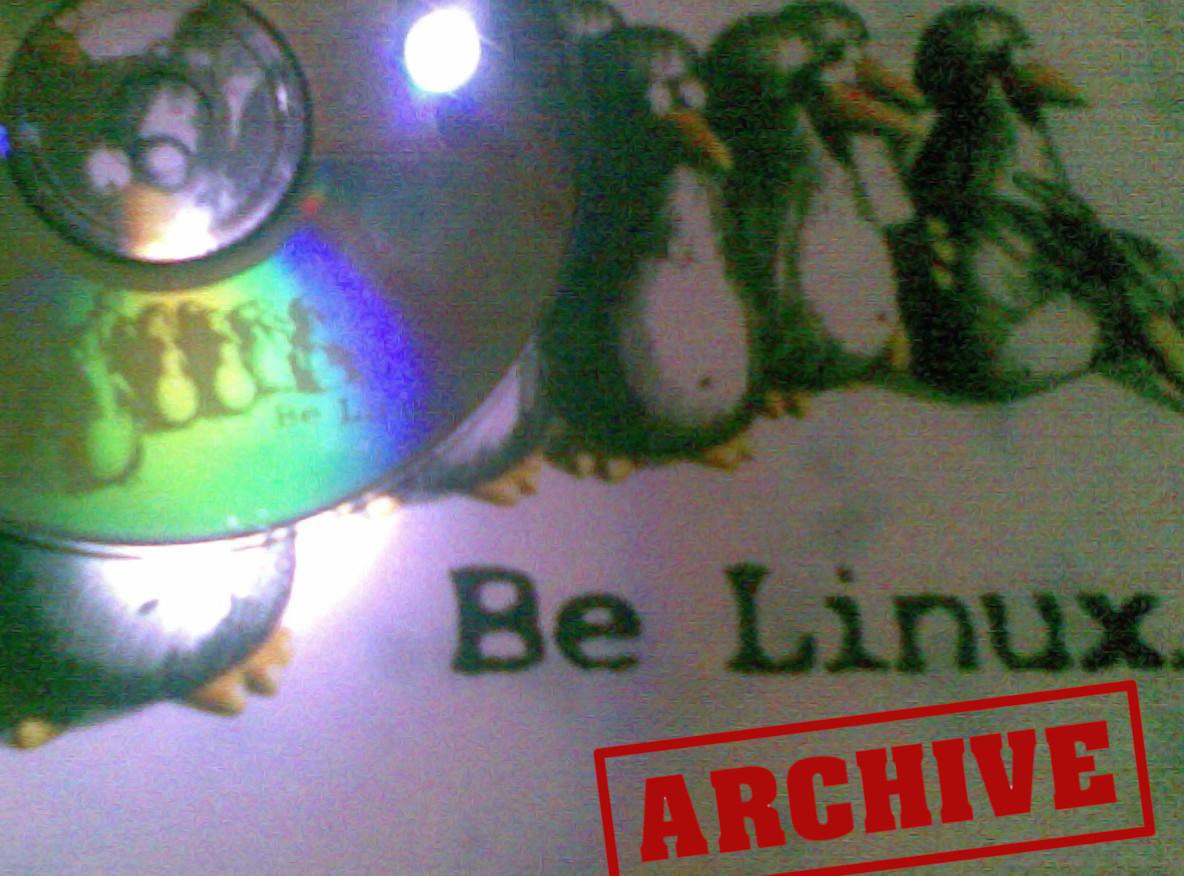
A couple of my early experiments (sorry for bad quality, photos are from 2008):

Experimenting with photo burning
One of the earliest attempts

The Short Story

The short story is that compact discs are optical volumes. Data is encoded in areas with different optical properties and organized in spiral. You might have noticed a visual rim on a compact disc surface between written and unwritten areas. So by generating specific data that will form darker and lighter areas it is possible to burn visible images on a compact disc surface. Sounds easy, isn't it? Just convert an image to polar coordinates and here you are.

The Long Story

You may skip this section if you are not interested in technical details.

The long and real story is more complicated. If you really want to understand the concepts, I suggest that you read the so-called “Red Book” which describes all technical specifications. I am not going to retell the entire boring standard here, just name some key points.

Did you know? Compact disc formats specifications are called Rainbow Books. The first one considered Digital Audio Compact Discs and was named "Red Book".

The surface consists of “pits” and “lands”. They differ in light reflection properties. But it does not mean that “pit” is 0 and “land” is 1 or vice versa. In fact NRZI code is used to prevent long series of “pits” and “lands”. Which is good for data...

Read more »

  • 1 × A regular CD-RW drive
  • 1 × A regular compact disc I recommend that you use one of the following: (1)Verbatim CD-RW; (2)eProformance CD-RW 4x-10x; (3)TDK CD-RW 4x-12x.
  • 1 × CD burning software For example cdrtools
  • 1 × CDImage My tool to convert images to CD tracks. You’ll also need QT6 library and C++ compiler to build it.

  • CD Burning Issues

    arduinocelentano08/07/2022 at 18:24 0 comments

    Some people reported issues with Windows CD burning software, so I updated the instructions. Please check them out if you experience problems while burning your disc.

  • Windows and Arch Linux Packages

    arduinocelentano07/24/2022 at 12:40 0 comments

    Since many Windows users experienced problems with building the software or did not want to install Qt and all the stuff, I've made a Windows build.

    Arch Linux package is also available (thanks to ShayBox).

    Build instructions were updated too.

  • Considering Calibration

    arduinocelentano07/12/2022 at 19:50 2 comments

    Since many people keep asking about it, I think it should discussed.

    From the Mathematical point of view we have a sort of multi-objective optimization problem. Bicriteria optimization, to be more precise. It means that two objective functions should be optimized simultaneously. If we define goal as getting a "neat image", we need an expert who is able to provide some feedback regarding image "quality". Which leads us to interactive methods.

    The first and the most obvious idea is to select some series of equally spaced values for each criterium and burn a lot of discs with all possible combinations. If the space is narrow enough, you'll see something at some discs. Then narrow the range and repeat. A typical Computational mathematics approach. A lot of iterations and time.

    The number of iterations could be reduced if we gradually change criteria within one image from disc center to rim. Then visually looking for areas where some distinctive fragments could be seen. The only implementation I know about was a part of CD PAINT project I mentioned. I thought it was gone, but finally found it today. It was called defcdparams. Apparently CD PAINT project contributors used it to define geometry of four discs I know. However it is still a time consuming procedure. I think it was the main reason why CD PAINT project was abandoned.

    At least for me it was the reason why I finally gave up. However I'd like to share some of my thoughts regarding possible improvements of calibration technique. The weakest component in the mentioned algorithm is the necessity of human expertise. How it could be automated?

    1. If all the discs are geometrically different, then seek time delays would be different to. Because the same sector A is located at different angles for two different discs. So if we know "ideal" delays for a calibrated disc, we theoretically should be able to calibrate another one. But... These delays must be optical drive dependent. So this solution potentially would face some hardware issues.

    2. I have not considered this option in 2008, but now we have more advanced image recognition algorithms and better cameras. So maybe some AI solution might be used instead of human expertise.

    If you have other ideas, please share them.

  • Links Update

    arduinocelentano07/12/2022 at 18:31 0 comments

    Finally I found the missing link to the second project, which I thought was gone for good, and updated the description. Thank you for your feedback. I did not expect it would be still interesting in 2022.
    So, there existed at least two successful implementations that I know.

    1. img2cd by [argon]. I think it was the first ever implementation of this technique. Not sure when it was accomplished, but given that the earliest comments under Instructables post were made 16 years ago, I assume 2006.

    2. CD PAINT by [unDEFER]. My track generating code is mostly based on their implementation. Unfortunately there never existed English documentation, but the code is freely available. Not sure about exact date, but timestamps of the source code files vary from 2005 to 2008. So it might have been the first implementation too. :)

    Anyway, it's interesting that two people almost simultaneously achieved it.

    What makes the second implementation interesting is that they managed to guess geometry for several compact discs. I've tested two of them, and they mostly worked. Not for all compact discs though. Sometimes some manual tuning was needed.

    In fact they even created a calibrating tool which is called defcdparams. The idea was to generate tracks with parameters that vary from center to rim and look for areas where the image was distinctive.

View all 4 project logs

  • 1
    Preparing the Software (Unix/Linux users)

    You’ll need a compact disc writing tool (like wodim, cdrecord etc.) and my CDImage tool to generate an audio CD track.

    Arch Linux package for CDImage is now available (thanks to ShayBox).

    However you could also build it yourself. To compile it from source code, you’ll need the Qt6 library. Qt installation procedure depends on your package manager. Afterwards just run

    qmake
    

    and then

    make
    

    Alternatively you could build the project with Qt Creator if you installed it.

    Note: You’ll also need a compact disc writing tool. CDImage just generates tracks, but does not burn discs itself.

  • 2
    Preparing the Software (Windows Users)

    You’ll need a compact disc writing tool (like wodim, cdrecord etc.) and my CDImage tool to generate an audio CD track.

    Windows binary release of CDImage is now available. But if you still want to build it yourself, consider the following tips.

    1. Make sure you download open source version of Qt.

    2. You should install Qt library itself, MinGW compiler and (optionally) Qt Creator IDE. You could choose them in the installer.

    3. If you installed Qt Creator, just open the project (.pro file) and build it.

    Note: You’ll also need a compact disc writing tool. CDImage just generates tracks, but does not burn discs itself.

  • 3
    Picking Up an Image

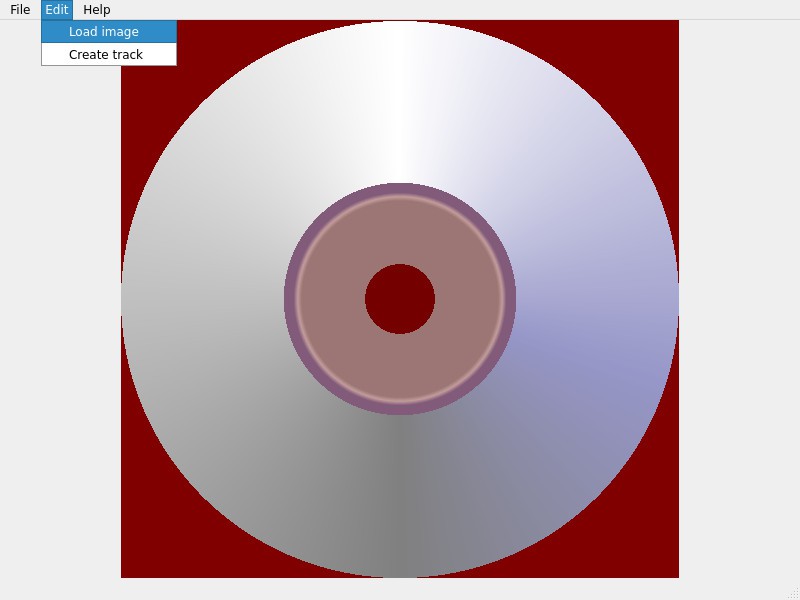
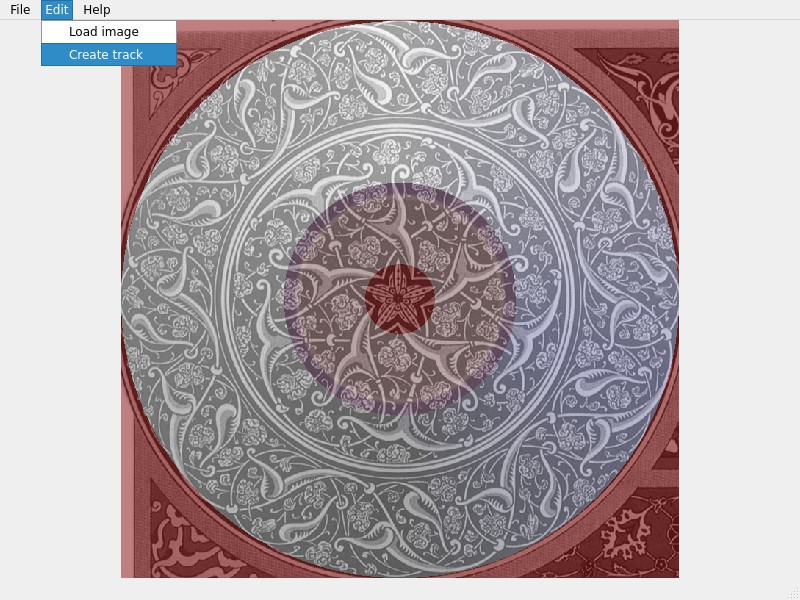
    Click Edit→Load image and select an image file. I recommend that you use a high-contrast image. No need to mention that you will not be able to burn full color images. Well, in fact every image will have a recognizable rainbow palette when you finish. You can move and scale the image:

    left mouse button — move image;

    double click — center image;

    mouse scroll wheel — zoom image.

View all 5 instructions

Enjoy this project?

Share

Discussions

bettygdurand wrote 05/20/2023 at 14:35 point

I appreciate your suggestion, and I may consider trying it out if I come across more compact discs to experiment with. Nevertheless, I have concerns that it might not yield a significant contrast.

  Are you sure? yes | no

Keith wrote 10/02/2022 at 01:23 point

I think the project is ideally suited to making zoetropes.
One could use an old CD drive to spin them.

  Are you sure? yes | no

Spyfoxls wrote 08/23/2022 at 22:04 point

With the first cd Image i made the tool created something but i set the radius wrong (i had it set to 33 or so). When i try to generate another cd Image the Program crashes. I'm using the Windows Build. I tried png and jpg images and even the same one i tried before without luck. 
Any ideas what i could try to make it work again?
Thanks in advance. 

  Are you sure? yes | no

Gennaro wrote 08/10/2022 at 07:03 point

Again, thanks to arduino for adding more helps about this funny project. Using cdrtools did the work...more or less. In fact, it correctly recognize the track but, and it's not its fault, it fails to write because of the disk geometry (I have not neither TDK or Verbatim disk but some othe brand). How we all can find the right one and help contributing this project with more brands? :-)

Thanks to anyone can answer.

Cheers

  Are you sure? yes | no

Gennaro wrote 08/02/2022 at 06:20 point

First of all, many thanks to arduino for releasing the Windows binary.

But...even with that the output file is about 800 MB and, worst of all, I tried two  (cdburnerxp, ashampoo) cd writer tools but both report that the file is protected by DRM - Digital Right Management (maybe because the "oversize"??). I'll give to wodim and cdrecord a chance...

  Are you sure? yes | no

arduinocelentano wrote 08/07/2022 at 18:38 point

Thank you for your feedback. Yes, I think some CD burning tools find a generated file "unusual". Probably because of its size. I've just tested it with cdrtools for Windows and managed to burn a disc. Please check out the updated instructions for further details.

  Are you sure? yes | no

Evan wrote 07/24/2022 at 04:16 point

These instructions are worthless.  I downloaded both CD Image (just shows up as folder, no runable program) and QT6 (wtf do i do with this?  There is no option to run "qmake" & "make") This was suppose to be a fun project, but it's been 2 wasted of hours of frustration.  If anyone actually makes a youtube walkthrough on how this all is actually suppose to work including all programs needed, free to PM me.  

  Are you sure? yes | no

arduinocelentano wrote 08/07/2022 at 18:32 point

Thank you for your feedback. I've uploaded Windows binaries and updated the instructions. Hope it would be helpful.

  Are you sure? yes | no

Gennaro wrote 07/19/2022 at 06:42 point

Mark8989 rised a good question: the audio file output is 800MB not 700MB, as showed in the examples above (and the actual preset selection). 

By the way, I'm using CDBurnerXP that doesn't recognise the track as audio (maybe only an extension matter? Not checked yet) 

OOT: I still have troubles compiling all the stuff using QT. Downloaded a CDImage installer from reddit.

  Are you sure? yes | no

Mark8989 wrote 07/18/2022 at 17:59 point

how to burn the disc as audio if most burning programs don't recognise it as audio?

I also tried to burn it as an image but the programs won't let me because of the filesize

  Are you sure? yes | no

Michael wrote 07/17/2022 at 13:32 point

Am I downloading the QT for open source?

  Are you sure? yes | no

Gennaro wrote 07/17/2022 at 11:44 point

Greetings

I've downloaded and installed QTcreator on my Windows machine, downloaded and extracted the CDImage project .zip, but  I don't understand how to compile and link the stuff. Is there someone who can help me step-by-step? After loaded the cdimage.pro file I don't know how to proceed...QT still asking for something like kits. Please help.

  Are you sure? yes | no

Jake Masei wrote 07/12/2022 at 20:13 point

Any idea on how to CD PAINT's defcdparams? I can't read Russian and translating it makes me confused as I don't get what I should be looking for.

  Are you sure? yes | no

arduinocelentano wrote 07/13/2022 at 14:19 point

As far as I know, they have never released English documentation. To be honest, it was several years ago when I used their software last time and russian is not my cup of tea neither. But I think I could try to look at their code and summon up the way it should be used. If I remember correctly, it was a time-consuming routine. Unfortunately I’ll be out of my workplace, where I have the only working optical drive, over the next week or two. I think that I’ll write a post in the project log if I manage to figure it out.

  Are you sure? yes | no

greg wrote 07/12/2022 at 20:12 point

qt's website kinda sucks.  Go there, click on qt6, then the green DOWNLOAD button.  That takes you to the GET STARTED page, where you choose the SOURCE CODE option.  You click on that, and it gives you the "Building qt *5* from GIT" instructions.  Am I missing something on the site that gets me v6 instead of v5?

  Are you sure? yes | no

Sigma wrote 07/12/2022 at 21:27 point

I just clicked the Qt6 link in step 1, then download, then try Qt and signed up for a free account, it brought me right to the download for the free version.

  Are you sure? yes | no

greg wrote 07/13/2022 at 10:30 point

heh, I think I forgot to take my anti-stoopid pills yesterday morning...  sorry!  :-)

  Are you sure? yes | no

Sigma wrote 07/12/2022 at 18:19 point

Not sure if I am doing something wrong, I compiled the project using QtCreator, and it runs fine, but every file I get as output is over 800Mb no matter what geometry or image I choose. Any tips?

  Are you sure? yes | no

arduinocelentano wrote 07/12/2022 at 20:09 point

It's ok. 700Mb is a limit for Data CD. Audio CD does not use some error correction techniques and they have different sector size. You should be able to write it as Audio CD.

  Are you sure? yes | no

Jake Masei wrote 07/12/2022 at 20:41 point

Approximately 700MB for data and 800MB for audio

  Are you sure? yes | no

Sigma wrote 07/12/2022 at 21:23 point

Sorry folks, no idea what I'm really doing here, attempted to write it as an audio cd using NERO, wouldn't accept it, attempted changing the file type to MP3, same thing. Any specific application I should use?

  Are you sure? yes | no

Jake Masei wrote 07/12/2022 at 15:16 point

Any advice on cdrw calibration? No matter what settings I use give great results. It either ends up distorted or a complete mess.

I'm using Verbatim DataLife Plus CD-RW's.

I'm using an image that is a grid with concentric circles overlaid on it. Using the Verbatim SERL 1 or 2 default settings, the concentric circles come out fine, but the grid is distorted.

  Are you sure? yes | no

arduinocelentano wrote 07/12/2022 at 20:15 point

I have never tried DataLife Plus series. It might have different geometry. If you could see deformed but still distinctive lines, you are pretty much close to actual parameters.

I've just written some tips regarding calibration in project logs:

https://hackaday.io/project/186303-burning-pictures-on-a-compact-disc-surface/log/208473-considering-calibration

  Are you sure? yes | no

Aaron Saul wrote 07/12/2022 at 12:23 point

Hi! I'm not a programmer in the slightest, but saw this and wanted to try it out. Problem is I don't know anything about (and would rather not pay $300 a month) this "Qt6 library" thing, do you have any version of this that could be downloaded as a exe, or a way to compile it that's cheaper? or am i just missing something? :/ Thanks! :D

  Are you sure? yes | no

Jake Masei wrote 07/12/2022 at 15:17 point

For open-source software Qt is free.

  Are you sure? yes | no

nmz787 wrote 07/11/2022 at 20:17 point

Great to see progress with this! I can't tell you how much time I spent staring at the original img2cd code and concepts! It was the start of my quest to get into nano lithography. Though I ended up getting into electron and ion beam mastering systems, I still think there could be some amazing hacks/utility with a CD based burning system. I will have to give this code a try, and maybe some reflective photolithography stuff too!

  Are you sure? yes | no

arduinocelentano wrote 07/11/2022 at 21:26 point

Nice to see you here. Yes, when you start something without being
sure it’s possible at all... you must be extremely motivated
person. It was easier for me because I had at least two working
projects to start with. Thank you for your effort again. I think it
was underrated.

If you have some repository of img2cd, give me a link and I’ll add it to the
description. I found only your Instructables post. Maybe you know
something about another implementation I mentioned? I think I
abandoned this project in about 2008-2009 and have not saved the
links. At some moment I decided that it is not feasible as an
end-user soulution. No one would spend a lot of time and compact
discs to get one with an image. Unless you find some reliable supply
of geometrically identical discs, which is unlikely.

  Are you sure? yes | no

axet wrote 07/11/2022 at 19:30 point

It seems like it burn the data to create an image. Can you clarify this in project description? Just to be sure, this is data side of the disk, not the cover side?

  Are you sure? yes | no

arduinocelentano wrote 07/11/2022 at 21:31 point

Thank you for your feedback. Yes, it's data side of a compact disc. You construct a track that will form dark and light areas when recorded.

  Are you sure? yes | no

KD9KCK wrote 07/11/2022 at 19:11 point

It could be cool to then dissolve off the top aluminized layer to level you with a plastic disc with the engraving in it when light is passed thru.  

If I can find a thing of CDs to write I will give it a try.

  Are you sure? yes | no

arduinocelentano wrote 07/11/2022 at 21:39 point

Thank you for your suggestion. Maybe I'll give it a try if I find more compact discs to experiment with. However I'm afraid it would not be very contrastive.

  Are you sure? yes | no

Similar Projects

Does this project spark your interest?

Become a member to follow this project and never miss any updates