Close
0%
0%

Blockchain Camera

A photo taken with this camera will instantly become a NFT.
This camera aims to prove with blockchain that a photo was taken with a camera.

Similar projects worth following
In the near future, we will have to live in confusing world full of fake images and videos generated by AI. In that world, can photographers prove that their photos are real? Pressing the shutter button on this camera takes a picture and at the same time stores it to distributed file system. Then touch the Confirm of the crypto wallet displayed on the touch screen. A NFT linked to the photo stored in the distributed file system will be minted on the blockchain. Anyone can see on the blockchain that the stored photo is linked to the camera's cryptocurrency wallet address via an NFT.

Research on how to distinguish between images generated by AI is continuing. I also saw a news story about a company that provides AI image generation services will add digital watermarks to the images it generates. However, there seems to be no single breakthrough way to solve this social issue at present. If so, there should be a combination of various solutions. Therefore, the blockchain camera also be one of the solutions. However, the blockchain camera still have many challenges. So I open source it. Proving that a photo was taken with a camera seems simple but difficult. So everyone will enjoy solving it. It would be even better if it could be solved without using blockchain.

Caution

This project used blockchain to solve social issues. It does not endorse investment in cryptocurrencies. The build instructions do not explain how to use crypto wallets or how to buy cryptocurrencies. People who make the blockchain camera should at least be familiar with handling them. This is something that conventional wisdom does not apply to. For example, to use the blockchain camera, you first need to transfer a small amount of cryptocurrency to its crypto wallet. If you send cryptocurrency from a crypto wallet that contains your deposits, its deposit and transaction history will be known. Also, if you transfer your cryptocurrency incorrectly and lose it, no one can help you. Therefore, the blockchain camera are not yet something that everyone can easily use. The ideal is for anyone to be able to use it without thinking about blockchain or cryptocurrencies.

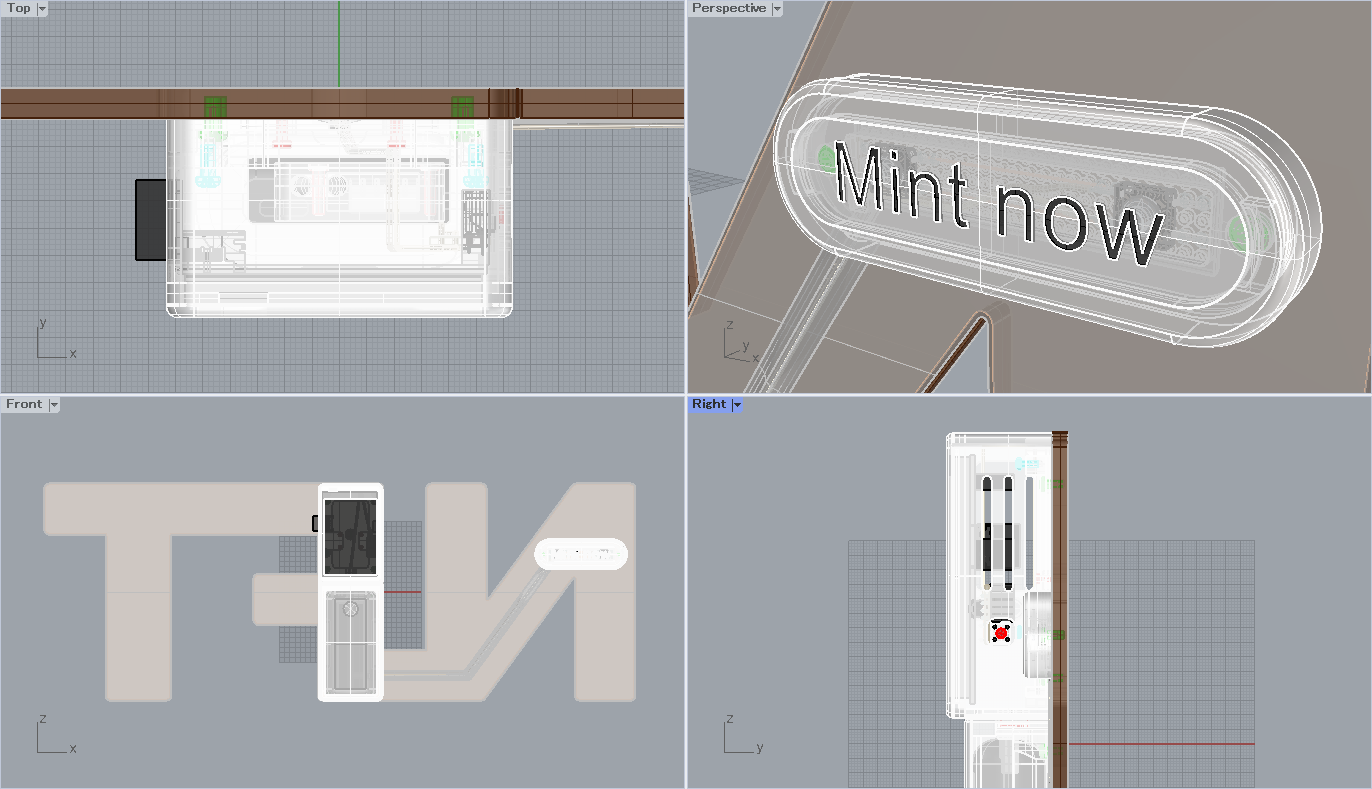
Process of minting a NFT

  1. Pressing the shutter button sends a signal to the GPIO.
  2. A photo is taken with the camera module.
  3. A metadata is created from the image file. Meta data includes a image file name and attributes.
  4. The image file and metadata are stored in IPFS via Wi-Fi. IPFS is one of the distributed file systems.
  5. IPFS generates a content identifier (CID) from stored data. 
  6. The CID is sent from IPFS to the blockchain camera.
  7. The crypto wallet is displayed on the touch screen, so touch "Confirm".
  8. The CID is sent from the blockchain camera to the DApp (Decentralized Application) on the blockchain.
  9. The DApp mints a NFT that has the CID as data.

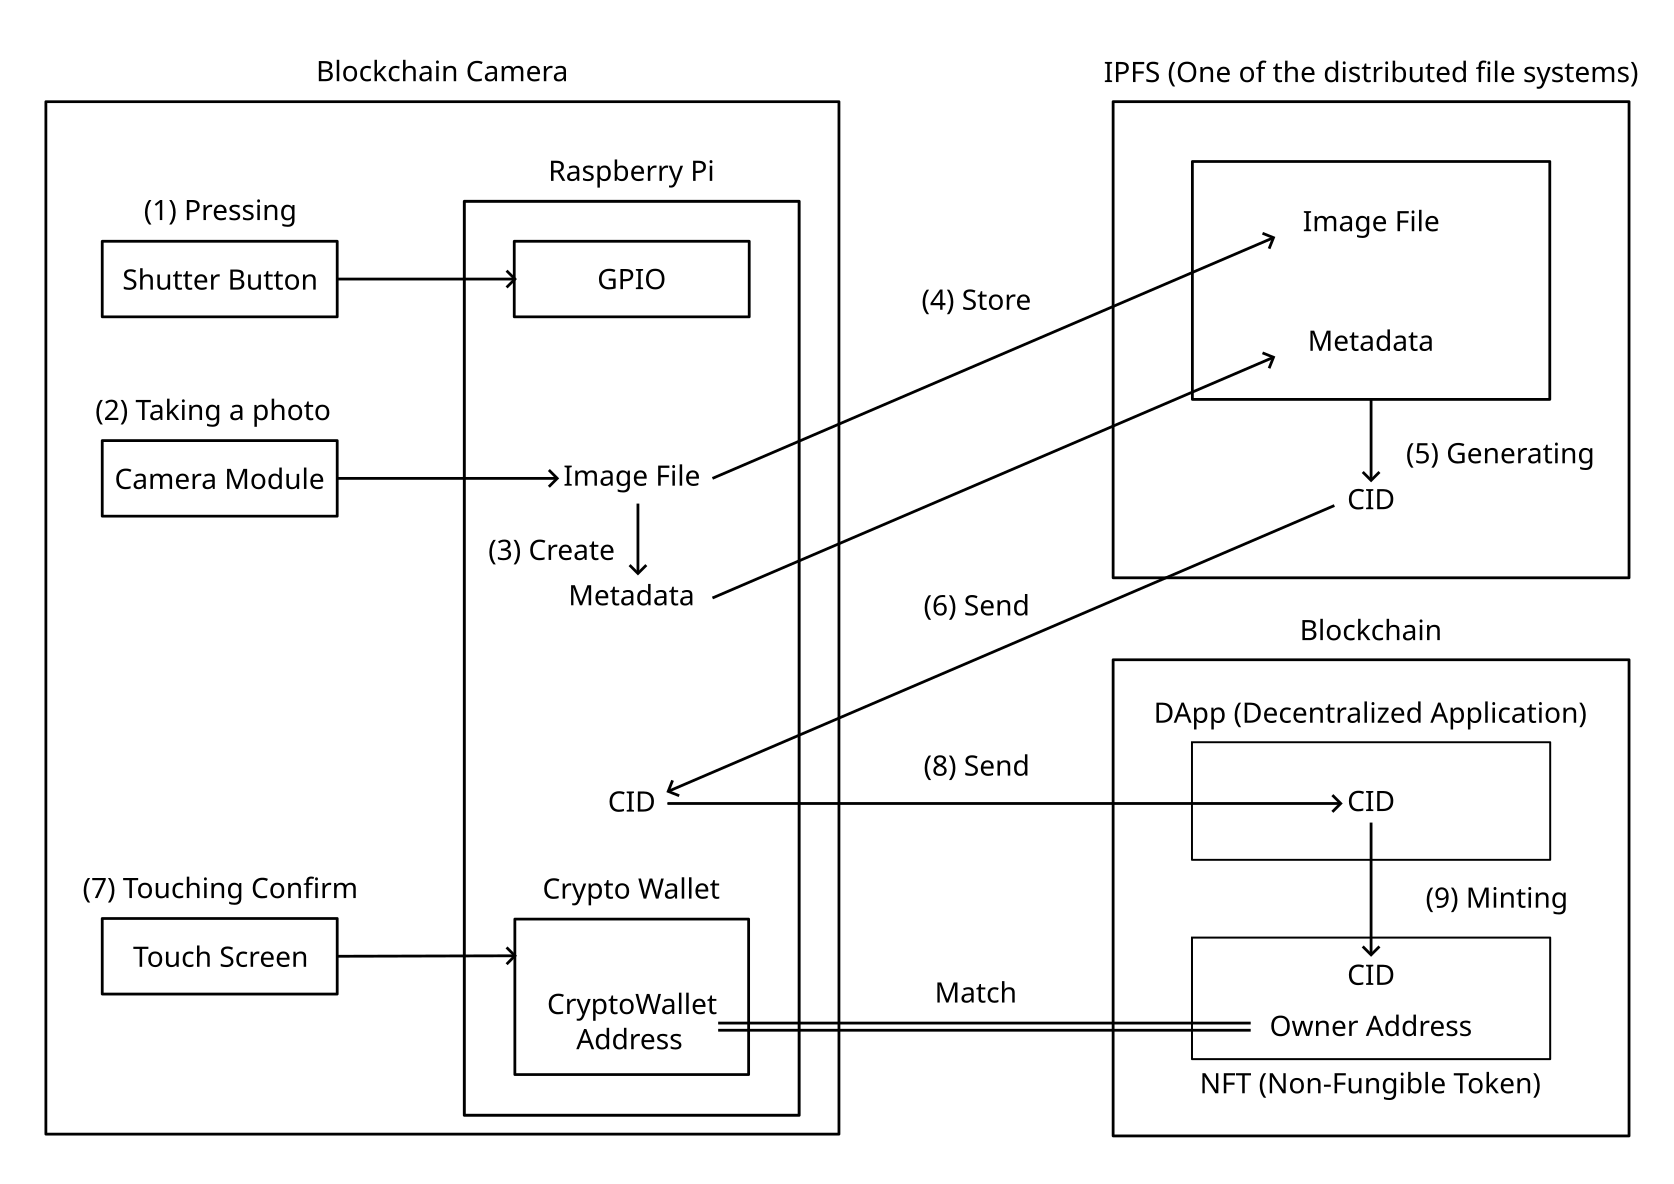
A non-fungible token (NFT) is a unique digital identifier that is recorded on a blockchain, and is used to certify ownership and authenticity. The fact that the NFT was minted from the blockchain camera's crypto wallet is recorded on the blockchain with a timestamp. That NFT is linked to data stored in IPFS via CID. The blockchain camera use these as proof that the photo was taken with the camera.

The reason why image files are not stored directly on blockchain is that blockchain is not suitable for storing large-sized data. However, data stored in a distributed file system is difficult to tamper with, similar to blockchain.

How to view NFTS

Blockchain Explorer

Note: Blockchain Explorer sometimes stops.

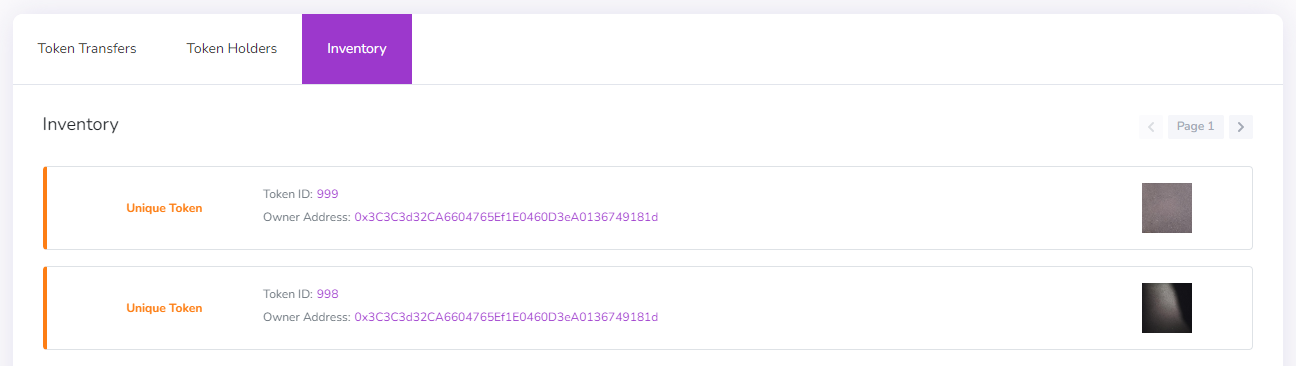
Owner Address is crypto wallet address of my blockchain camera. Even if I change the owner by sending this NFT to another address, the record of the original owner's address will not be erased.

NFT Marketplace

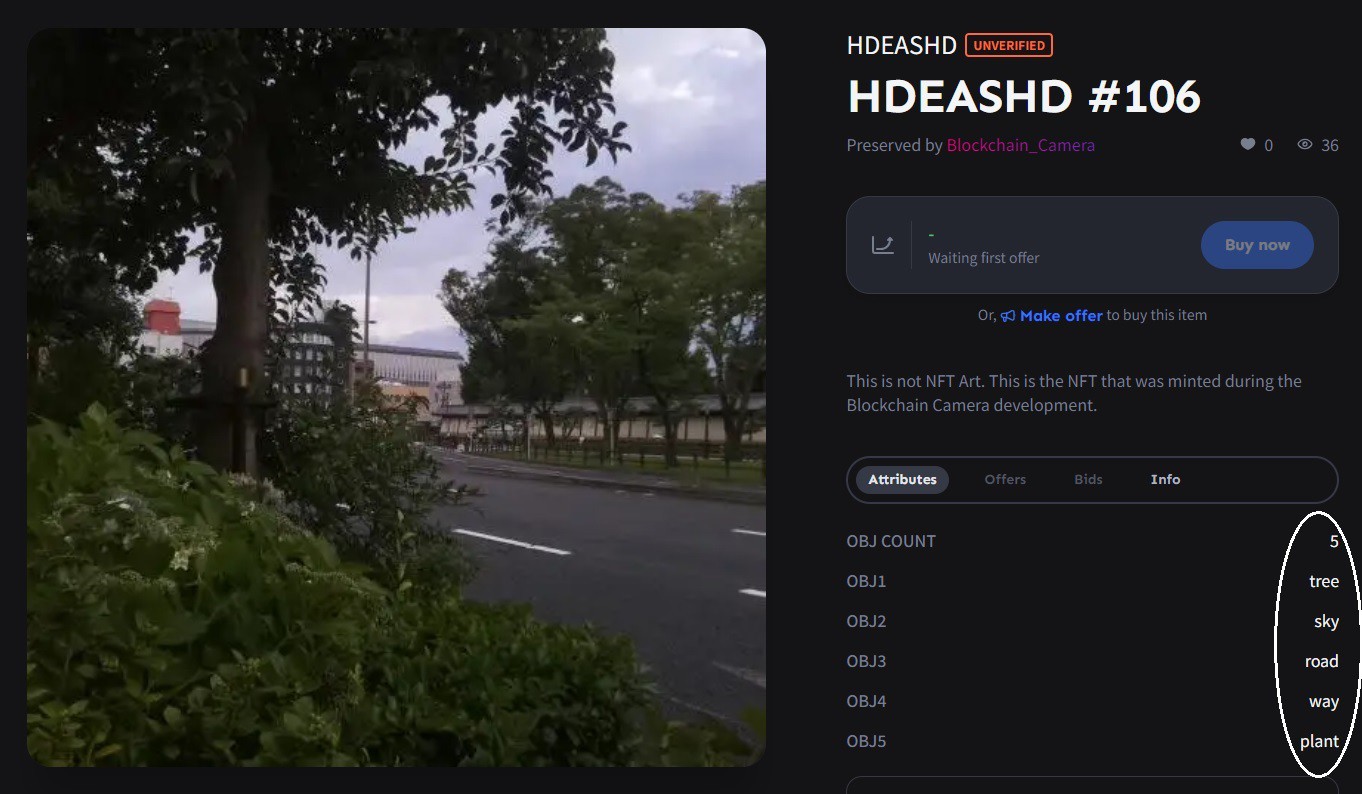
How to photograph a NFT

  1. Press the shutter button.
  2. Touch Confirm on the crypto wallet displayed on the touch screen.

Challenges

There are many unresolved challenges. Here are some of the big challenges as examples.

  • You can copy your blockchain camera's crypto wallet to the PC and mint fake photo NFTs from the PC. Is it a solution to develop a crypto wallet that cannot be copied? You can also do the same thing by remotely accessing the blockchain camera Raspberry Pi without having to copy your wallet to your PC. Is there any hardware that cannot be hacked?
  • Anyone can confirm on the blockchain that the NFT owner address and blockchain camera crypto wallet address match. However, the only way to know if the blockchain camera really has the crypto wallet for that...
Read more »

Standard Tesselated Geometry - 489.44 kB - 09/03/2023 at 09:36

Download

Standard Tesselated Geometry - 724.40 kB - 09/03/2023 at 09:36

Download

Standard Tesselated Geometry - 1.02 MB - 09/06/2023 at 04:18

Download

Standard Tesselated Geometry - 474.11 kB - 09/09/2023 at 12:26

Download

Standard Tesselated Geometry - 450.28 kB - 09/09/2023 at 12:26

Download

View all 14 files

View all 24 components

  • Shape of the shutter button

    Human Controller2 days ago 0 comments

    The blockchain camera's shutter button is shaped like the mint now button on the NFT minting website. 

  • September 13, 2023 Object recognition

    Human Controller09/13/2023 at 06:50 0 comments

    This is what I have done in the past with the blockchain camera and has nothing to do with solving social issues. It recognizes the objects in the photo and adds those as attributes to the NFT's metadata. Attribute is an important element in PFP NFT collections. The rarity of the NFT is determined by the rarity of its attributes, and people enjoy it. I considered whether this could be done with photos. However, the following issues have not been resolved.

    • Classify the photographed objects. For example, living things and buildings.
    • Attribute combinations must not be duplicated within an NFT collection.
    • I need to create a machine learning model. I've used multiple object recognition services, but I haven't found a model that I like.

  • September 13, 2023

    Human Controller09/13/2023 at 01:22 0 comments

    The NFT that Blockchain camera photographs is Real

  • September 12, 2023

    Human Controller09/12/2023 at 13:48 0 comments

    I was able to open source the blockchain camera through HACKADAY PRIZE. Thank you to everyone who liked, followed, and viewed my project!

  • Changed the name from NFT Camera to Blockchain Camera

    Human Controller09/08/2023 at 09:01 0 comments

    September 09, 2023

    I changed the name from NFT Camera to Blockchain Camera.

  • September 06, 2023 Modification Report

    Human Controller09/06/2023 at 04:15 0 comments

    I modified the base of the Raspberry Pi Case to make it easier to work with.

    Old : RPi_Case_Base_v12.stl

    New : RPi_Case_Base_v13.stl

  • September 4, 2023 Test report

    Human Controller09/04/2023 at 13:54 0 comments

    I took 1000 NFTs with the Blockchain camera between August 2nd and September 2nd. The gas fee paid for it was 0.617 ASTR ($0.0329). I would like to test other blockchains such as Ethereum. The gas cost and time required to mint an NFT will vary depending on the blockchain.

  • September 2, 2023 Bug report

    Human Controller09/03/2023 at 04:02 0 comments

    When minting Not Generated #999, the screen display did not change from Minting... to Not Generated #999. But minting was successful.

  • August 23, 2023 Modification Report

    Human Controller08/30/2023 at 14:16 0 comments

    Modified the description in metadata for Not Generated NFT collection.

    Modified file : $HOME/erc721-minting-boilerplate/src/components/ERC721Camera.jsx

    Description of Not Generated #747 and earlier.

    This is an photo taken with a camera whose shutter button is the Mint now button.

    Description after Not Generated #748.

    This is a photo taken with a camera whose shutter button is the Mint now button.

  • August 2, 2023 Bug report

    Human Controller08/30/2023 at 13:59 0 comments

    The NFT name number of the following Token ID in the Not Generated NFTs are incorrect.

    10, 20, 21, 22, 23, 27

    This is caused by pressing the shutter button before minting the previous NFT is complete.

View all 10 project logs

  • 1
    Caution

    Be very careful that NFT images are public and cannot be deleted!

    Put masking tape on the lens of the camera module until the blockchain camera is completed. Even after the blockchain camera is completed, put masking tape on the lens when not in use.

    Strictly speaking, data stored in IPFS may be deleted if left alone. However, the person who stored it cannot actively delete it.

  • 2
    Installing the App & Deploying the DApp

    TOOLS

    • PC
    • MicroSD Card Reader
    • Wi-Fi
    • USB Type-C - AC Power Supply

    COMPONENTS

    • Raspberry Pi 4 Model B 2GB
    • SanDisk microSD 32GB Extreme Pro U3 V30 A1
    • OSOYOO Raspberry Pi Touch Screen 3.5"
    • Raspberry Pi Camera V2 
    • Adafruit Flat Flex Cables for Raspberry Pi Camera - 200mm (You can use a flat flex cable that came with the Raspberry Pi  Camera V2. However, when it is connected to the Raspberry Pi along with a touch screen, the wires tend to break.)

    Install the Blockchain camera App on your Raspberry Pi. Deploy the NFT minting DApp (Decentralized application) on the blockchain. Refer the blockchain camera GitHub repository for those instructions.

    GitHub

  • 3
    Printing the parts with a 3D printer

    TOOLS

    • 3D Printer

    COMPONENTS

    • 3D Printer ABS Filament

    FILES

    • RPi_Case_Top_v11.stl
    • RPi_Case_Side_v12.stl
    • RPi_Case_Base_v13.stl
    • Power_Bank_Holder_Top_v11.stl
    • Power_Bank_Holder_Side_v11.stl
    • Power_Bank_Holder_Base_v13.stl
    • Shutter_Button_Plate_v11.stl
    • Shutter_Button_Side_v11.stl
    • Shutter_Button_Base_V11.stl
    • USB_Connector_Top_v11.stl
    • USB_Connector_Bottom_v11.stl

    Print all STL files. 

    For reference, the 3D printer I used is the Afinia H480. The print settings for each STL file are as follows. I only set the Z Resolution to 0.15mm for the parts I want to print accurately.

    Z Resolution : 0.15mm, Fill : #1 (Solid), Quality : Normal

    • RPi Case Top
    • Shutter Button Plate
    • Shutter Button Side
    • USB Connector Top
    • USB Connector Bottom

    Z Resolution : 0.25mm, Fill : #1 (Solid), Quality : Normal

    • RPi Case Side
    • RPi Case Base
    • Power Bank Holder Top
    • Power Bank Holder Side
    • Shutter Button Base

    Z Resolution : 0.25mm, Fill : #4 (Big hole), Quality : Normal

    • Power Bank Holder Base

    You can modify the original 3D-CAD file with the Rinoceros 7.

    • Blockchain_Camera_v13.3dm

View all 13 instructions

Enjoy this project?

Share

Discussions

Melanchali wrote 08/29/2023 at 18:36 point

This is amazing. This is a project I've been wanting to do but procrastinated on. Beautiful execution and description.

I wanted to call it "Truth Camera" exactly for the reasons you mentioned. Amazing work.

  Are you sure? yes | no

Kevin Santo Cappuccio wrote 08/29/2023 at 07:02 point

Okay, I've thought NFTs were dumb from day one, but this project has it's own brilliance. Like, if this is what an NFT was from the get-go, I would have at least given it more than 5 seconds before deciding NFTs were unilaterally a poorly-executed scam.

Anyway, I think this project is actually super cool despite its association with NFTs. And the form factor of it literally being the letters "NFT" really pushes it into the territory of genuinely solid art. 

Great work!

  Are you sure? yes | no

Human Controller wrote 08/29/2023 at 08:34 point

Thanks for the first comment on my first post!

  Are you sure? yes | no

Mike wrote 08/29/2023 at 21:39 point

I agree with everything said above. Well done!

  Are you sure? yes | no

Similar Projects

Does this project spark your interest?

Become a member to follow this project and never miss any updates