Close
0%
0%

Arcus-3D-M2 - Mixed material filament printer

Active mixing, fused filament fabrication 3D printer.

Similar projects worth following
This is our ongoing effort to perfect a reliable active mixing filament printer.
Up to six filaments, controlled by gcode weights, can be combined into a fully mixed result.
We can currently get a complete color change in approximately 20mm of 0.4mm extrusion.

This project starts where the Arcus-3D-M1 leaves off with a more narrowly defined set of build parameters.

The current design is based on a Beaglebone Black/CRAMPS board running Machinekit, and some custom code. The interface is published as a network service and can be accessed locally or remotely with an Android, Windows, or Linux client.

Six stepper motors located on a floating carriage push 1.75mm filaments down short, PTFE bowden tubes to a compact, liquid cooled cold-end.

The all metal hot-end employs a tiny impeller located right at the melt-zone of the 6 distinct incoming plastic streams. The impeller spins at a relatively high speed and is designed such that it also generates it's own extrusion pressure to feed the nozzle. This greatly reduces the feed pressure required, eliminates feeding back into idle ports, dramatically improves color change performance, and helps to mitigate 'oozing'.

The impeller drive is a PWM controlled BLDC motor, and it is proportionally tied to the current extrusion rate.

Summing up:

  • 6 materials under gcode control
  • Active mixing, generating it's own extrusion pressure (no back-feeding into idle ports)
  • Uses a standard, interchangeable nozzle.
  • 1 cubic mm total mixed volume for fast color changes (about 20mm of 0.4mm extrusion)
  • Mixing hotend weighs in at 49g, with the entire assembled end effector at 150g
  • Print head can be removed/assembled in under 2 minutes with 2 screws. The entire assembly uses 4.
  • Flying 6 extruders via a clockspring counterbalance so no additional load on carriages
  • Short, tight fitting bowden tubes so no complicated math for compensation
  • 346mm x 370mm cylindrical build volume
  • Ceramic mains powered heated bed
  • 500mm/sec motion and up to 180mm/sec printing with no resonance issues

Result: The ability to pick any ratio of the loaded filaments with a few M codes and complete color changes in 20mm of 0.4mm extrusion.

x-arduino - 8.16 kB - 05/17/2019 at 23:29

Download

  • 1 × Beaglebone Black Microcontroller
  • 1 × CRAMPS board http://reprap.org/wiki/CRAMPS
  • 9 × DRV8825 2.4A Step sticks
  • 1 × Afro 20A BLDC motor controller Motor controller with SimonK firmware
  • 1 × NTM Propdrive 28-26 1200Kv BLDC motor Good low speed, high torque operational characteristics.

View all 10 components

  • Unintentional upgrade

    Daren Schwenke05/17/2019 at 07:17 0 comments

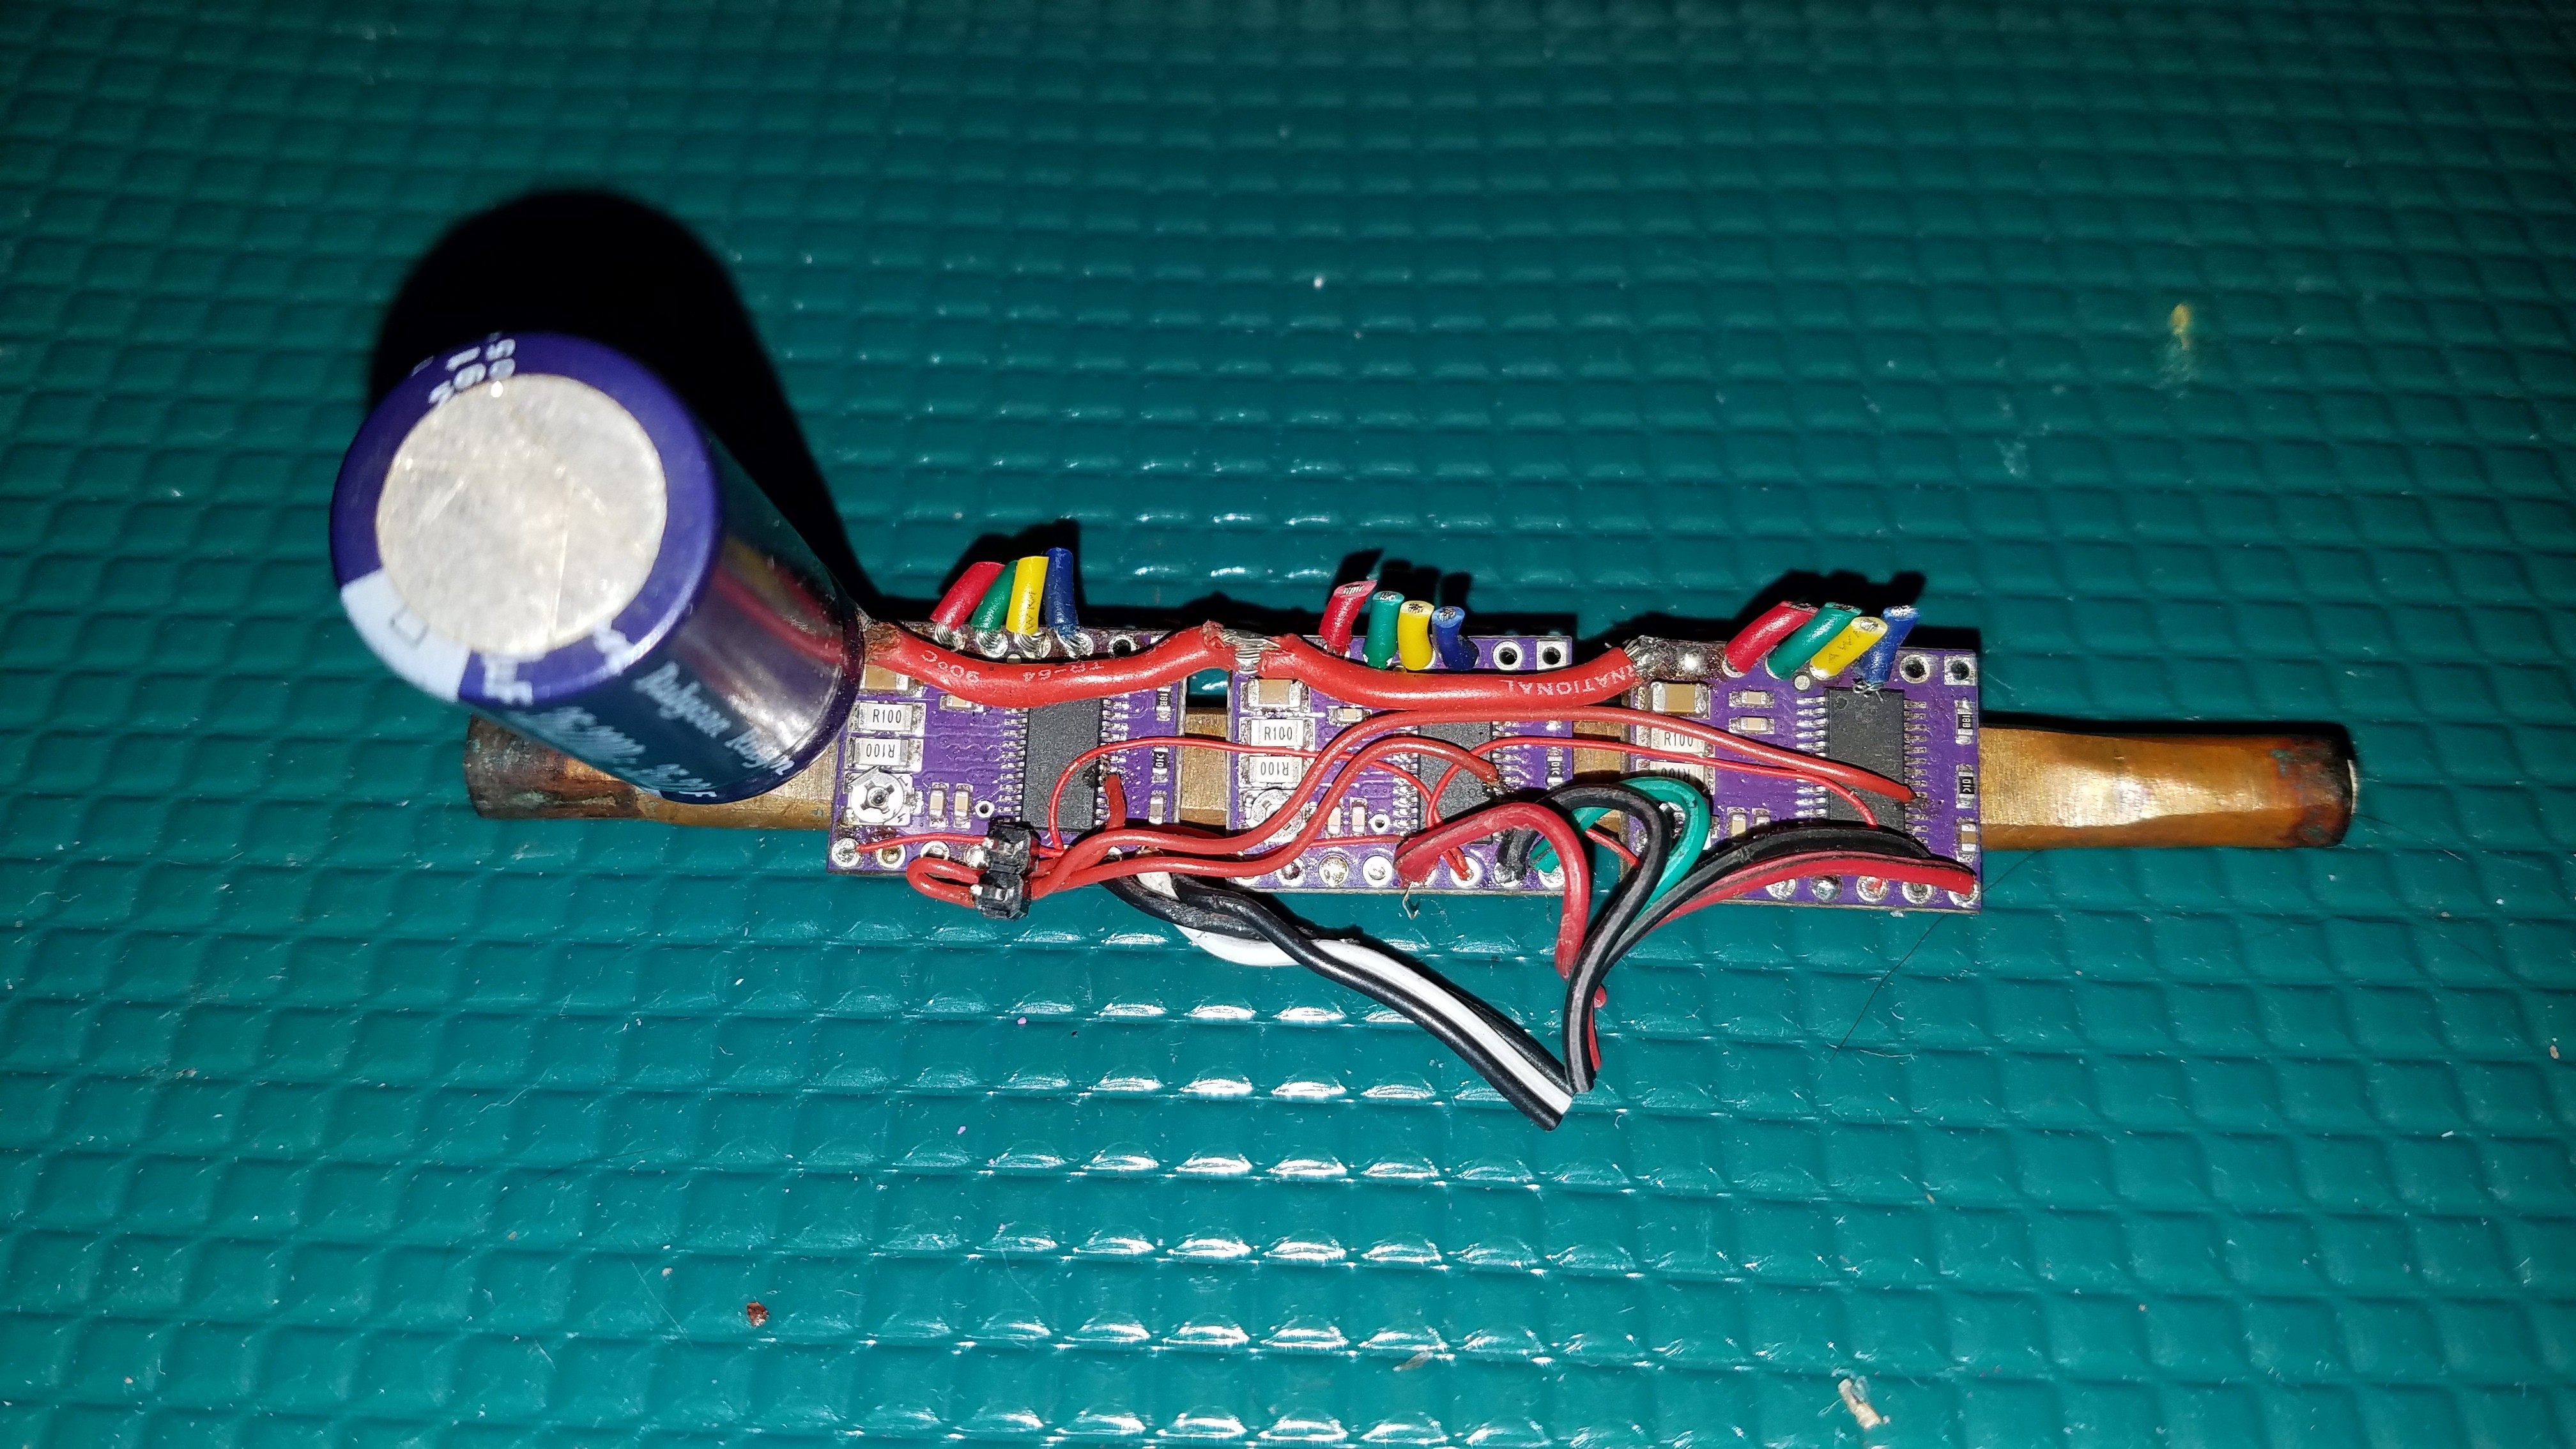
    I was of the opinion today that my DRV8825 axis steppers were to blame for an issue I was having.

    This was not the case, and I later found it all the problems I was having was just due to one of the extruder step-sticks having lost a good connection to its heat-sink, and overheating selectively.

    Solving for a solution which avoided the resulting inconsistency produced some close,, but still unusable prints for gears.  In any space other than modeling fine pitch inside gears, I probably would not have noticed this issue at all honestly.  But, here it matters.

    So I ended up removing the set of three water cooled DRV8825 modules I had.

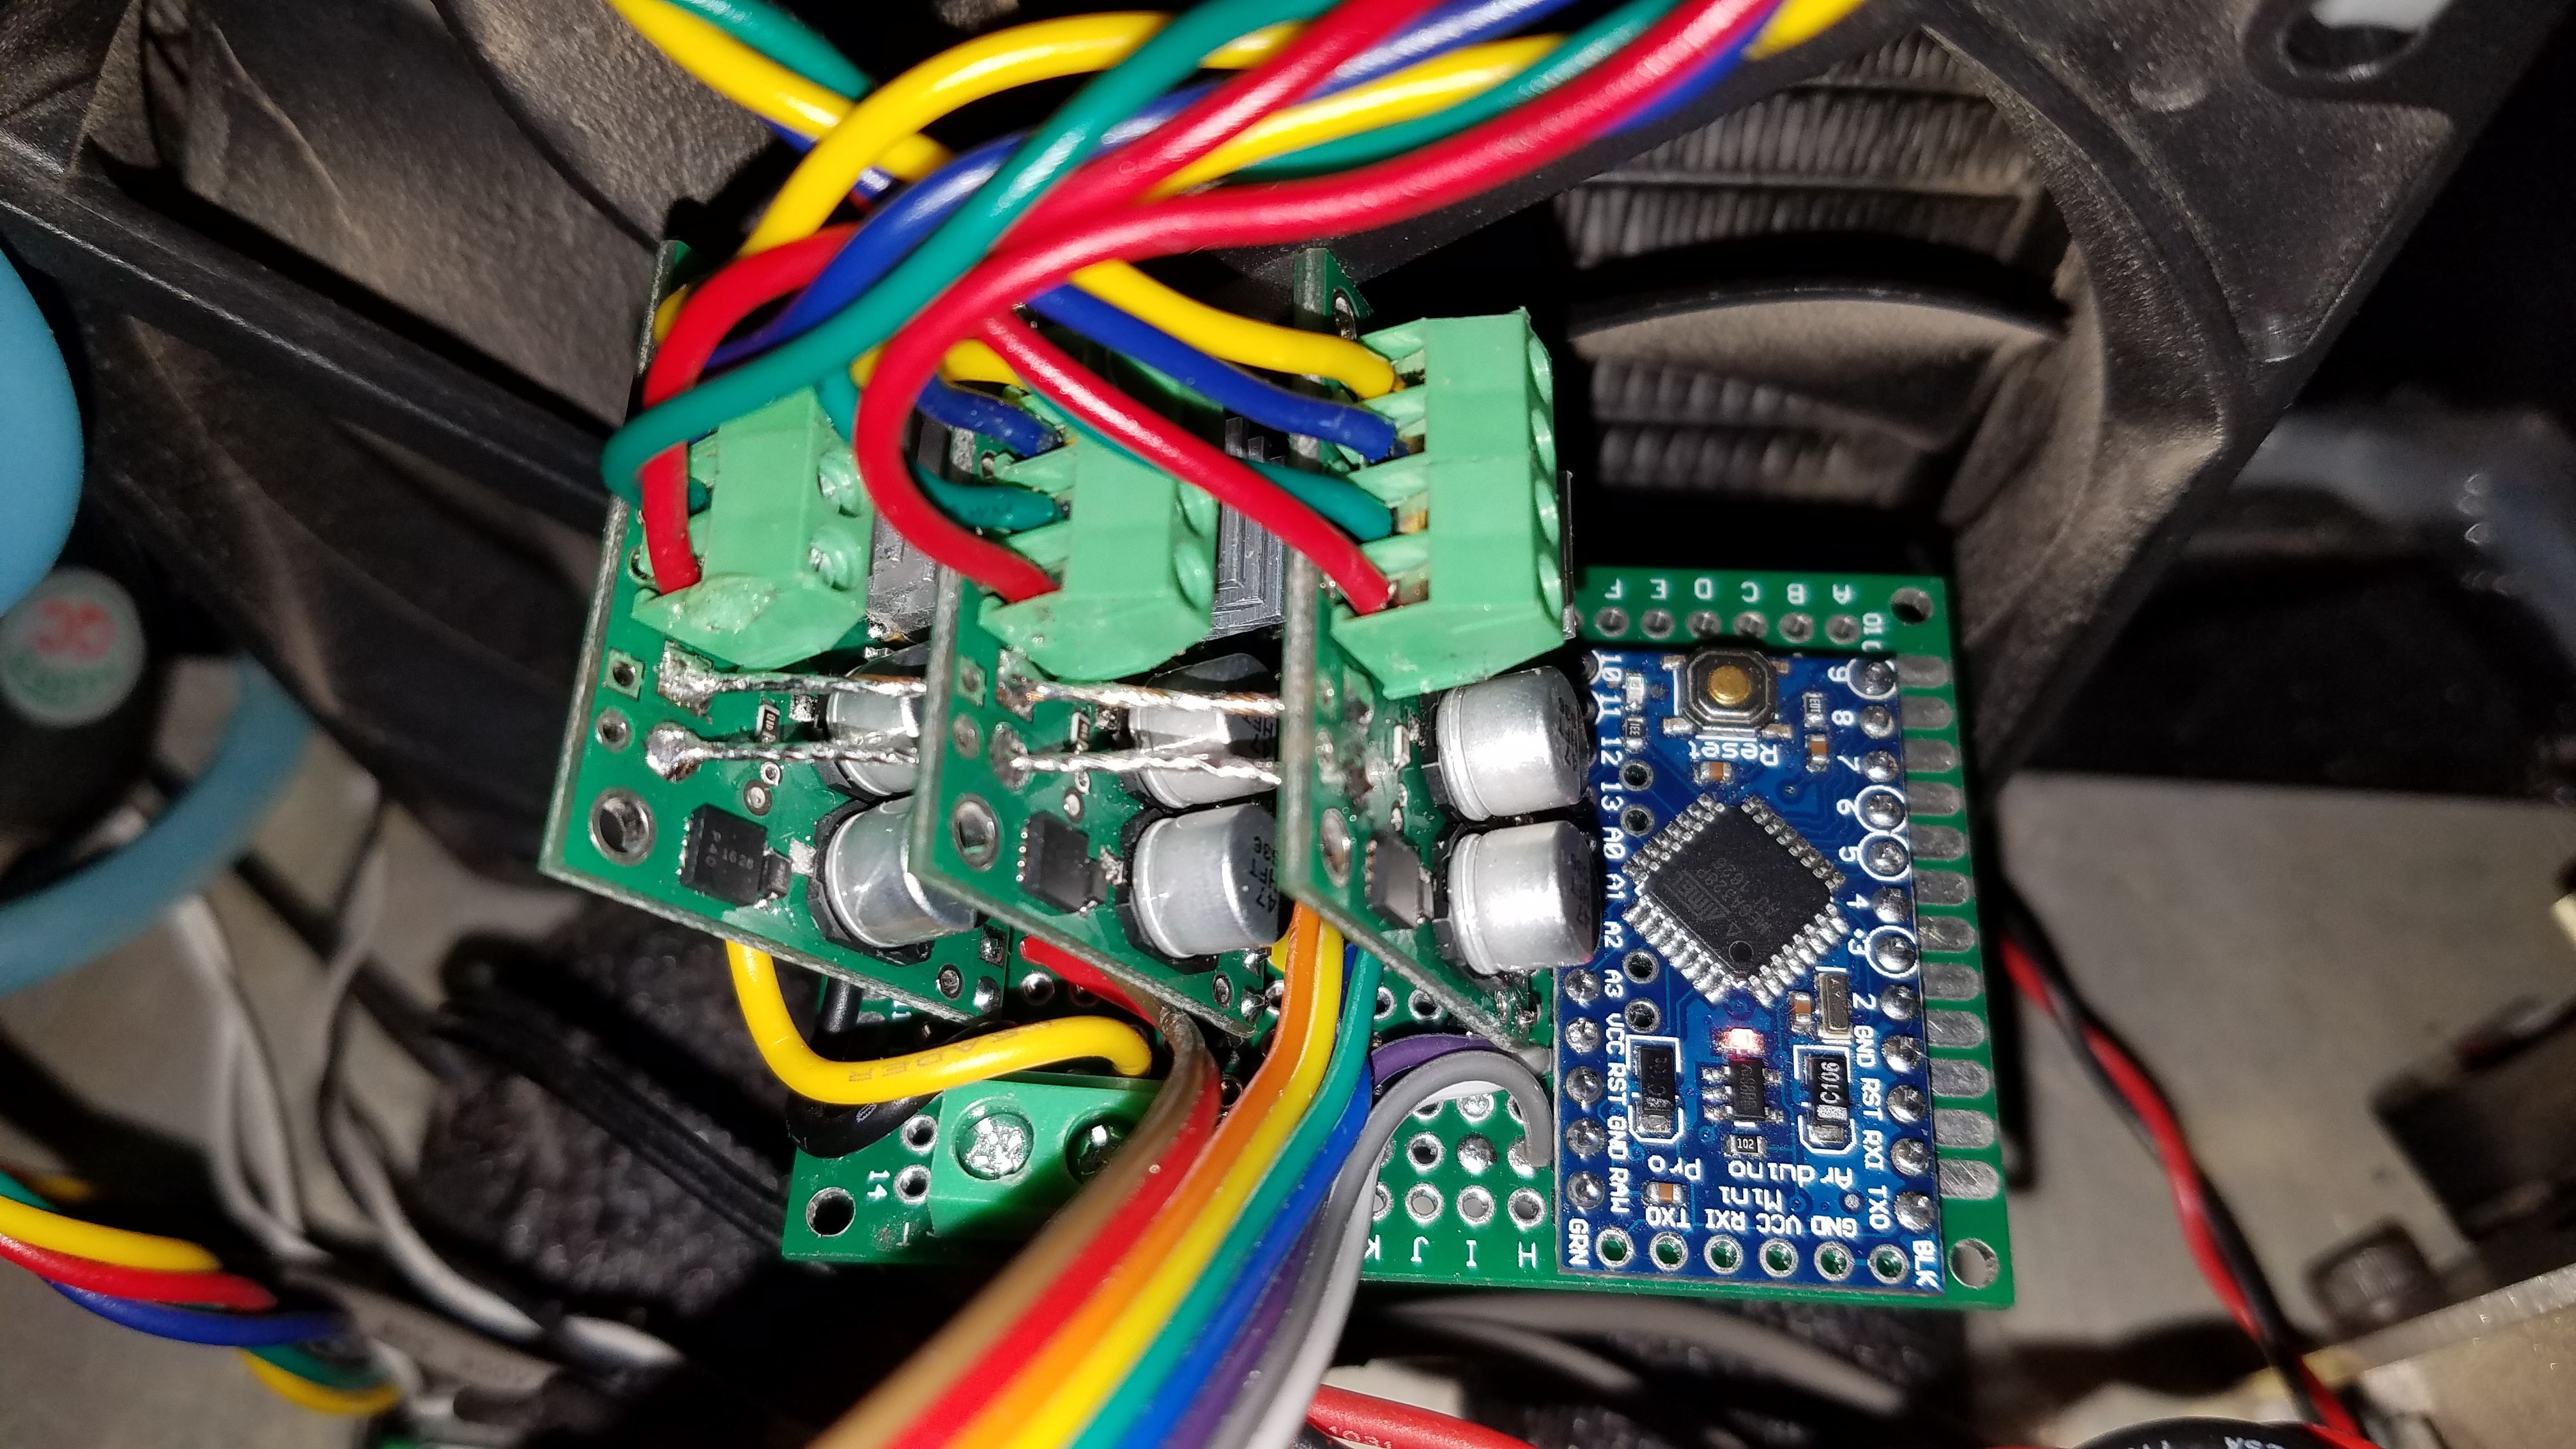
    I replaced them with three AMIS-30543 modules stuck on some perfboard, and an Arduino to handle the SPI configuration required.  I copped out to doing it from the Beaglebone, but more on that in a bit. 

    I had always intended to try out the SPI interface for additional steppers, but I actually didn't have enough free pins left on the Beaglebone to implement more than a single channel of SPI and you can't chain these modules without a CS pin per module.  

    I had run out of individual pins to do this..  Yes... I ran out of pins on a Beaglebone Black.  I'm kinda proud of that...

    Instead of re-organizing everything and breaking the CRAMPS paradigm in the process, I just added an Arduino Pro Mini to handle the SPI configuration of the modules, and then I trigger the toggling of the enable/disable SPI based flags in the modules by reading a pin on the Arduino.  In other words, it was a drop in replacement.

    Short answer, everything works again, and is a little better than it was before.  I did like my water cooled stepper drivers though...

    I'll put the arduino code I used here, adapted from some example, up here soon.

  • Water where water wasn't wanted.

    Daren Schwenke02/26/2018 at 18:33 0 comments

    Over the last year, the print head has sprung a pinhole leak in the machined cooling channels.

    In my quest for making it ultra lite, I previously moved the water cooling channels to the bottom of the head as it made sense.  So there is an aluminum cover plate held on by nothing other than activated Lock-tite. I think the leaking problem is the result of the hot-end radiantly heating the cover plate and eventually degrading the Lock-tite.  Or I could have just overheated it.  Either way, it leaks a tiny bit.

    Interestingly enough this isn't much of a problem to the point that I haven't bothered to fix it.

    The cooling system is basically sealed and the print head is at the lowest point. When I fill it with water it leaks for a little while until the pressure at the print head equalizes with air pressure, drawing a little vacuum on the rest of the system. Then it stops leaking, and is good for another 3 months.  Barometric pressure and temperature variances cause a drip or two or it would be stable. 

    The previous version of the head was a couple grams heavier due to requiring more AL, but the cover plate was sandwiched between the main body and the mixing motor then and so the seal was inherently stable.  It also didn't get radiantly heated there, and it would take some massive overheating to break down the Lock-tite in that location.  

    I think I'll move it back.


  • The future's so bright.

    Daren Schwenke10/12/2017 at 20:17 0 comments

    This project is not dead.  It's going to market, eventually.

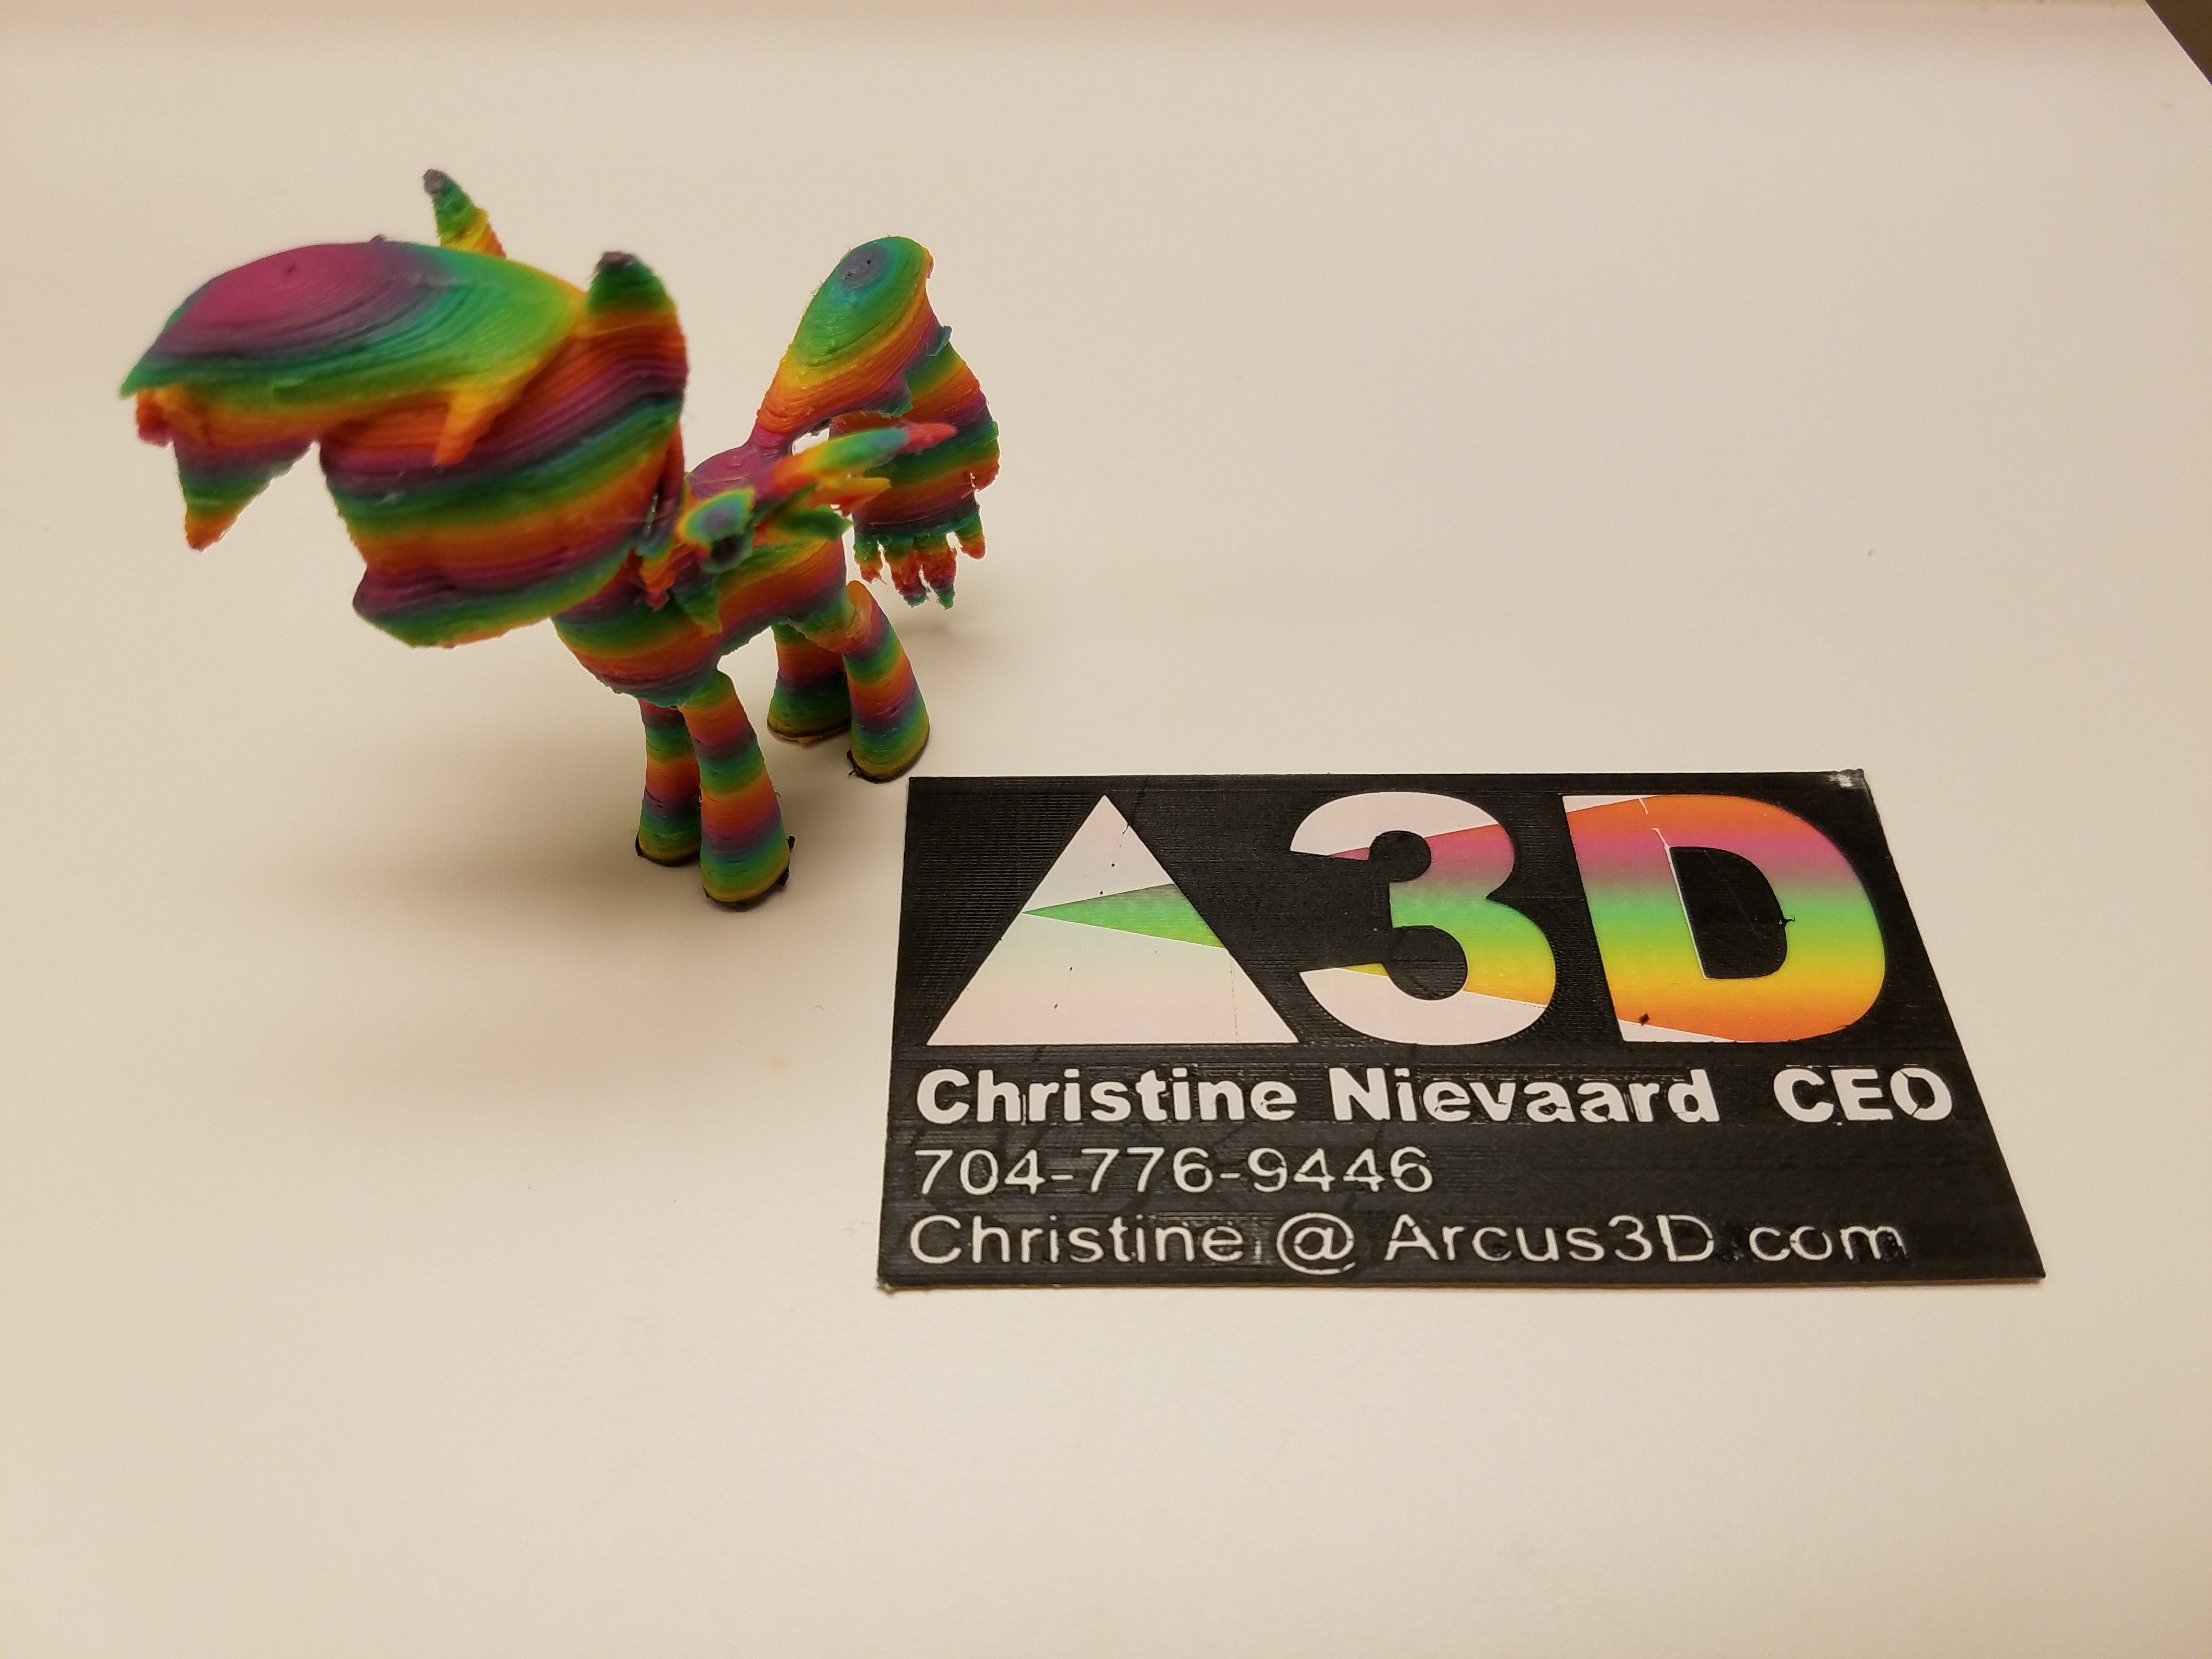
    Two recent prints.  'Rainbow Star' (get it...) and a 3 layer business card.

  • Naked Printer.

    Daren Schwenke04/17/2017 at 13:08 0 comments

    Re-designed and cut some new side panels for the M2.

    • The door hinge was relocated the the front corner to allow it to open a full 180 degrees. The door is 13mm larger to compensate.
    • The door striker was replaced with a magnetic closure.
    • Switched to a different paint chemistry. The previous paint had the wrong mix of volatile organics and was degrading the impact resistance of the polycarbonate.
    • Riveted all the panels on. The snap-in nature of the panels was great for accessibility and aesthetics, but not so much for repeatedly dropping the printer it on it's side for transport. Overdid it on the rivet count a bit: An angry badger was enlisted for testing with good results.

    Since it was torn down, we got to correct a couple other minor issues as well.

    Machined down the center hole of the polycarbonate top panel to match the corresponding AL plate. It was originally spec'd out as slightly smaller for aesthetic reasons. This resulted in the maddening tendency of the filament to get caught on the resulting lip as you tried to load it in the printer.

    Since switching to BerdAir part cooling, the additional silicone tube was just dangling. We changed from using heat shrink to a mesh sock on that harness. It was an aesthetic change initially, but the sock also makes the harness flex more evenly which should prolong it's lifespan. It's also stiffer than I would like now, but is not causing any issues yet.

    A new print head is still being machined, so no pictures until that is done.

    No badgers were harmed in the making of this printer.

  • BerdAir cooling visualized.

    Daren Schwenke04/10/2017 at 15:49 0 comments

    Very happy with the performance of the BerdAir Max pump we recently added.

    Running the pump here at 50%. Turning it up higher made a mess.

    We are still using our hose as it was silicone (and was already installed), and our nozzle as it produced a good directed airflow (and was already installed). I didn't really give the nozzles that came with it a fair shake though. They would probably work fine.

  • Up the voltage.

    Daren Schwenke04/10/2017 at 13:12 0 comments

    The switch to a 24v PSU more than doubled the top speed from 200mm/sec to 500mm/sec with no other mechanical changes required. Acceleration has also been increased from 3000 to 5000.

    We had to stop at 500mm/sec or we ended up violating the step length requirements of the DRV8825's of 1900us.

    We will never approach the stepping limits of the BBB/Machinekit itself unless we decide to do some radio broadcasts.

    Acceleration will probably still be tuned back down to avoid excessive vibration during stitching.

    We now need some better acoustic dampening/isolation, but I'm back to being happy with Nema 23 steppers again.

    Up the voltage

  • Speed.

    Daren Schwenke04/07/2017 at 19:27 0 comments

    Came across an article: New research project by MIT and Binghamton could make FDM 3D printing a whole lot faster

    Yes, it tells everyone what they already knew. The upper limit of speed with FFF with existing designs is being approached.

    Let me pull something from the mothballs; a project log from the M1.

    Speed kills.

    Summing up, we had just discovered we could go really fast if we raised the mixer speed. Of course that experiment eventually destroyed itself, but this was from before we moved away from trying to get PTFE blends to bend to our will, and went to an all metal design.

    I've made some compromises with the M2 for the sake of convenience. One of the worst such compromises, was when my 24v supply ate itself, I threw in a 12v one. Driving Nema 23 steppers with 12v with any expectation of speed, is kinda silly. Mass of the system, beyond rotor mass, was not a significant constraint yet. We had nearly the same top speed with just the bare steppers.

    The fact that most of the M2 design favors accuracy over speed is another issue, but we will come back to that if we have to.

    Initial tests of the Berdair Max pump with our delivery system are awesome. Cooling shouldn't be a problem anymore.

    So last night we decided to bite the bullet and flip the whole thing over to 24v. We had since acquired a couple suitable 24v supplies, but they are all spoken for in the long term for other awesomeness. Through the dark magic of Amazon Prime, the majority of the required parts for the switch to 24v will be here tomorrow.

    I'm hoping Colin will approve of the results.

  • Let there be cooling, again.

    Daren Schwenke04/04/2017 at 13:02 0 comments

    With the ever present goal of keeping the mass of the end effector as low as possible, the previous cooling solution for the M2 was getting out of hand.

    It involved a large radial blower mounted to the rear of the floating stepper carriage, a flexible duct, and an engineered, 3D printed nozzle with two distinct flow characteristics. Low speed flow would result in a precise cone of air surrounding the nozzle, and high speed flow would result in an additional air-multiplication effect from surface flow.

    It worked, but it was completely excessive and still added 10 grams to the print head mass. Cooling was a wash of air near the print bed, cooling it, the part, and the print head itself far too much. It also did not solve the issue of part cooling in an enclosed build area.

    So we went looking for a better solution and found Berdair.

    Sadly they were not in stock, so we mocked up our own version with a bit of AL tubing, and drove it from a compressed air source. Stainless would be superior here, but the AL was easy to form and most importantly, in the shop.

    The results were fantastic. It produced exactly the effect we were after with the first design: A precise cone of air intersecting just below the nozzle, but without the excessive wash.

    Then came time to pack up and head to MRRF, and leave our compressed air source behind.

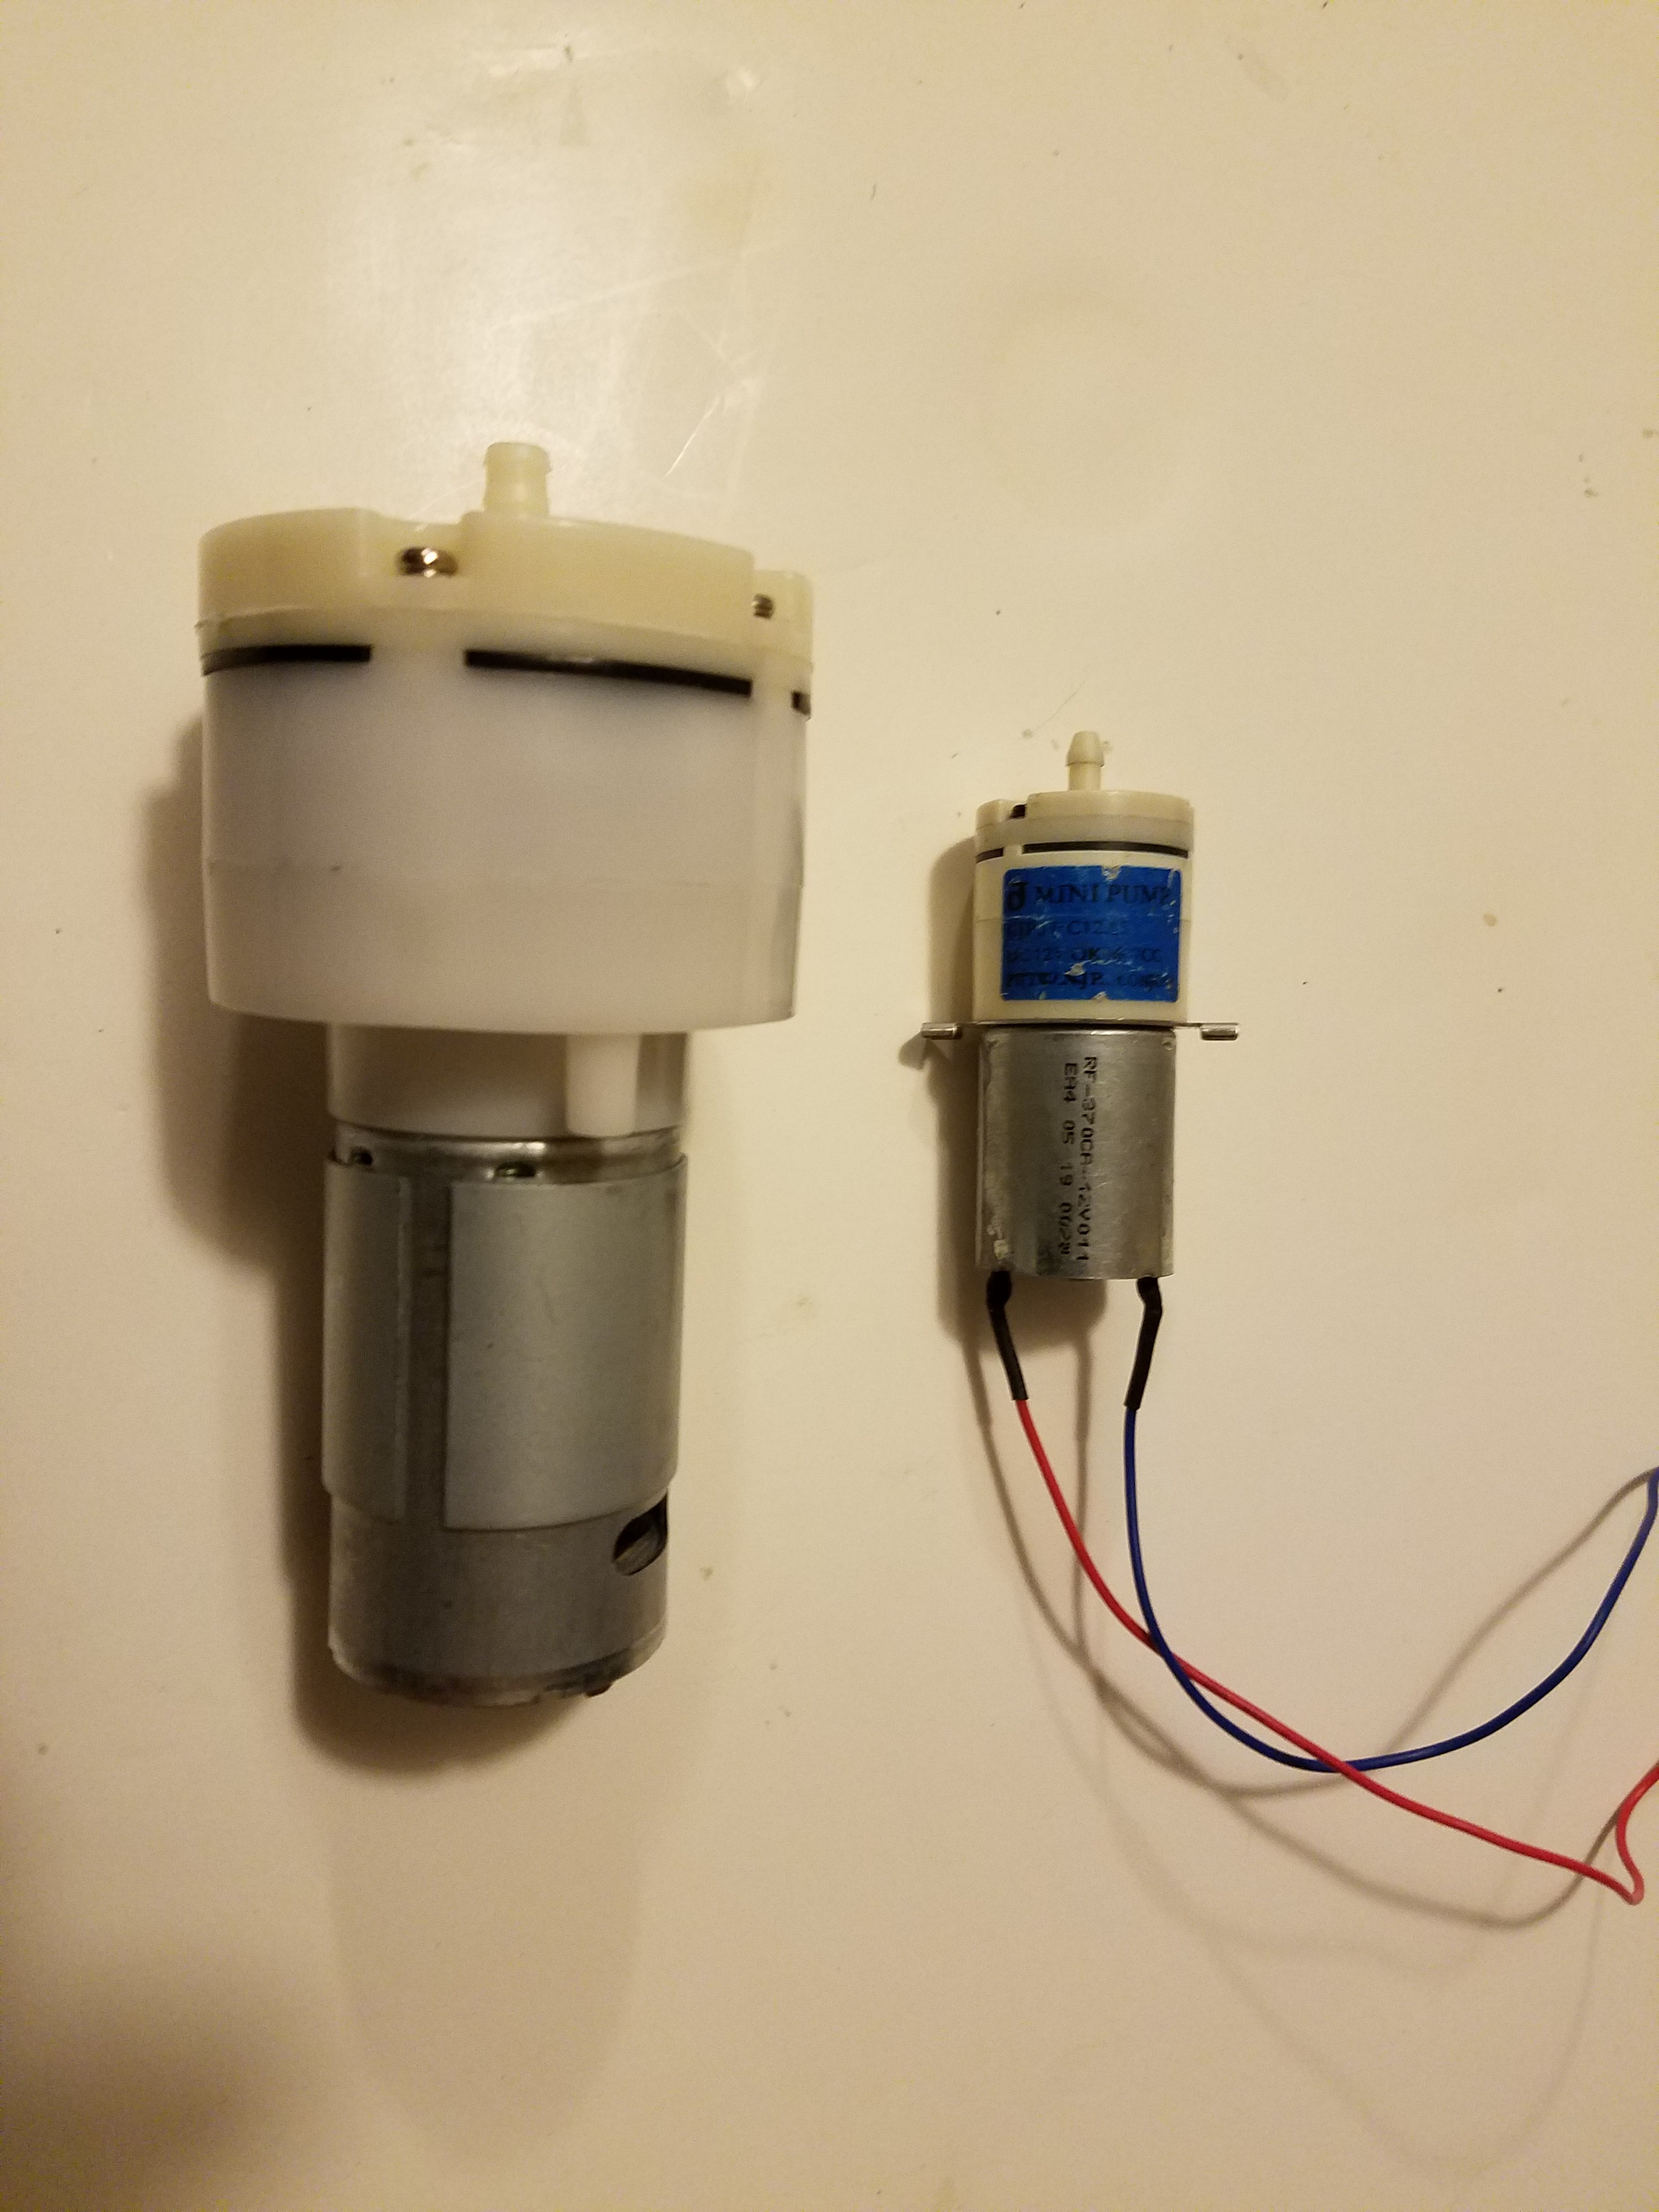
    We installed a surplus micro 12v air pump we had acquired during a recent expedition to Skycraft.

    It was woefully inadequate.

    We looked around for Berdair at the show, but didn't look hard enough. They were there, but had sold out of the pumps the first day and so the marker we were searching for did not exist.

    So for the entire show, we printed with basically zero part cooling. This really limited the top speed we could get on the single wall print I loved so much to a paltry 45mm/sec.

    Yesterday in the mail our Berdair kit finally arrived.

    Comparison of the pump we were using, to the new Berdair pump.

    I can't wait to try it.

  • Cura plugin for velocity extrusion

    Daren Schwenke03/30/2017 at 17:04 0 comments

    Thought I would share the plugin I've been using with Cura.

    It adds the ability to directly generate the velocity extrusion gcode I've been using for this project since the beginning, and now it's simple enough for the average user to pull off.

    Since velocity extrusion support never got merged into the main branch for Slic3r, working with it has been as problematic as building Slic3r from source can be.

    Since it seems unlikely Slic3r is going to come around to using this any time soon, Machine Koder has released the same modifications he originally made for Slic3r as an easy to use Cura Plugin. No more compiling from source required.

    Happy days.

  • MRRF2017

    Daren Schwenke03/29/2017 at 21:13 0 comments

    Minus some massive sleep deprivation related flailing, MRRF2017 went off well. Drove the printer to the show directly from Tampa and arrived Saturday morning, where at one point I had to look up how to use software that I had written.

    This time we brought along all the spare parts and the tools needed to fix just about anything, and of course, then everything worked perfectly.

    Drew Fustini of Beagleboard.org was kind enough to share some media he had collected during the show related to the M2.

    Chatting about the internals with a patron.

    Basically the only time the top of the printer was open.

    Wow, what an experience. So many innovative and passionate people gathered together in a single place.

    The response to the printer was simply mind blowing.

    Got featured on Hackaday.com: http://hackaday.com/2017/03/26/mrrf-17-true-color-3d-printing/

    Got featured on All3DP.com: https://all3dp.com/full-color-3d-printing-budget-junkstrap-delta-cmykw-printer/amp/

    Got featured on 3ders.org: http://www.3ders.org/articles/20170328-arcus-3d-m1-evolves-from-junkstrap-into-full-color-3d-printer.html

    We are still recovering from the intensity of the interest in this project, and we thank you for your patience while we get things sorted.

    Lots more to say and do here, but it will have to wait for now.

    I would like to say thanks to Coex for providing virtually all the filament we have used throughout the development of this printer. This print head has some pretty strict tolerances for filament, and they have never let me down.

View all 10 project logs

Enjoy this project?

Share

Discussions

ekaggrat singh kalsi wrote 05/30/2021 at 07:11 point

what happened to this project. will there ever be a product? I wanted a mixing extruder ( 2 colors ) and even built one a few years back only to scrap it on seeing this project. great work !. 

  Are you sure? yes | no

heinz wrote 05/30/2021 at 07:29 point

I'm often coming back to this project, too. I think I wrote Daren a few times personally, but as so often time was the biggest problem, I think. Another version with 2 colors by Ekaggrat would be interesting. :)

  Are you sure? yes | no

ngrmarco wrote 06/04/2017 at 11:30 point

I have read you want to make your printhead as an open-hardware project, it is very nice! do you know when will it be available?

  Are you sure? yes | no

techbaker wrote 05/10/2017 at 10:29 point

very nice. Is it possible to rebuild this mixing extruder? Or are there any plans to sell this?

many thanks

  Are you sure? yes | no

Douglas Miller wrote 04/10/2017 at 14:57 point

Like I told you at MRRF2017, you're really, really close to the Holy Grail of 3D printing. Great work! I'm sitting here looking at the bowl you let me abscond with from the show. Thanks again! It's a beautiful thing. :)

  Are you sure? yes | no

David H Haffner Sr wrote 03/31/2017 at 23:09 point

Very beautiful work this design makes :)

  Are you sure? yes | no

BeagleBoard Foundation wrote 03/29/2017 at 19:05 point

We were very impressed by the Arcus 3D at Midwest RepRap Fest!

  Are you sure? yes | no

oshpark wrote 03/29/2017 at 19:03 point

Very exciting!

  Are you sure? yes | no

Similar Projects

Does this project spark your interest?

Become a member to follow this project and never miss any updates