Close
0%
0%

MIPI DSI Display Shield/HDMI Adapter

A controller for LCD/OLED screens with MIPI DSI interface. Arduino shield format, HDMI-to-DSI adapter & built-in framebuffer.

twltwl
Similar projects worth following
A simple controller for MIPI DSI displays, based on a Xilinx Spartan-6 FPGA.

MIPI DSI is a high speed packet-based interface for delivering video data to LCD/OLED displays. In a way it is similar to DisplayPort, with a more power-conscious (and thus complex) physical layer. DSI is mostly used in mobile devices (smartphones & tablets).

I started this project as the base for building a low-cost HD projector. Later on I realized it could be also useful for VR applications and as a general-purpose graphics card for small uCs - that's why it comes in Arduino shield format.


Features

  • Supports 3/4 lane MIPI DSI displays.
  • DSI controller supports resolutions of up to 1080x1920 at 60 Hz refresh rate.
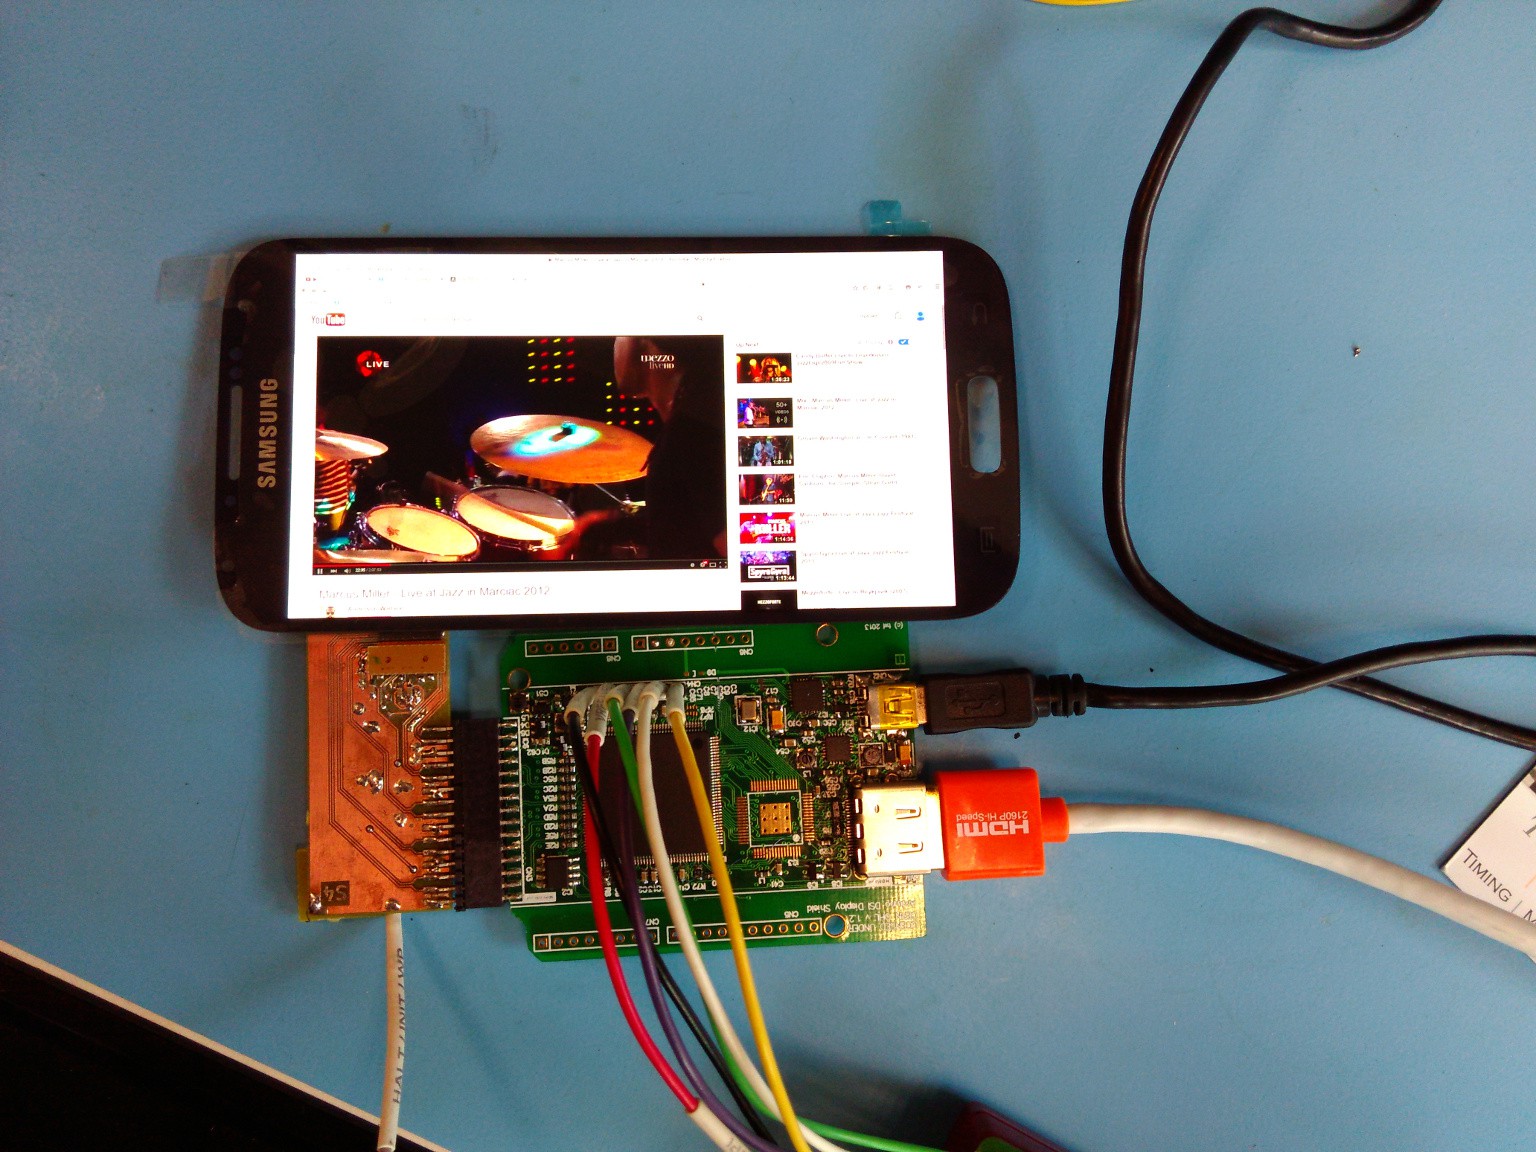
  • Converts HDMI video to DSI - letting you connect any MIPI DSI screen to your PC, Raspi or similar devices. Conversion works up to 720p@60 Hz or 1080p@48 Hz.
  • Built-in framebuffer with simple graphics stack, allowing to interface small microcontrollers, such as Arduino through 8-bit parallel or SPI busses
  • Sub-$50 BOM, including 4-layer PCB (@100pcs).
  • Powered through mini USB connector.
  • Embedded 32-bit CPU, available for user applications.

Project history

  • 12/2013: Schematics & PCB done.
  • 12/2013: Initial version of the firmware, works with Iphone4/4s screens on a FPGA dev kit.
  • 02/2014: Got the PCBs and components.
  • 02/2014: Test PCB assembled, drive both 3- and 4-lane screens.
  • 07/2014: Started work on HDMI <> DSI conversion.
  • 08/2014: HDMI convesion working for 640x960 Iphone4 screen.
  • 08/2014: DSI core achieves 1080p @ 60 Hz (48 Hz with HDMI conversion).
  • 08/2014: Rev 1.1. PCB design, schematics and firmware released.
  • 06/2015: Prototypingr rev 2.0.

To do

  • Arduino interface/drawing commands (depending on demand).
  • Test external HDMI decoder with displays larger than 1080p.
  • Port Doom to run on the softcore CPU.

Hardware

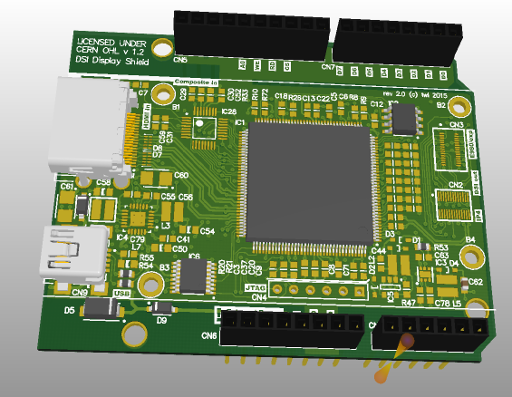
The diagram below shows the main blocks of the design:
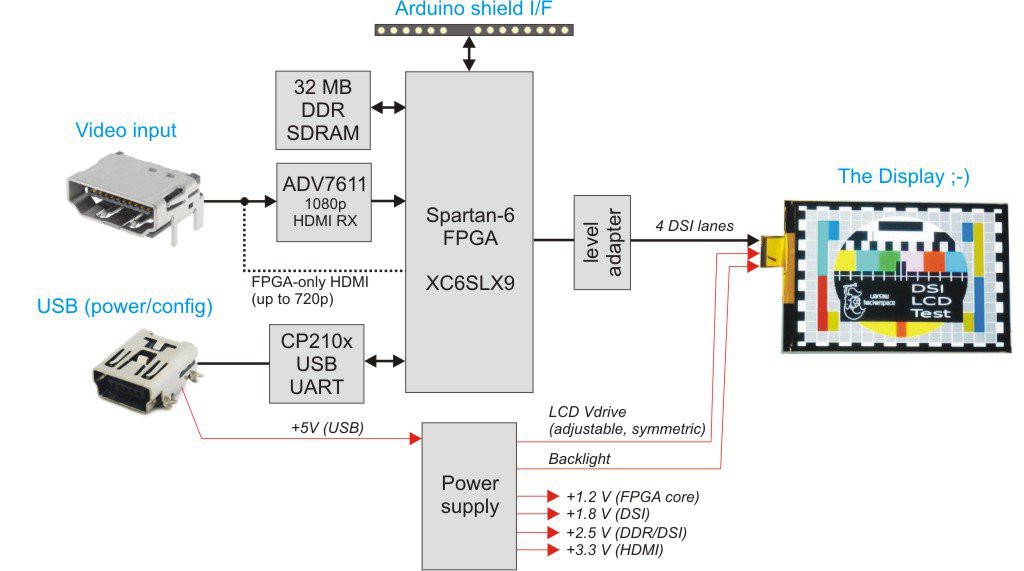
  • The FPGA: Xilinx Spartan-6-SLX9. Highlights: amateur-friendly TQFP144 package and built-in SerDes rated up to 1080 Mbits/s. The FPGA does pretty much everything in this project, hosting the MIPI DSI core, framebuffer controller with DDR memory, HDMI/DVI decoder. Everything is managed by an embedded Lattice Mico32 CPU.
  • DSI Level adapter: a bunch of resistors interfacing the FPGA's 1.8 V SSTL/LVCMOS I/O to DSI levels. More info in the FPGA section.
  • DSI connector: a standard 2x15pin 2mm pitch female connector with all DSI signals, power supplies and some GPIO pins for interfacing with the display. Since connector pinouts differ between displays the idea here is to use a tiny adapter board hosting the particular LCD's connector and its wiring.
  • DDR SDRAM, providing memory for the framebuffer, since most smartphone DSI displays don't have one.
  • HDMI input: slow version, using FPGA's ISERDES blocks (up to 1080p @ 48 Hz) or a fast one (1080p @ 60 Hz), based on Analog Devices' ADV7611 chip. The external HDMI decoder shares some pins with the SDRAM chip and the host interface, so the full HD - 60 Hz version can only work as a HDMI to DSI adapter.
  • Host interface: 12 pins wired to Arduino shield's IOH/IOL headers. Exact functions are not defined yet, I'm thinking about a 4-wire SPI interface and an 8-bit parallel bus.
  • USB UART a CP2102 chip providing USB UART, software bootloader and JTAG functionality for the FPGA.
  • Main power supply: integrated PMIC (TI/National LM26480). Voltages are: +3.3 V (HDMI input, USB, host I/F), +2.5 V (SDRAM and FPGA Vccaux), +1.8 V (DSI), +1.2 V (FPGA core).
  • LCD bias/backlight power suply: Most displays need some higher positive/negative votlage to operate. The board has a simple DC/DC converter for that purpose, producing symmetric voltage of up to +/- 6 V. The voltage can be adjusted for the particular panel by connecting a resistor between one of the DSI connector pins and ground. There is also a separate current driver for backlight LEDs, programmable by another resistor. Both DC/DC converters use a TPS61041 chip.

PCB Design
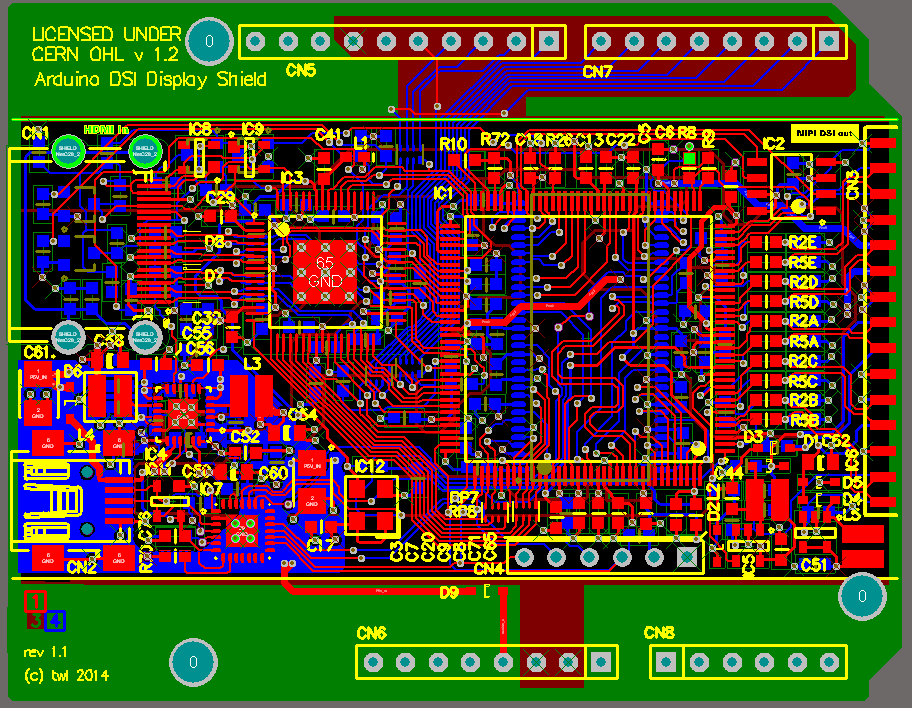
The DSI shield consists of two PCBs - the main board, where all the cool stuff is and a small adapter board, usually different for each display, connected through a 30 pin 2mm pinhead.

The main board is a typical Arduino shield. I routed the design on 4 layers, with the signals on the 2 outer layers, a contiguous ground plane and a split power plane. The DDR is placed right under the FPGA to simplify routing. SSTL to DSI level translator resistors are placed right next to the FPGA output pins to avoid stubs. All differential pairs are calculated for Z0=100 Ohm.

The adapter boards simply route the DSI lanes,...

Read more »

  • 1 × XC6SLX9-4TQ144 Spartan-6 FPGA
  • 1 × LM26480 Power Management ICs / Switching Regulators and Controllers
  • 1 × CP2103 Interface and IO ICs / USB
  • 1 × M25P80 Memory ICs / FLASH Memory
  • 1 × Molex 500254-1927 (or similar) HDMI SMD connector

View all 11 components

  • Announcement

    twl01/16/2018 at 19:54 7 comments


    As you've probably noticed, there hasn't been too many activity on the DSI Shield project during the past year. Many people were asking me where to buy the boards, how to set them up for a particular display and so on.

    Unfortunately, the amount of my spare time does not allow me to contribute to the DSI Shield enough to make it a viable product - that is manufacturing and shipping the boards, providing user support or adding new features. It's just too much for a single person doing this sort of stuff in free time (most of which is already devoted to KiCad development).

    If someone of you is interested in manufacturing these boards or firmware development, let me know.

    Tom

  • Rev 2.2a. KiCad PCB & Schematics published​

    twl08/24/2017 at 09:51 4 comments

    I've just pushed the full schematics/PCB design of the latest revision of the board to GitHub. It took a while to convert them to KiCad...

  • Rev2.0 prototypes arrived

    twl08/18/2015 at 16:10 27 comments

    I've received a couple of Rev 2.0 prototypes. Iphone4 display is working fine, still waiting for Optimus E980 connectors though...

  • Revision 2.0 & commercial availabilty of the boards.

    twl06/21/2015 at 23:08 26 comments

    Hi all,

    The prototype of Rev 2 PCB (see below) just went to production.


    Some news:

    - Boards will be manufactured and sold by Creotech. We are targeting $99 (+ taxes/shipping).

    - Rev 2 board will support resolutions up to 1080p/48 Hz and work by default with Iphone4 and LG Optimus E980 displays. For other screen types (AMOLED Galaxy S3/S4, Iphone 5) there will be adapters (available later).

    - New version will also come with a composite video input, foreseen for building FPV systems for drones/flying models.

    Note that the initial V2 release firmware WILL not work as a graphics card for Arduino. Writing a graphics accelerator is a serious task and my time resources are quite limited...

  • Commericial availability of the boards

    twl04/28/2015 at 08:43 17 comments

    Hi all,

    We've found an industrial partner to manufacture and ship the DSI shield boards. Before we start the production, we need to know how many people would be like to purchasing the boards and which display models should be supported out-of-the-box. Feel free to fill the Doodle below if you are interested:

    http://doodle.com/uv283rp366prppnt

    Cheers,

    Tom

  • Galaxy S4 AMOLED screen working

    twl04/14/2015 at 09:47 12 comments

    We have a working Galaxy S4 AMOLED screen, 1920 x 1080. A QHD screen from GS Note 4 is waiting to be tested soon!

  • First release

    twl08/16/2014 at 00:26 0 comments

    The PCB design, FPGA and software sources for the first release of the DSI shield are now available on Github.

    Enjoy!

  • HDMI to MIPI conversion working

    twl08/05/2014 at 17:37 2 comments

    HDMI to MIPI conversion is finally working, here's a video showing a Raspi driving an iPhone 4 screen.

    Freshest sources coming as soon as I've cleaned them up :)

View all 8 project logs

  • 1
    Step 1

    Build the hardware:

    - Make/order the DSI Shield PCB.

    - Solder it!

    - Check the BOM, as not all components should be mounted.

    - Make/order/design an adapter board for your screen.

    - Connect the two boards together with the LCD. Power the system through USB.

    - No smoke indicates probable success.

  • 2
    Step 2

    Clone the repository:

    git clone https://github.com/twlostow/dsi-shield

    Install an LM32 toolchain. You may find one on Lattice website. There's a pre-built version for Linux (IA32) available here.

    Download and install Xilinx ISE 14.7 Webpack from Xilinx website.

  • 3
    Step 3

    Build the software:

    - edit software/rev1/panels.h and set the panel type you wish to use.

    $ cd software
    $ make

    This will produce the boot.ram file that the synthesizer will embed in the FPGA bitstream. The file contains both the panel initialization/HDMI handling code and the bootloader, so the LM32 application can be re-loaded at any time via USB UART.

View all 5 instructions

Enjoy this project?

Share

Discussions

John Molton wrote 09/10/2023 at 22:37 point

Does anyone know if this project can do 1080p/60hz as-is or with some modification to the design? I am confused about the 1080p/48hz (slow ISERDES) and the 1080p/60hz (fast ADV7611) option?
The end goal is to connect a 1080p/60hz display to the Raspberry Pi 4 hdmi port, and drive it at 1080p/60hz.

Any help would be much appreciated, great project overall!

  Are you sure? yes | no

Chris wrote 06/27/2023 at 20:30 point

Hi. I'm trying to use an FPGA to control a display. I have an LCD for the

Samsung Galaxy Tab A7 Lite. It has an 1340 x 800 resolution, but I have no datasheet so I don't know the connector, pinout or protocol. How would I figure out how to control it? Is there some convention or does every manufacturer just makes up their own pinouts?

  Are you sure? yes | no

WEI2015-First wrote 07/03/2021 at 02:21 point

thank you,I'm very interested in this,and I come from China 

  Are you sure? yes | no

mickel52 wrote 09/27/2020 at 01:33 point

hi, sorry but this my offtopic.

I use dragonboard 410c. It have adv7533. It DSI to HDMI converter transmitter.

I want to use cheap 1024 600 waveshare 7* display(43 or 85Hz). 

I want help. I must write panelcfg.xml file. There are documentation on website, but I don't know parameters DSI. Where I found it? Please help.

  Are you sure? yes | no

Bill S wrote 09/17/2020 at 14:56 point

Hi twl, thanks for this great project! I'm about to build it and I need to ask you: Can I use a 1.8V 25MHz oscillator directly connected to the FPGA (without R20 & R21), or I should use only this 3.3V solution ?

  Are you sure? yes | no

thekarlmiller wrote 09/07/2020 at 02:44 point

What would it take to add the touch interface as well?

  Are you sure? yes | no

sublime wrote 07/05/2020 at 20:56 point

Thanks a lot for the great work you have done! Could you tell me, where can I find the XC6SLX9-4TQ144 chip? Its strange, but Google keeps the silence about this;)

  Are you sure? yes | no

Bill S wrote 03/12/2020 at 10:13 point

Can a iPhone 4S lcd be connected to Raspberry Pi Display DSI connector and function?

  Are you sure? yes | no

Bill S wrote 03/12/2020 at 01:35 point

I guess  Raspberry pi DSI connector for LCDs (2 Data lanes plus Clock) is not compatible with iphone 4/4S lcd, right ? I mean iPhone 4S lcd has 3 data lanes + clock (named LCD_MIPI_DATA0_C_P  &  _N,  LCD_MIPI_DATA1_C_P  &  _N, LCD_MIPI_DATA2_C_P  &  _N  &  LCD_MIPI_CLK_C_P  &  _N), but Raspbery Pi cannot interface it, not because of 1 extra data line, but because of different MIPI DSI protocol. Right ?

  Are you sure? yes | no

Demon wrote 10/15/2019 at 02:15 point

is there any way to get my hands on finished boards?

  Are you sure? yes | no

Avataro wrote 10/04/2019 at 10:36 point

when I plug LS055R1SX03 2560x1440 5.5 inch 2 K LCD with my laptop it displays very well, but if I plug it with the satellite receiver or rasberry pi or tv box the led flashes blue and the black screen . I would like a solution to this problem , Thank you.

  Are you sure? yes | no

Harshman Sharma wrote 09/11/2019 at 12:09 point

I have a 480 x 854 display from my old phone (micromax canvas 2 A110). Is it possible to find a MIPI DSI shield/HDMI adapter for it ?

Or else how I could design a similar PCB for my screen. How my PCB needs to be different than yours???

I wanted to use it as a temporary screen for my raspberry pi 3 model B.

Any help?

  Are you sure? yes | no

lmao wrote 02/05/2019 at 19:15 point

Hi,

This seems like a great project, and I kinda want to use this to put a rpi 0 inside an old iphone 4s I have laying around, but it would be great if I could get the gerber files for this. I am 100% willing to put this together myself. Also can you suggest where the heck I buy the components because lcsc has nothing useful.

  Are you sure? yes | no

jx.ask.ir wrote 12/12/2018 at 20:24 point

Hi,

Thanks for your great job,

I'd like to know, does it possible to connect multi DSI LCD (from same type, for example iphone 4 LCD ) to a driver? to state clearer, I want to duplicate my content in few LCDs .

Jay

  Are you sure? yes | no

John wrote 06/24/2018 at 05:20 point

Hello,

I really like your project and I think I have skills to help you. Not sure if it deviates too much from the original design but I think there is an alternative to make this project work, in 1-2 months time. 
Some time ago I have made a shield to connect Arduino platforms to HDMI TV of 1080p. The way to go was to leverage existing converter chip for SPI->RGB video, then RGB->HDMI. Details you may take a look at https://youtu.be/MUeIY_gLn3c. It works because the RGB controller (RA8876) has external SDRAM buffer coupling with a SPI interface, together with BitBlt engine, font engine and various 2D functions so that even a 24MHz SPI bus can display some sort of sprites with movie-like effect.
Similar architecture can be repeated for MIPI DSI that is the video protocol for most smartphones. That means it is possible to drive a 4"-5" smart phone LCD with ESP8266, Arduino M0, ESP32, Teensy etc. without wiring up a RPI or BeagleBone.

This time, we may use an arduino's SPI -> RA8876 as RGB video generator -> SSD2828 as RGB to MIPI converter. This should work and deliver a smooth display...

Very sorry if this message means an offence to you since it is a FPGA for the current project.

John

  Are you sure? yes | no

ealerguy wrote 05/06/2018 at 02:18 point

Can someone please tell me where to buy.

Or where and how to get a run of these made?

I’d be willing to have them made to sell to others.

  Are you sure? yes | no

Sruti wrote 11/04/2017 at 04:42 point

Hi, 

My name is Sruti Visweswaran and I am from Mumbai, India. I am trying to send video signal to a small LCD screen stripped bare for an artwork that I am working on and came across your Display Adapter on a youtube video you had posted.

I would like to know more about this product and place an order if possible. Could you share your email id?

Thank you,

Sruti.

  Are you sure? yes | no

dosya.ada wrote 10/17/2017 at 22:24 point

I bought 5.9 - 6 inch displays with hdmi dsi driver board from different manifacturers, we want to use this on our mass production vr glasses.

But they all doesnt work with our 1920x1080 resolution device (i think because of their 1080x1920(portrait) resolution). If we plug them to a pc they are working well because pc supports this 1080x1920 resolution. But we dont want to plug it to a pc we want to plug it to a device that supports 1920x1080 resolution.
Do you know a solution for that ( for example another control board)
I need your help,
Yours,
Tan 

  Are you sure? yes | no

spyknee wrote 09/18/2017 at 16:09 point

Wish I had your skill set. HMD I want to dev needs your skills but I want to use displayport to DSI. Specifically pc's gpu displayport to SONY's Xperia 806 ppi display. Are you gonna design a DSI interface for Displayport?  I need 4K @ 120Hz.

I am following along lines of Pimax 8K .

  Are you sure? yes | no

twl wrote 09/18/2017 at 19:07 point

Good luck with 4k. A good starting point would be to get the VESA DSC (Display Stream Compression) spec ;-)

  Are you sure? yes | no

spyknee wrote 09/19/2017 at 18:35 point

http://www.analogix.com/en/products/dp-mipi-converters/anx7530

http://news.toshiba.com/press-release/electronic-devices-and-components/toshiba-introduces-industry-first-4k2k-embedded-disp

Things seem to be out there but......for my purposes, if I could just bread board interface. What I cannot do is design the circuit, I could build it......I only want display interface, no audio, or anything else.

Not on topic but you are doing something in same direction as I.

  Are you sure? yes | no

Similar Projects

Does this project spark your interest?

Become a member to follow this project and never miss any updates