Close
0%
0%

Oscilloscope Vector Game Display

Raspberry Pi (or Linux) vector display using audio output

Similar projects worth following
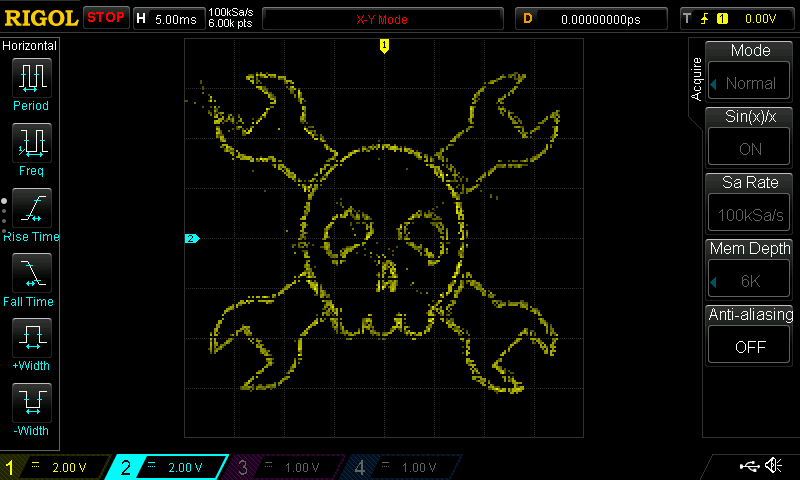
This is a simple, usable vector display on an oscilloscope using the audio output from a Raspberry Pi or other linux hardware. There's a lighweight API through which you can pass a display list of line segments to the driver, which maintains the display between updates. The resolution and update rate is limited by the capabilities of the audio output, but the display is good enough to program basic retro-style vector games. The display is semi-usable with the native Pi audio output, and somewhat improved using a $6 USB audio adapter.

The basic display driver is working, and in the GitHubs.  So far, it:

  • Uses Raspberry Pi audio output (or cheap USB sound adapter) to drive X-Y input of oscilloscope
  • Alternatively works on different Linux-compatible hardware as long as it supports ALSA
  • Implements a simple display "driver" which maintains a drawing thread to continuously update the display through the ALSA sound API
  • Exposes a display list interface where a list of vector segments can be passed to the driver to update the display.
  • Uses a separate thread to maintain the display with the last display list while your code calculates the next frame
  • Includes optional DC restoration dots for AC-coupled audio outputs (see log)
  • Uses tunable slew-rate limiting to control segment intensity

The driver code is straight C, and exposes a simple display-list interface for drawing a set of polylines.

There is also a higher-level abstraction for DLO's (disk-like objects), which are vector sprites (think geometrical disks instead of data storage disks).  Facilities are provided for updating positions and angle, finding collisions between DLO's, and elastic collisions.

The ultimate goal is a software toolkit for writing retro vector arcade games to play on your scope.

If anyone has access to a pair of fast galvos, I'd also love to see the output lasered on a wall somewhere.

Or, if you have plans or ideas for a fast galvo project.  Maybe using coreless DC motors?  Or since the output is really audio, maybe some speakers with the cones removed?  You get the idea.

Limitations

Despite the obvious application to space-shooter type games, the performance of this system is not stellar.

As an example, assume you are limited to 48kHz sampling rate, and have a DC-coupled audio output (they exist, I have one on my desk).  Also assume you want 60 fps output.  Then, you can issue up to 800 points to the driver, or up to 799 segments.

A larger problem is the fact that audio adapters are designed for audio.  Hence, they typically filter the DAC output for best frequency response, as opposed to best time domain response.  This causes ringing or extra dots in the output.

Having said that, it works OK on a Raspberry Pi with zero additional hardware.  It works a little better with a $6 USB audio adapter.

  • Project Completed

    Ted Yapo02/13/2018 at 16:25 0 comments

    I'm bad at "completing" projects, but I'm going to wrap this one up now.  It's been a week since I started on this, and I think I've learned 80% of what I could possibly gain from it.  Presumably, learning the remaining 20% would take another month, if the 80/20 rule holds.

    There's a working system in GitHub, along with a few examples for anyone who wishes to experiment or move this idea forward in some way.

    I'm reserving the right to re-open this should inspiration strike, and please comment or ask questions if you have them, but I'm going to mark this as my first completed project.

  • "Asteroids" is property of Atari, Inc.

    Ted Yapo02/13/2018 at 03:59 0 comments

    So this isn't called Asteroids.  It is in GitHub, however.  It really isn't like Asteroids, anyway.

    Game aficionados will notice that I'm not really playing, I'm trying to break it (that's my excuse, anyway).  I also made my ship immortal for the video.  No sense losing on camera...

    This wasn't meant to be a complete game, just to get an idea of what could be done on this display.  The extra dots created by the upsampling DAC look like little comets or bits of space junk on the screen, and aren't that distracting.  In another game genre, they might be a problem.

    I also wanted to test integration with SDL2.  In this case, SDL2 is just used for joystick events.  You could also use it to add sound to games using another audio adapter.  One issue is that when SDL is used without a video window (arguably not a use case it was designed for), it doesn't process keyboard events.

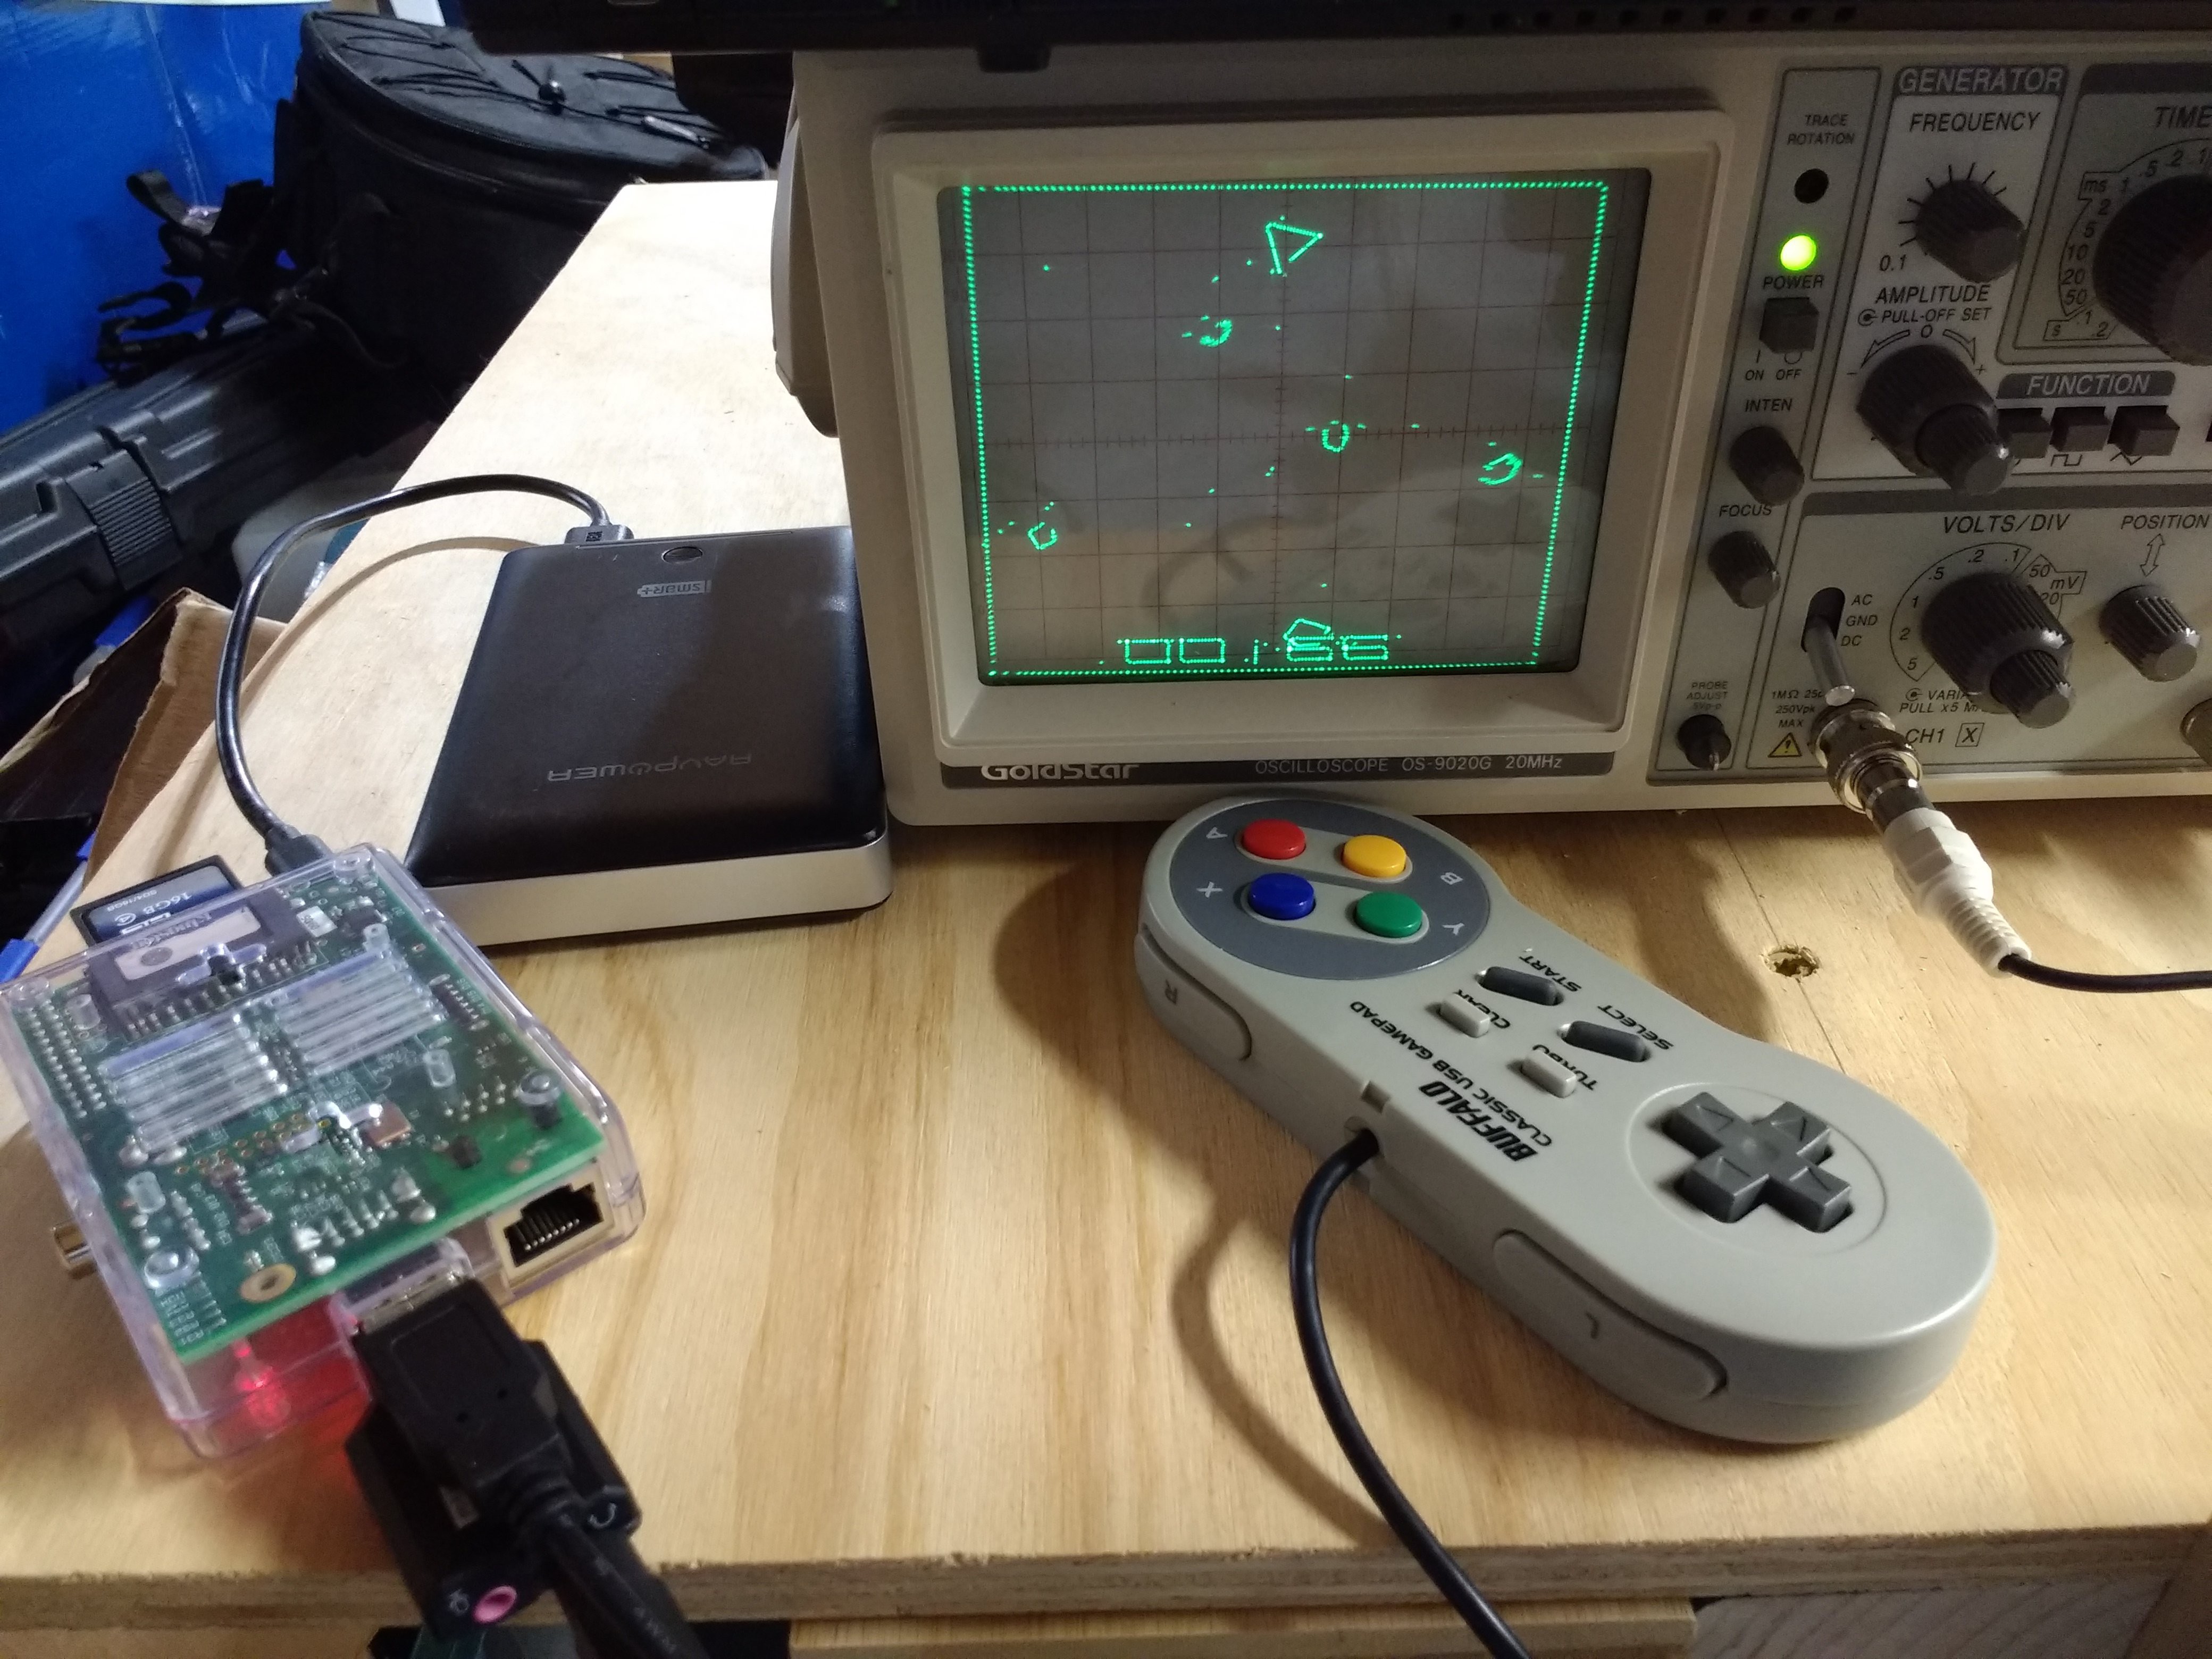
    The joystick (gamepad) I've been using is a Buffalo iBuffalo Classic USB Gamepad.  Here it is connected up with the Pi and the SYBA audio adapter, running off of battery power:

  • Rudiments of Text

    Ted Yapo02/11/2018 at 03:03 0 comments

    As far as I can tell, retro games need text for three reasons: to display the score, to show off awesome FPS values, and to allow you to enter your high-score initials as "ASS".  I've managed two out of three, and will soon have the last.

    So far, I've only made glyphs for 0-9, F, P, and S.  If I add A, the initials thing will be done.  The remaining letters and symbols are just a matter of keying in some more points.  There's room for refinement, obviously - the 5 and S are the same at the moment, for example.

    The text is a little big, because I developed it on a scope with a tiny screen.  On this one, it should be a bit smaller.  That's just a parameter in the render_text() call, though, so is easily adjusted.

    You can see the extra dots inserted by the interpolating DAC on this adapter.  In a space-type game, they might even be mistaken for "detail."

    This scope is also a little jittery; it hasn't aged well.

    I also used a goto in my C code.  And checked it into GitHub.  It's truly liberating.

  • Soundcard Impulse Response

    Ted Yapo02/09/2018 at 20:11 7 comments

    You may have noticed that I like to measure things.  I just added another example program to the GitHub repo, this time for measuring the impulse response of audio adapters.  The results are pretty interesting.  You can clone the repo and test your soundcard, too.

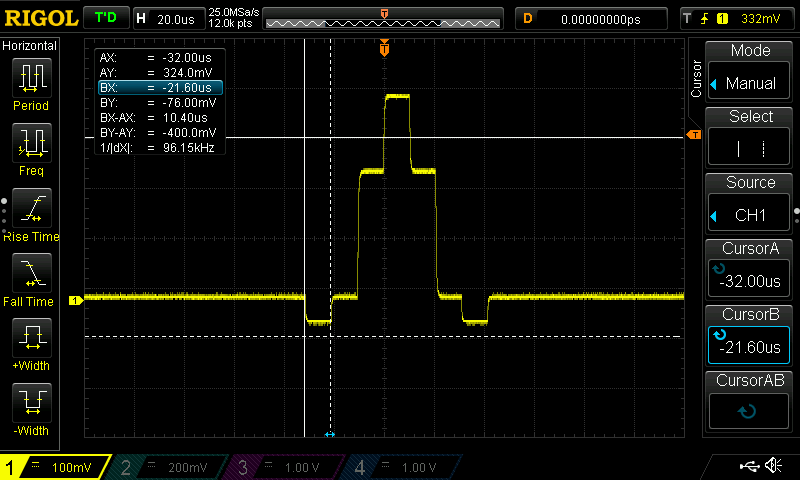
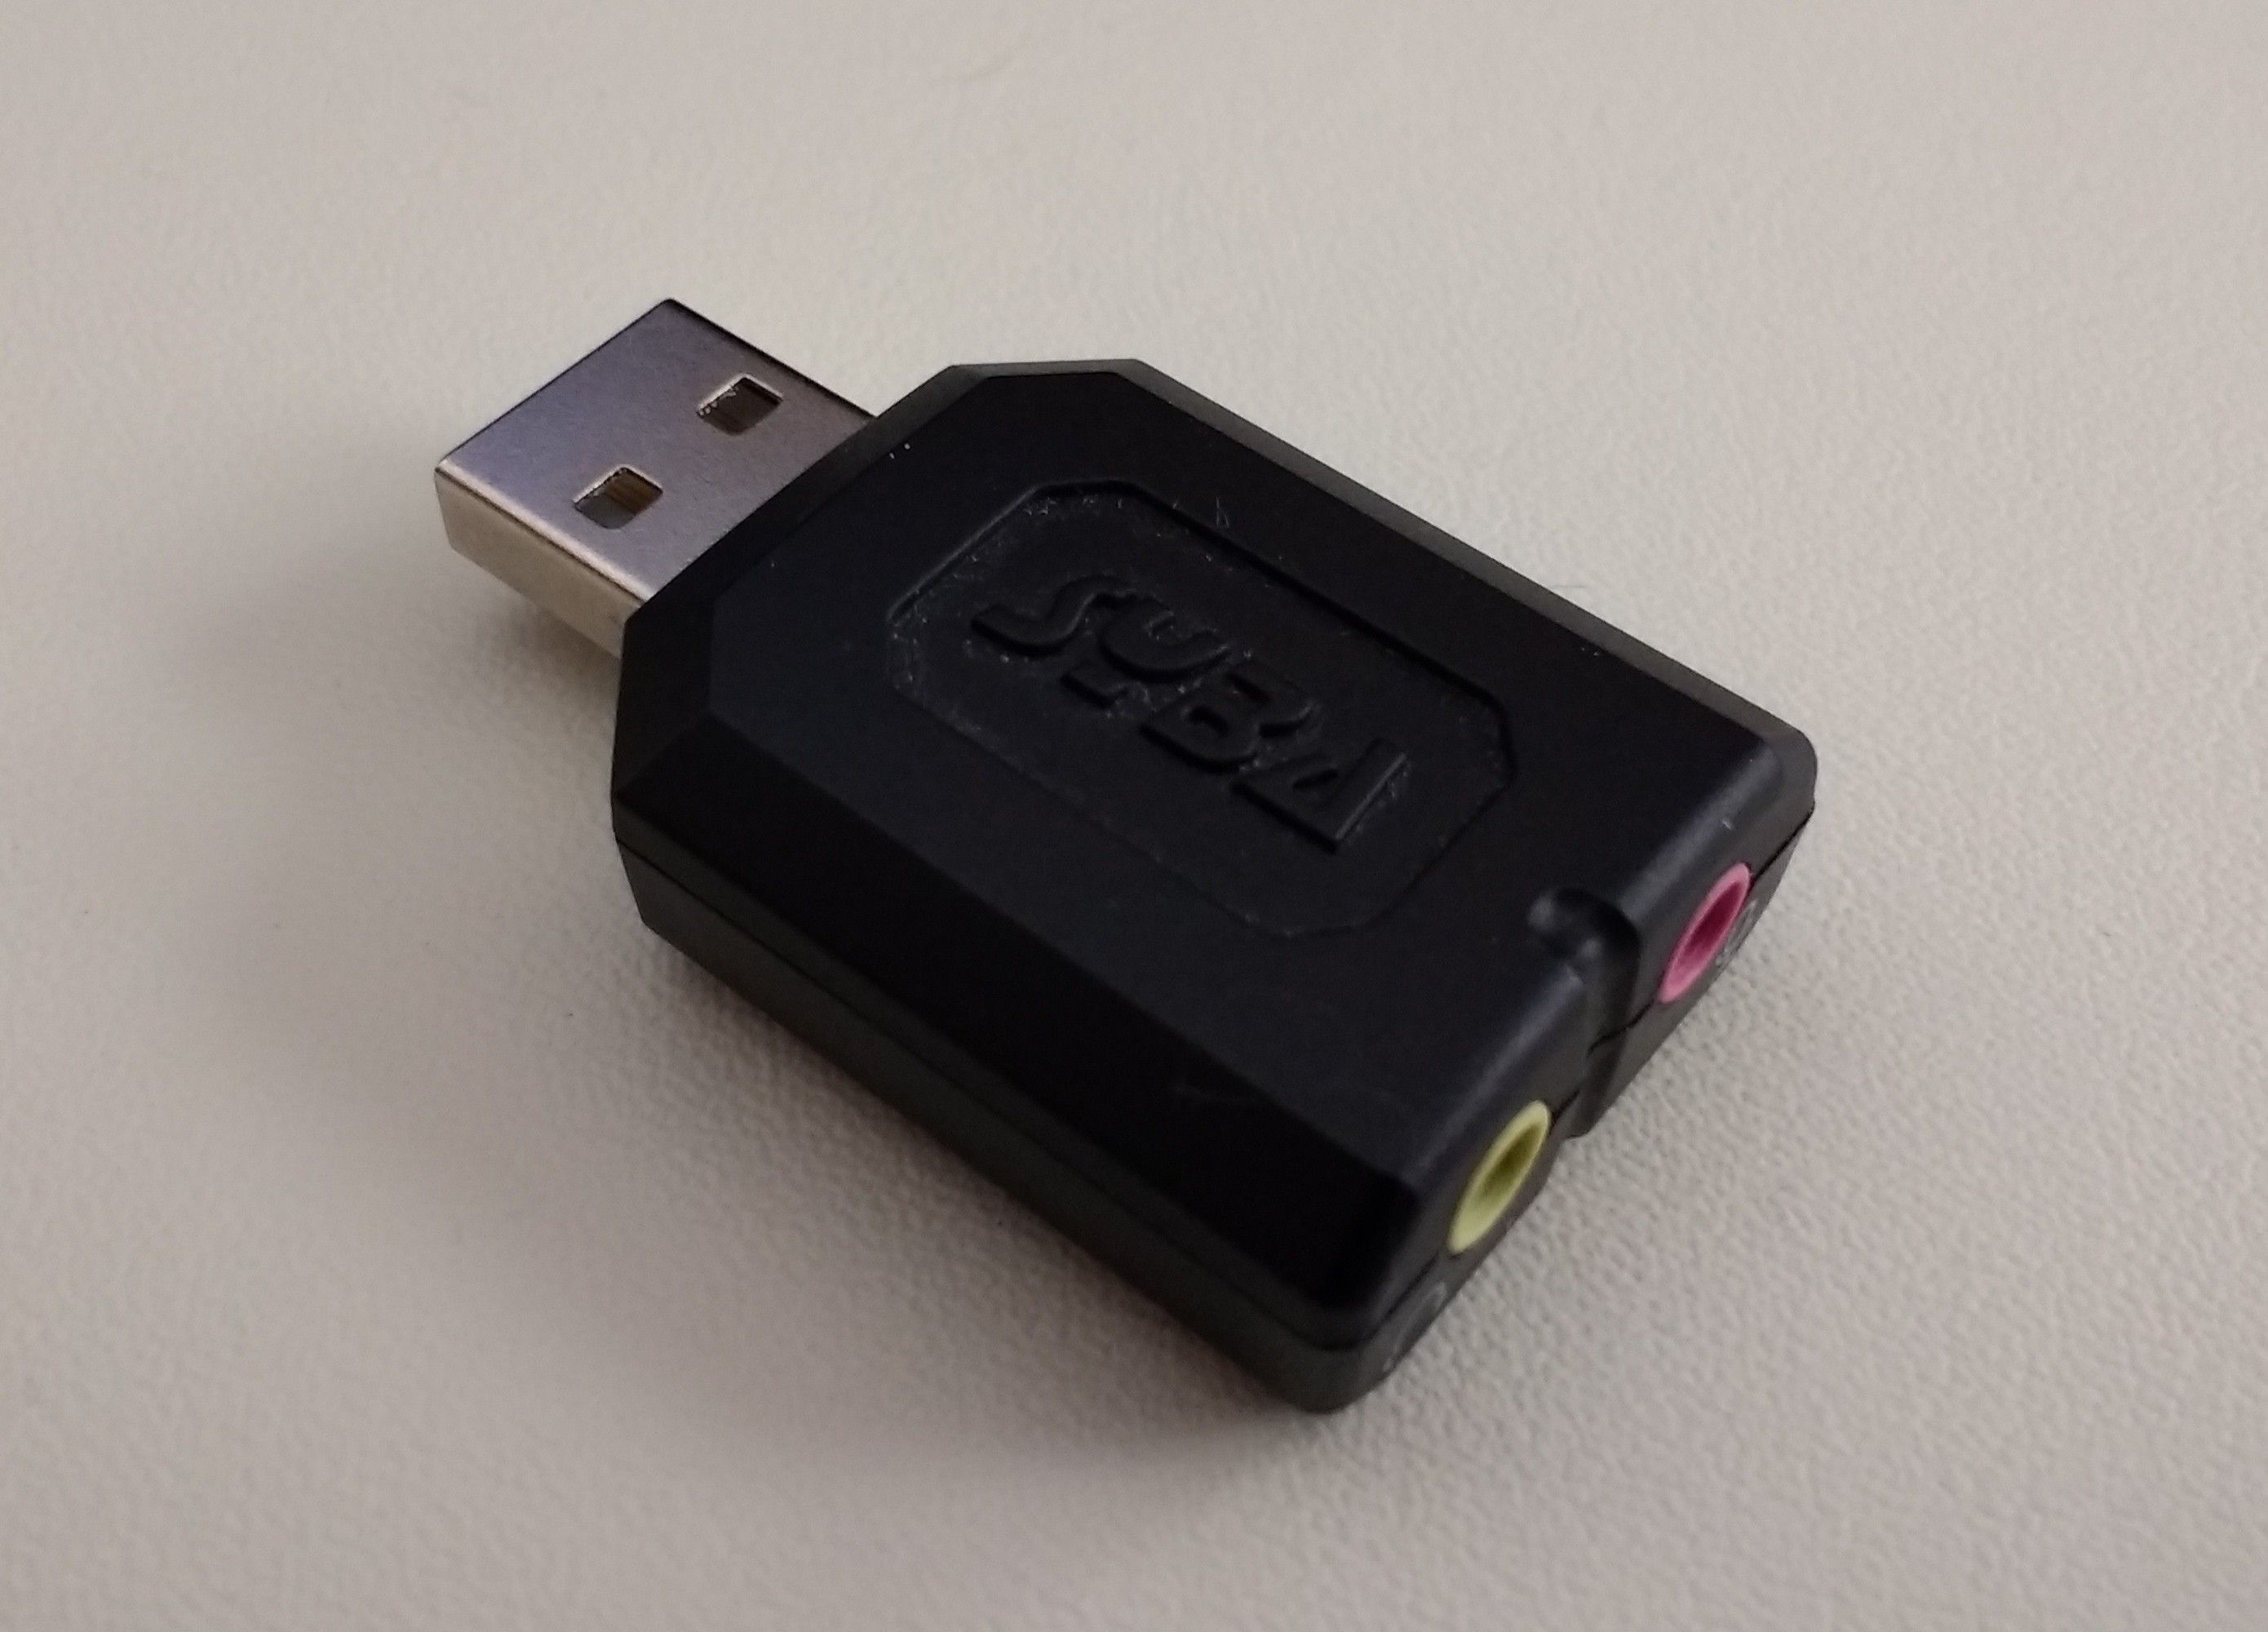
    The impulse_response example program generates a single-sample impulse at the specified sampling rate.  In this case, 500 samples of 0, followed by a single sample of 1, then 500 more 0's, and repeats this forever.  The output from the card is then a representation of the system's impulse response.  This first waveform, taken from one of those tiny $8 SYBA USB audio adapters, is funny for several reasons.  This dongle uses a CM119 chip from C-Media, as a brief hammer and chisel session revealed:

    The output from this card is slightly bizarre.  From the output shown above, it looks like there's no analog filtering whatsoever on the output - you get discrete steps right from the DAC, but digital filtering has been applied before the DAC.  The card only supports 44.1 or 48kHz, and the output above was set to 48kHz.  However, the output is sampled at 96kHz (see cursor measurement), and has been digitally filtered with an approximation of the sinc function.  This is just plain weird (not the sinc part, which is the correct reconstruction filter for frequency domain accuracy).

    It's this upsampling that causes the stray dots in the vector display - in between desired dots and as ringing artifacts.  On the plus side, this card does draw discrete points on the display, even if it adds a few extra.

    One of the challenges of this project is that soundcards/audio adapters are designed to sound good by reproducing the signal accurately in the frequency domain.  This is a different goal from reproducing the signal accurately in the time domain.  The sinc function is the ideal reconstruction filter for the frequency domain, but what we'd really like is a Gaussian filter, which shows minimum step times with no overshoot or ringing.

    UPDATE:

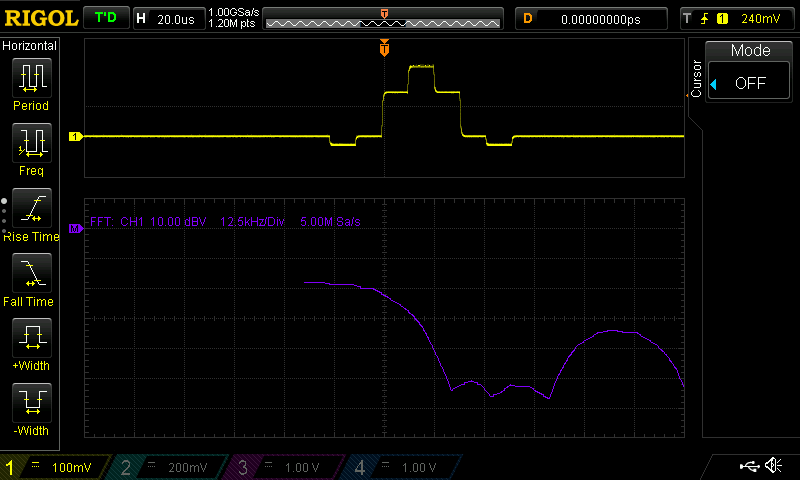
    I think I know what's going on here.  I had read about oversampling interpolating DACs before, but didn't recognize this one when I saw it. Analog Devices has a nice whitepaper on the concept here.  The idea is to reduce the requirements on the post-DAC analog anti-aliasing filter, so that a lower-order filter can be used.  In this case, they've taken it to an extreme, and used *no* anti-aliasing filter at all.  I guess the assumption is that your headphones will act as the filter.  I also remembered that I can look at the frequency response implied by the impulse response using the FFT on the scope:

    It's tough to read from the image, and the cursor view obscured the trace, but I measured the response as -3dB down at 18.7 kHz.  The deep trough is about 50dB down, and extends from 37 to 61kHz.  If you followed this DAC with an analog filter that dropped substantially before 61KHz, it wouldn't look that bad (as it is, the harmonics extend pretty high). @Thomas mentioned that you might use an adapter like this as a MW transmitter, and now I believe it!

    I am tempted to dig out my bag of 5532 amps, whip up a decent lowpass, and see how nice I could make this cheap adapter look.

    Motherboard Soundcard

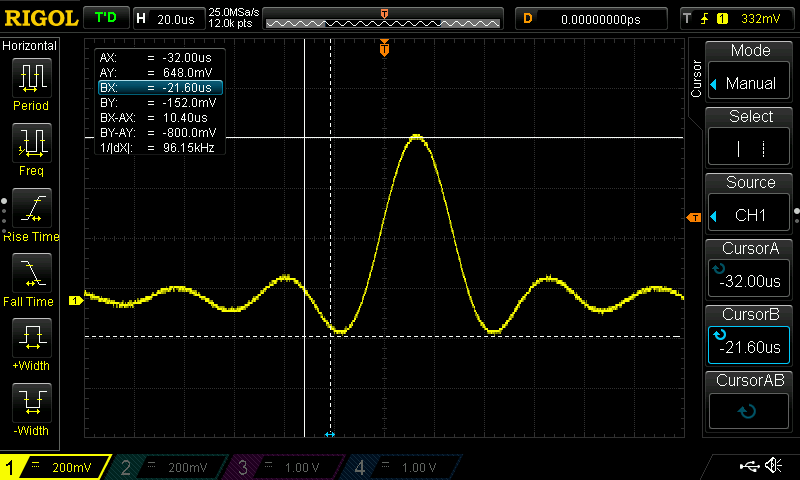
    Here's a similar test using the output of the audio adapter built into my desktop motherboard, reported as:

    00:14.2 Audio device: Advanced Micro Devices, Inc. [AMD/ATI] SBx00 Azalia (Intel HDA) (rev 40)
    

     It's an Azalia audio chipset.

    This is more like...

    Read more »

  • It Works!

    Ted Yapo02/08/2018 at 16:55 0 comments

    The latest code in GitHub works pretty well.  Here's the bouncing_ball example displayed on my DS1054Z:

    This example refreshes the display between 85-112 fps, although the software limits the position updates to 60 fps (this is adjustable).  The video above was taken with the inputs set to AC coupling to simulate an AC-coupled soundcard.  You can see the compensation dots along the sides of the image.  Also visible are a bunch of "noise" dots - these are caused by the audio adapter upsampling the output.  This is particularly annoying because the upsampling algorithm appears to use a sinc filter, which would be great if this were really audio.  For a time domain display like this one, a Gaussian filter would be much better because it minimizes rise and fall times with zero overshoot.  I'll make another log about what this particular audio adapter does and why it's so annoying.

    The ac-coupling compensation isn't perfect because the code doesn't predict where the oversampling points will be inserted by the audio adapter.  This causes the image to drift slightly from frame to frame.  Although the effect is noticeable, it doesn't seem like a big deal.  Again, with a DC-coupled audio adapter, it doesn't matter.

    Without the AC-coupling compensation, the code maintains a fairly steady 114 fps update on the example program.

    So, the code is fairly complete as a simple low-level C driver.  Here's the meat of the code for the above example:

    int main()
    {
      display_params_t display_params;
    
      /* set the display parameters and initialize the display */
      /* display_params.pcm_device = "default"; */
      display_params.pcm_device = "hw:CARD=Device,DEV=0";
      display_params.frame_rate = 60;
      display_params.sample_rate = 48000;
      display_params.slew = 10;
      display_params.ac_coupling = 1;
      InitDisplay(&display_params);
    
      const int n_balls = 10;
      ball balls[n_balls];
      create_random_balls(balls, n_balls);
    
      float dt = 1.; /* simulation timestep */
      uint32_t update_count = 0;
      while(1){
    
        update_positions(balls, n_balls, dt);
    
        /* initialize a display list */
        DisplayList dl;
        InitDisplayList(&dl);
    
        /* render balls into display list */
        for (int i=0; i<n_balls; ++i){
          draw_circle(&dl, balls[i].cx, balls[i].cy, balls[i].r, 20);
        }
    
        /* update the display, and free the display list */
        int limit_fps = 1;
        UpdateDisplay(&display_params, &dl, limit_fps);
        FreeDisplayList(&dl);
    
        /* periodically print the display drawing rate */
        update_count++;
        if (!(update_count % 32)){
          fprintf(stderr, "%4.1f fps\n", GetDisplayFPS(&display_params));
        }
      }
    
      CloseDisplay(&display_params);
      return 0;
    }
    

     The drawing interface is rather crude, requiring you to fill a display list of line segments for each frame.  It works, but it's a little tedious to program.  I'm working on a C++ layer on top that exposes a set of primitives and transformations to make programming a game easier.

    So far, I've mostly been developing on my desktop linux box. Now I have to set up some room somewhere to experiment with a Raspberry Pi, an oscilloscope, and a USB retro game controller...

  • AC vs DC Coupling

    Ted Yapo02/06/2018 at 18:34 0 comments

    Some audio adapters use AC coupling (i.e. an output capacitor), while others work down to DC.  The difference for audio is subtle, but for a vector display, it's huge.  Here's an illustration using a DC-coupled adapter and the AC/DC switches on the scope inputs.

    With an AC coupled output, the centroid of the image will always be in the center of the screen - you can't have a single object translate around, for instance. This happens because the DC (and low frequency) components of the signal that represent the translation of the object are blocked by the output capacitor.  You can see the difference in the video.

    The dots in that video are another story - for another log.

    Solutions

    1. Hack Your Pi

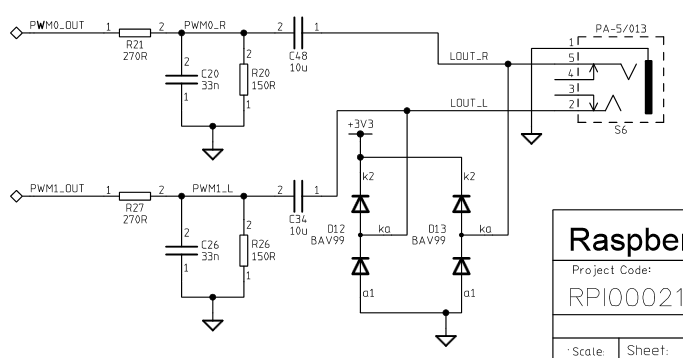
    The audio output of the Raspberry Pi is AC-coupled, as shown in the schematic:

    To make the output DC-coupled, you could just short out C48 and C34. Also interesting is the fact that the audio outputs are just PWMs.

    2. Buy a USB Audio Adapter

    I have been playing with this one.  I bought it years ago, so don't know the exact model.

    It has an unfiltered DC-coupled digital output, so draws discrete dots instead of lines.  Interestingly, it also interpolates extra points into the output (discussed below).  New ones like this cost around $8.  I'm looking at 96kHz output versions, which are a little more expensive, but will produce a better display.

    Beyond possibly higher sampling rates, there's another advantage to a USB adapter: you can use the on-board audio output for game sound effects.

    3. Use Software Compensation

    I developed some example code that compensates for the removal of the DC components by adding a single repeated extra point to the display.  This point, which is always along one of the edges, is calculated so that the centroid of the total display is always at (0,0).  Here's an example:

    The very bright point at the edge of the display is the extra one added to balance the output.  The extra "flying dots" are an artifact of that particular USB audio adapter.  Even though it only accepts 48kHz maximum sampling, it appears to interpolate up to 96kHz (and in some cases 192kHz) before output.  I don't really understand it yet.  More about that in another log.

    As you can see, this is workable, but is probably not the preferred solution.  I can add a switch in the software to enable it or not.

  • Upgrade your DS1054Z

    Ted Yapo02/06/2018 at 16:40 1 comment

    I found out today about the new firmware for the DS1Z series oscilloscopes, including the popular DS1054Z.  I installed it this morning, and among the upgrades, the X-Y mode can now be made full-screen:

    This upgrade does not disturb any system settings or options you may have "installed" previously :-)

    The vector display will still best be viewed on an analog scope, though.

View all 7 project logs

Enjoy this project?

Share

Discussions

Dave.K wrote 10/07/2018 at 16:22 point

Have you thought about trying this with the HiFiBerry DAC+ Pro, which allows 192Khz audio on the Pi?  This is what I use to play Jerobeam Fenderson's oscilloscope music and it plays really clear.

  Are you sure? yes | no

Similar Projects

Does this project spark your interest?

Become a member to follow this project and never miss any updates