Close
0%
0%

NixieBot

A neon faced, twitter connected, clock, social monitor and picture server

Similar projects worth following
A neon clock that uses huge tubes, displays twitter and sends pictures of words or oracular phrases to twitter users that talk to it.

Basics:

This clock can display words as well as numbers, it connects to twitter to source words, either random or submitted by twitter users. It uses the camera to send out pictures of things it has displayed too.

More details about how to use it can be found on nixiebot's tumblr

To see what it has been getting up to, take a look at Nixiebot's time line. ( beware, it reads like youtube comments sometimes! )

Overview of operation:

A Raspberry Pi is interfaced via TTL level serial I/O to a series of Smartsocket boards each of which contain a PIC processor and high voltage driver transistors to drive a vintage Burroughs B7971 neon indicator tube.

There is a separate board that houses high voltage power supply modules for the neons and a high current 5V regulator to feed the Pi.

The Pi is fitted with a camera module pointed at the display and runs raspbian linux hosting a python program which does these things:

  • It displays the time, set via NTP over the internet.
  • It also uses the Twython package to access twitter and read from the random sample stream and display random tweets on the tubes every twenty seconds or so.
    • The random tweets are placed in a big circular buffer that is used to compile live stats about current tweeting behavior, such as the "originality index" which is the ratio of tweets to retweets.
  • It uses twitter's twitter's stream filter API to listen out for any tweets that contain the hashtag NixieBotShowMe
    • These tweets are queued and at regular intervals (spaced so as not to violate twitter's posting rate limit rules) it will:
      • Pop the oldest message off the queue and parse it to see if it contains a word that can be displayed, or a hashtag that commands another action (such as picking an "eight ball" answer at random ).
      • If so it will further check to see if any image processing hashtags have been added to the tweet and apply the appropriate image setting to the pi camera. it then checks the length of the word ("word" is any sequence of characters bounded by whitespace, so to display a phrase use a non displaying character like a colon to:separate:the:words:in:a:phrase:like:this ).
        • If the word fits on the tubes it will take a still image.
        • if the word is too long it will scroll the word and take a lower resolution image of each scroll position.
          • These scroll frames are then composed into an animated gif using the Graphicsmagick library.
      • Once an image or movie is generated it will compose a tweet in reply, attach the image or movie and upload it to twitter where it becomes visible on Nixiebot's time line.
    • Any temporary files are then cleared up.
  • Loop repeats.

XmasLEDNixiebot.ino

Arduino code for Nixiebot seasonal LEDs

ino - 8.42 kB - 12/27/2016 at 23:52

Download

NixieBot.sch

NixieBot HVPSU carrier and connector breakout board schematic , eagle format.

sch - 91.14 kB - 10/07/2016 at 20:06

Download

NixieBot.brd

NixieBot eagle board file for HVPSU carrier

brd - 26.46 kB - 10/07/2016 at 20:06

Download

  • 1 × raspberry Pi MkII B Main brain
  • 1 × raspberry Pi camera module take pictures to send to twitter
  • 8 × B7971 Smartsocket boards Driver boards for the Nixies, I used these : http://tayloredge.com/storefront/1386_B7971SmartSocket/index.html others are available
  • 8 × B7971 indicator tubes Fourteen segment nixies, obtainable occasionally on eBay, excpect to pay around $80 upwards each. Use as many as you can find
  • 1 × https://www.tindie.com/products/freto/pi-camera-hdmi-cable-extension/ Pi camera extension boards, used to run the camera signal over an HDMI cable.

View all 12 components

  • BlinkenLights added

    Robin Bussell12/27/2016 at 23:48 0 comments

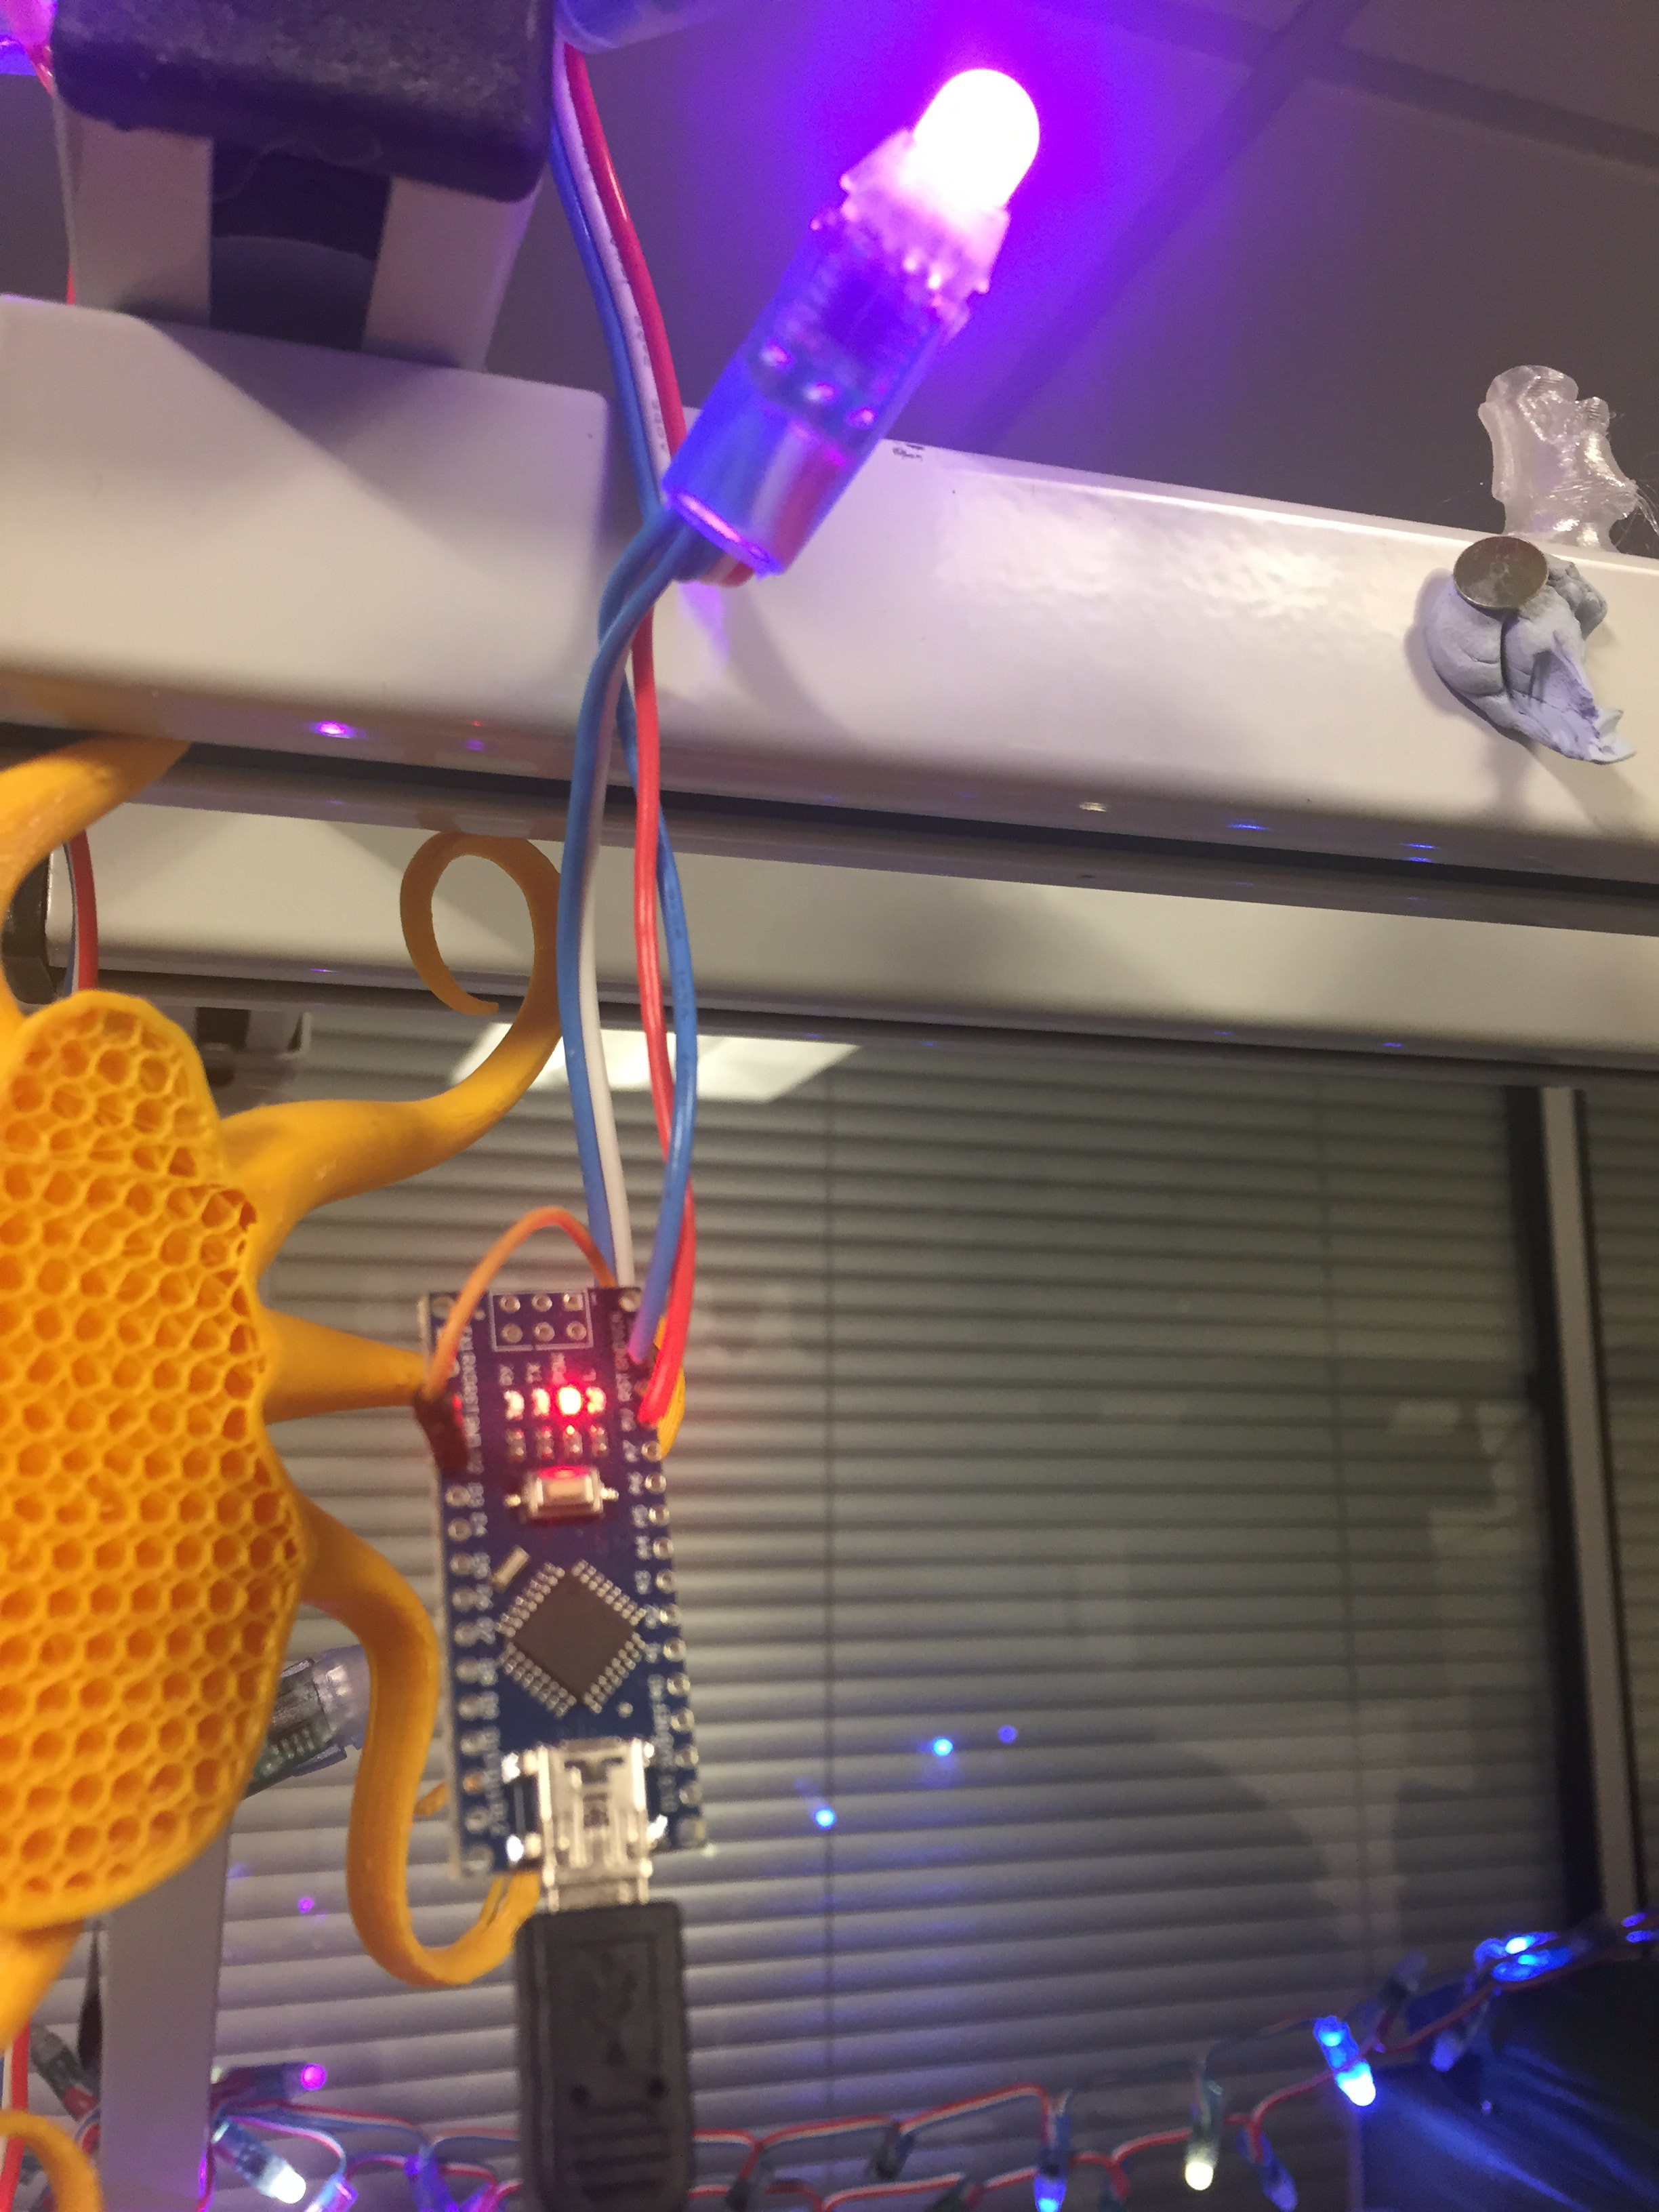
    As it's the season of goodwill ( and hackers covering everything in LEDS ) Nixiebot now has a string of WS2811 based RGB LEDs added. Since it's nixiebot they are, of course, controllable by hashtag too. An arduino nano is driving them using the wonderful fastLED library .

    The arduino is connected to the USB on the pi and appears as /dev/ttyUSB0 , I added a routine to nixiebot to pick up on a new #lights hashtag and the arduino has a routine to check serial input and receive commands from nixiebot.

    The lights are purely USB powered so I enabled the max_usb_current=1 parameter on the pi after making sure that the 5V regulator on nixiebot's power board can take the extra current. It's a 2A regulator and with the max_USB_current flag set then USB can deliver 1.2A.

    Current for a raspberry Pi 2B and camera module should be under 700mA so we're good... as long as I don't turn on too many LEDs. There are 50 LEDs in the string, each of which can take up to 60mA so you can see there's ample possibility for exceeding the 1200mA avalable from USB. However the code just twinkles a few LEDs at a time so we're good there.

    To change them just add the hashtag #lightsX to your nixiebot command, where X is a number from 1 to 7, to choose from some preset colour schemes:

    1: Red, White, Blue, Green

    2: Purple, Green, Red

    3: Green, Gold, Blue

    4: Purple, Pink, Yellow, Blue

    5: Green

    6: red,

    7: Blue

    The ardiuno code (see files) runs a loop that:

    • fades all Leds towards black a bit
    • If it's time, picks a random LED to turn a random colour from the current set
    • Checks to see if there are any characters waiting in serial input and, if so, interprets the command.
    • delays 50ms then loops back

    So the overall effect is twinkling leds that each fade out over a few seconds. Of course this is all going on according to the arduino timer loop and the pictures taken by nixiebot are timed according to nixiebot's code which spoils the twinkle a bit in the movies that nixiebot makes. So I might have a go at making the code synchronous with the Pi when composing movies next, the idea is to enter a mode where the arduino waits for a "do the next frame" command from nixiebot whicih is issued after each frame of a movie is taken. This will mean quite a rewrite of the arduino loop ( which is recycled from another project of mine ) as all the timers currently run on the arduino millis() function.

    The arduino runs a simple command protocol, all commands are two characters and have ':' as the third, followed by any arguments the newline. Currently Nixiebot only issues the "SC:" to choose a colour set.

    Here's the python side of things, it's based off a copy of the glitch setting function:

    def setLights(tweet) :
        #sets fairy ligts according to #Lights:[1-6] 
        print("setting lights")
        level = re.compile(r'lights[1-7]')
        for tx in tweet['entities']['hashtags'] :
            t=tx['text'].lower()
            if level.match(t) :
                try :
                    gl = int(t.split("lights")[1])
                    print("lights req to ", gl)
                    lights = gl
                    lcom = serial.Serial("/dev/ttyUSB0",baudrate=19200,timeout=1.0)
                    time.sleep(2.1) #allow time for arduino to reboot when port opened
                    lcmd = "SC:"+str(lights)+'\n' 
                    print(lcmd)
                    lcom.write(bytes(lcmd,"utf-8"))
                    time.sleep(0.5)
                    lcom.close()
                except :
                    print("lights setting exception text = ", t, "split = ", gl)
                    pass
    The only thing that had me mildly stumped was the fact that opening the serial port was resetting the arduino and subsequently the command was getting lost during arduino reboot. To cover this I just added a time.sleep(2.1) . In future I'm going to need to keep the port open globally if it's ever to be used for frame sync and so on. But for now this quick hack does the trick!

    The arduino code should be available over in the files section of this project by the time you read this, merry Xmas and happy new year to all on hackaday!

  • Starting NixieBot on bootup

    Robin Bussell10/19/2016 at 21:56 0 comments

    One of those jobs that I have been meaning to get around to for ages is that of making sure that the NixieBot code would automatically be run whenever the pi was booted. Recently a couple of weekend power cuts that left the bot down for a few hours until I noticed its absence prompted me to get this task done.

    First off, in normal operation nixiebot.py is run from a screen session. Screen is a text based window manager that allows command line processes to be run up, dismissed from view and then reattached to later to see what's going on or to interact with them. it's very handy indeed for a machine that has no keyboard or monitor that is only ever connected to by ssh session over the network. With screen you can start a process and terminate the terminal session without also terminating the process you ran from that session. Then later you can log back in and reattach to see what's going on with the process. It's a really handy utility that gets used in my day job all the time. So any script that aims to start nixiebot should start it in a screen session so that I can interact with it later if I want to change the clock routine's behavior.

    To keep things neat we first need a script that will run up nixiebot, here it is:

    #! /bin/bash
    cd /home/pi/nixiebot
    python3 nixiebot.py


    Pretty straightforward, this script is what will be run in the screen session. I saved it as a file named startNixieBot.sh, put a copy in /usr/bin so that it is in the path and made it executable with:

    chmod +x /usr/bin/startNixieBot.sh
    so it can be invoked just by typing startNixieBot.sh from any directory.

    The command to start up a screen session (named nixiebotScrn to identify it among any other screen sessions that might be running) and run the nixiebot code in it is this:

    screen -S nixiebotScrn  -d -m startNixieBot.sh


    So that deals with starting the code, what about stopping it? If you are at the console of nixiebot and type a 'q' then hit enter it will wrap up things nicely, terminating the connections to twitter's API in a polite fashion and closing down all the threads properly (more on those threads in a later log). So, rather than just killing the process, it would be good to send a 'q<cr>' sequence to nixiebot whenever the pi is being shut down.

    Luckily screen has a way of doing this with the -X stuff command, here's how to stop the nixiebot that was started by the above command:

    screen -S nixiebotScrn -p 0 -X stuff "q$(printf \\r)"

    Notice the use of -S nixiebotScrn again so that the key gets sent to the right session. The rather abstract looking "q$(printf \\r)" is just shell script-ese for "q then the return key". I got this handy tip from this question on stackexchange. Stackexhange nearly always delivers the goods if you have a unix scripting question!

    Having worked out the commands for startting and stopping a background nixiebot process from the command line, the next task is making sure that these commands get run on startup and shutdown.

    There are a few ways of ensuring that a process runs on bootup with linux systems, the best way (IMHO) is to write a proper init script. If you go looking in /etc/init.d you'll find a whole bunch of scripts that deal with starting and stopping the various services that might be running on that machine. There are some nice refinements that distro builders have worked out over the years to make sure that services only get started when any other services that they depend on are ready and so on.

    A little light googling produced a nice template script from here , all I had to do was edit the lines that actually did the work of starting and stopping the script plus change the descriptions in the header section.

    #! /bin/sh
    # /etc/init.d/nixiebot
    
    ### BEGIN INIT INFO
    # Provides:          nixiebot
    # Required-Start:    $remote_fs $syslog
    # Required-Stop:     $remote_fs $syslog
    # Default-Start:     2 3 4 5
    # Default-Stop:      0 1 6
    # Short-Description: Simple script to start nixiebot process at boot
    # Description:       A simple script from www.stuffaboutcode.com...
    Read more »

  • Daily time lapse movies from NixieBot

    Robin Bussell10/10/2016 at 20:18 0 comments

    Recent new feature: As well as tweeting user requested images NixieBot will send out a daily movie tweet about "how my day went". This movie is composed of one frame taken every 15 minutes throughout the day so you can see how lighting changes and weather affect the images the camera produces. The word to display is either picked from the last user requested word from the previous 7.5 minutes or else, if there was no request made during that time period, the most popular word (of four or more letters in length) used in the random tweet feed is displayed. Certain very common words:

    boringWords=["this","that","with","from","have","what","your","like","when","just"]
    are filtered out to make it more interesting. The movie attempts to summarize the twitter 'ZeitGeist' for the day.

    How it works:

    The time interval between frames is kept in the timeLapseInterval variable, every time round the loop in the main runClock() function this happens:

        if  int(t.minute) % timeLapseInterval == 0 :
                    doTimeLapse()  #either choose a frame from recent first frames or, if none available, take one from random stats
                                   #if it's the appointed hour, generate and tweet the time lapse movie. 
                else : 
                    lapseDone = False 
    The minutes value of the time variable t (set at the top of the loop) is checked to see if it's a multiple of the required interval, if so the doTimelapse() function is called. The lapseDone variable acts as a flag to make sure that doTimeLapse only gets called once per interval. Without this, if the timelapse process takes less than a minute to run, it would be called multiple times.

    So what does doTimelapse do then? here it is:

    def doTimeLapse() :
        global cam
        global lapseDone
        global makeMovie
        global effx
        global effxspeed
        if lapseDone :
            return
        print("doTimeLapse called")    
        #delete all lapse*.jpg older than (lapseTime / 2)
        #pick youngest lapse*.jpg file and copy to lapseFrames directory    youngestName = ""
        youngestTime = time.time()
        youngestFile= ""
        timeLimit = time.time() - ((timeLapseInterval/2) * 60)
        files = glob(basePath+"lapse*.jpg")
        for f in  files :
            fileTime = os.path.getatime(f)
            if fileTime < timeLimit :
                print("deleting ", f, " age =", (time.time() - fileTime)/60)
                os.remove(f)
            elif fileTime < youngestTime :
                youngtestTime = fileTime
                youngestFile = f
        if youngestFile != "" :
            print("moving file", youngestFile , "into frame store")
            move(youngestFile, basePath+"lapseFrames/")
        else :
            #take frame of most popular word in random tweet sample of four or more letters
            words=randstream.allWords()['wordList']
            bigEnough=[]
            for w in words :
                if len(w) >= 4 and w not in boringWords and "&" not in w:
                    bigEnough.append(w)
            c = collections.Counter(bigEnough)
            topWords=c.most_common(20)
            theWord=topWords[0][0]
            print(topWords, theWord)        
            makeMovie = False
            stashfx = effx
            stashspeed = fxspeed
            setEffex(0,0)
            lockCamExposure(cam)
            displayString(theWord)
            cam.capture(basePath+"/lapseFrames/lapse-"+time.strftime("%Y%m%d-%H%M%S")+".jpg",resize=(320,200))
            unlockCamExposure(cam)
            setEffex(stashfx,stashspeed)
            
        lapseFrames = glob(basePath+"lapseFrames/*.jpg")
        #if there are now 96 files in the frames folder, make a movie and tweet it out #NixieLapse
        print(len(lapseFrames),"lapse frames found")
        if len(lapseFrames) >=96 :
            print("making daily time lapse")
            delay=20
            mresult = call(["gm","convert","-delay",str(delay),"-loop", "0", basePath+"/lapseFrames/*.jpg","Tlapse.gif"]) 
            print("Make movie command result code = ",mresult)
            if mresult == 0 :
                uploadRetries = 0
                while uploadRetries < 3 : 
                    try:
                        pic =open("Tlapse.gif","rb")
                        print(">>>>>>>>>>>>> Uploading Timelapse Movie ", datetime.datetime.now().strftime('%H:%M:%S.%f'))
                        response = twitter.upload_media(media=pic )
                        print(">>>>>>>>>>>>> Updating status ", datetime.datetime.now().strftime('%H:%M:%S.%f'))  
                        twitter.update_status( status="This is how my day went: #NixieBotTimelapse", 
                           media_ids=[response['media_id']] )
                        print(">>>>>>>>>>>>> Done  ", datetime.datetime.now().strftime('%H:%M:%S.%f'...
    Read more »

View all 3 project logs

  • 1
    Step 1

    This project involves high voltages that will definitely hurt like hell and probably kill you if you touch the wrong bits when powered up (170V @ up to 45ma DC). Do not attempt to build this unless you are comfortable with HV safety practices and know how to solder and assemble PCBs. It is not a forgiving design and if you plug something in wrong you could cook a CPU or yourself! I'll not be going into step by step "what to solder where" instructions because if you need those then you are probably not of the required skill level to attempt this safely, sorry!

  • 2
    Step 2

    Before you embark on a project like this you should first make sure you can obtain the B7971 nixie tubes, these are becoming quite rare now and attracting high prices. It might take you a few months to track down enough, though you can start with as few as four tubes, it is easy to add extras as they turn up.

    You might even decide to use a different display technology, fourteen and sixteen segment VFD tubes are quite readily available though they are a lot smaller than B7971. If you go down this route you will also have to make your own driver board(s) and replace the low level display routines in the code with appropriate code to drive your board.

  • 3
    Step 3

    Obtain a raspberry pi and install the latest raspbian distribution on it ( I used the minimal build with no GUI, just terminal access, feel free to use whatever you are comfortable with). Then install prerequisites thus:

    sudo apt-get install graphicsmagick 
    pip install twython
    

View all 9 instructions

Enjoy this project?

Share

Discussions

Similar Projects

Does this project spark your interest?

Become a member to follow this project and never miss any updates