Close
0%
0%

SDR dock 1.0

Raspberry pi based open source device with SDR and easy to use controls for exploring RF signals and data.

Public Chat
Similar projects worth following
Introducing SDRDock, the next-level SDR device designed for both enthusiasts and professionals. Built on a Raspberry Pi platform, SDRDock aims to enhance the SDR experience by integrating all essential hardware components onto a single, streamlined PCB. With the convenience of 3D-printable enclosures and compatibility with various SDR dongles, this device is both accessible and versatile. What sets it apart is its tactile interface, featuring user-friendly knobs and buttons that transform complex SDR tasks into an intuitive and engaging experience. Whether you're a beginner or an expert, SDRDock turns the radio spectrum into your personal playground.

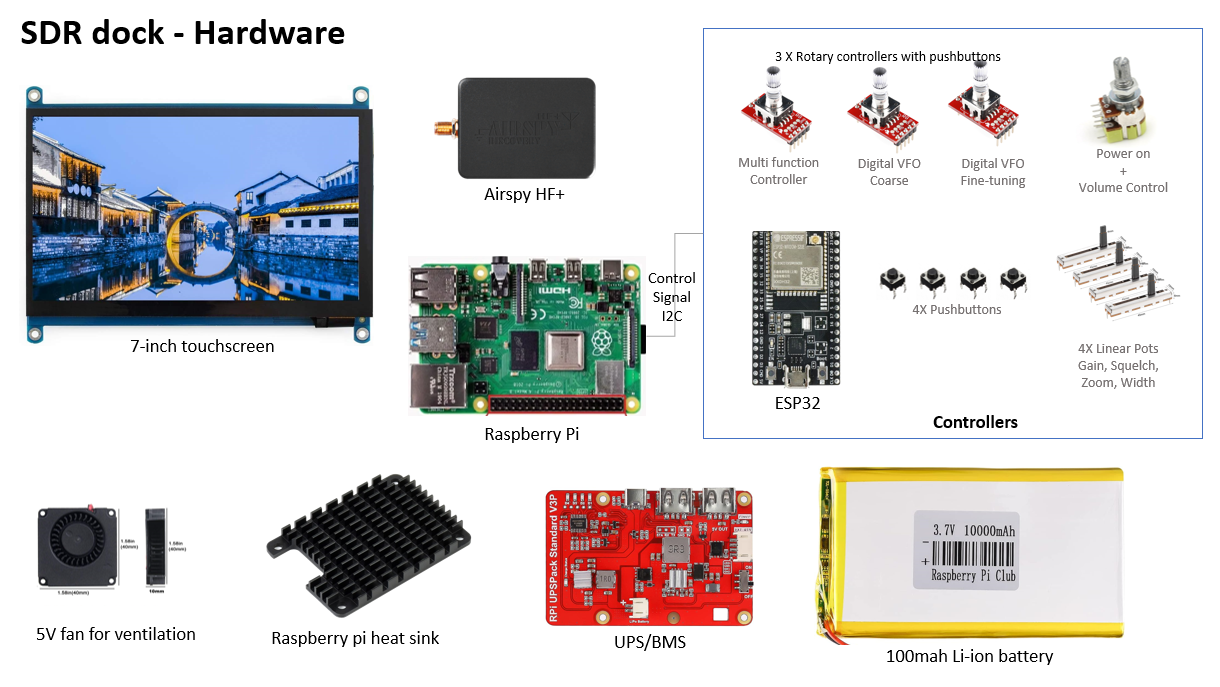
The current model is assembled from readily available components. The ultimate aim is to design a single, integrated PCB featuring all essential parts and connectors. This streamlined approach will result in a more compact, durable, and easy-to-service device. The build requires a Raspberry Pi, potentially a compute module, a battery, and a 3D-printed enclosure for the device.

HARDWARE: The build checklist comprises all essential components. Additionally, you will need a 3D-printed case, epoxy glue, and some screws. All these items can be conveniently purchased from Amazon or similar platforms. Compatibility with various SDR dongles like RTL-SDR and Airspy Mini has been verified to fit within the enclosure.
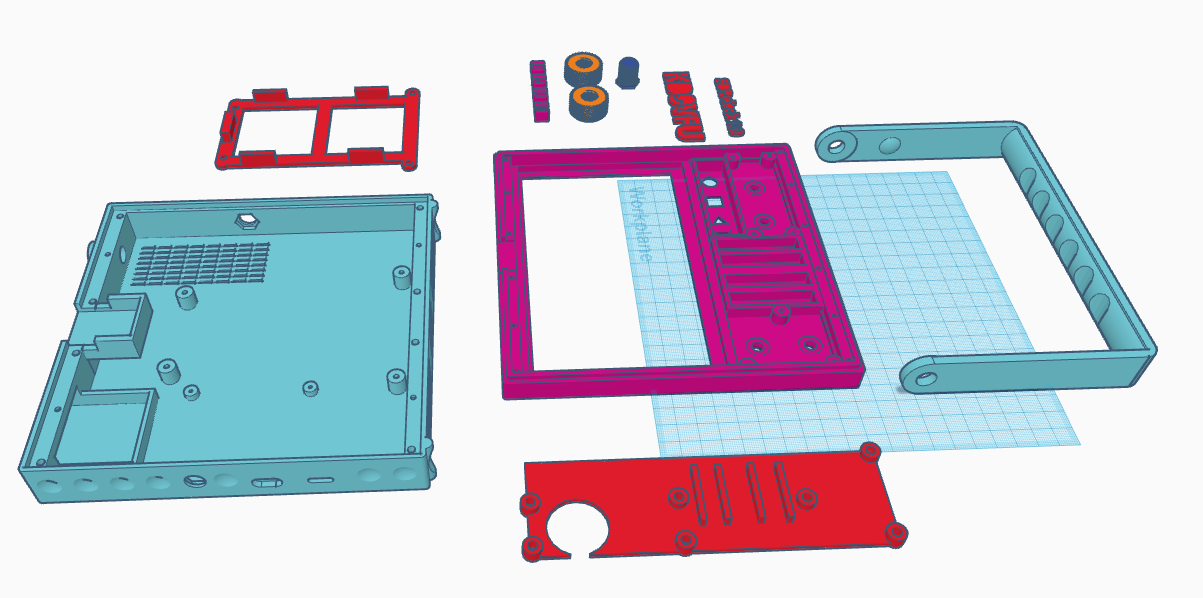
ENCLOSURE:  The shell design is 3D-printable and requires just a few screws for assembly. The STL files for the project will be made available. Currently, the design is undergoing refinements, particularly to accommodate an antenna within the handle. Updates will be shared as they become available.
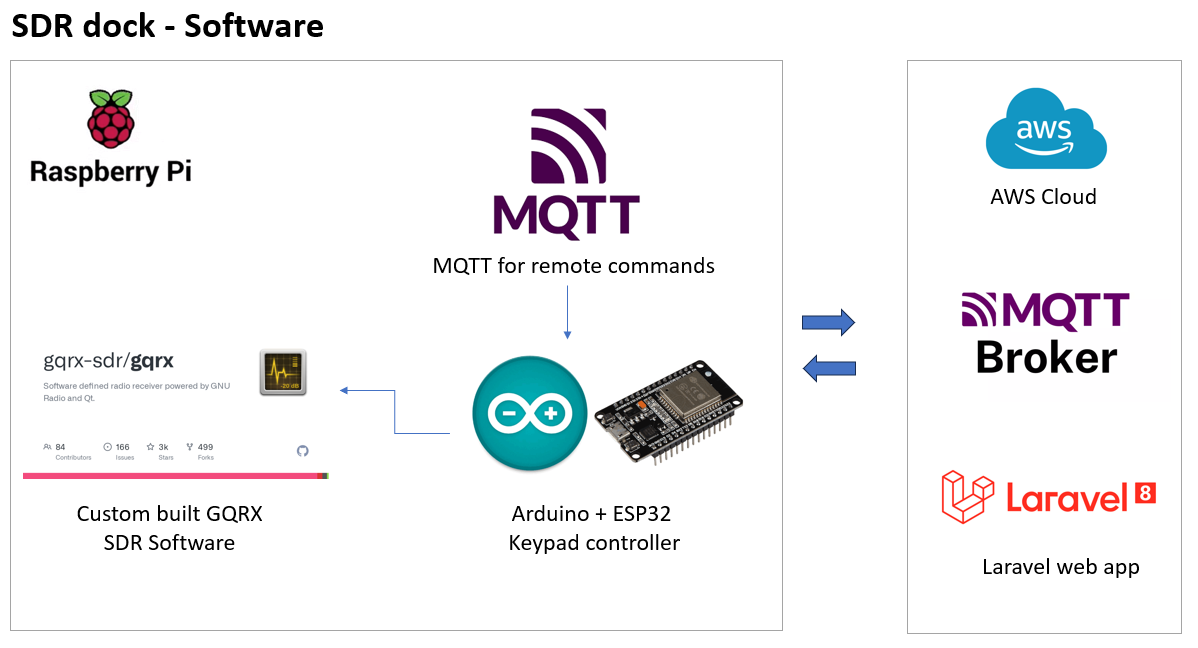
SOFTWARE : The software architecture is Raspberry Pi-based and either requires a customized GQRX build or a plugin capable of converting custom controllers, such as VFO sliders, into GQRX-compatible commands.

At the moment, three control options are under consideration: emulated keyboard inputs, rig control features, or a dedicated firmware or plugin. The selection will be based on compatibility and ease of customization with SDR software.

CLOUD: An optional feature allows for remote SDR control via cloud computing. It enables scheduled audio recording on specific frequencies, offering an efficient way to gather all the audio data you require. As a software enthusiast, I'll be adding cloud-based audio recording features to the interface.
What distinguishes SDRDock is its tactile interface, complete with knobs and buttons that add a tangible element to the experience. It evokes the nostalgic joy of tuning an old radio to discover a hidden station, or the satisfaction of precisely dialing into a frequency. SDRDock aspires to resurrect these tactile joys in today's digital landscape, transforming the often-complicated task of adjusting SDR settings into a simple and engaging activity.
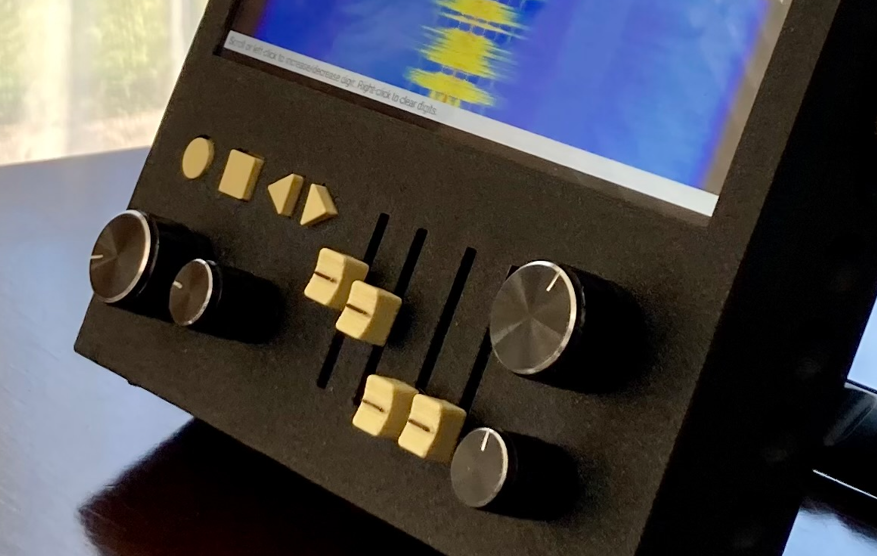
So, if you're intrigued by the expansive world of radio frequencies, SDRDock could be your ideal companion. It's not merely about tuning into frequencies; it's about transforming the radio spectrum into your personal interactive playground.

sdrdock-battery-cover.stl

3d printable Battery cover to be mounted on base frame

Standard Tesselated Geometry - 43.64 kB - 09/06/2023 at 16:10

Download

sdrdock-nutbolt--for-handle.stl

3d printable nuts and bolts. Nuts goes inside the base frame.

Standard Tesselated Geometry - 576.94 kB - 09/06/2023 at 16:09

Download

sdrdock-Base-frame.stl

3d printable main frame. holds battery, etc.

Standard Tesselated Geometry - 820.30 kB - 09/06/2023 at 16:09

Download

sdrdock-Top-cover.stl

3d printable top cover. holds the screen, and controls

Standard Tesselated Geometry - 210.92 kB - 09/06/2023 at 16:09

Download

controls-cover.stl

3d printable cover that goes on the face-plate and secures the electronics & controls

Standard Tesselated Geometry - 86.70 kB - 09/06/2023 at 16:09

Download

View all 6 files

View all 9 components

  • Building a Custom SDR Controller with Raspberry Pi Pico and ADS1115

    Kaushlesh C. ( KD9VFU )3 days ago 0 comments

    I am building a custom controller using a Raspberry Pi Pico paired with an ADS1115 analog-to-digital converter. In this guide, I will walk you through the process of connecting three linear potentiometers, a potentiometer with an on/off switch, four push buttons, and three rotary encoders with push buttons to your Raspberry Pi Pico.

    Why ADS1115?

    The primary motivation for selecting the ADS1115 is the absence of an Analog-to-Digital Converter (ADC) on the standard Raspberry Pi. Additionally, the Raspberry Pi Pico, while offering ADC capabilities, is limited to only three analog inputs. However, our design calls for four analog inputs, making the ADS1115 an ideal choice. Moreover, the decision to employ ADS1115 has an eye on the future, as it allows for the straightforward transfer of Python code from the Pico to the host Raspberry Pi. Furthermore, the Raspberry Pi Pico presents itself as an HID (Human Interface Device), opening the door to its use as a keyboard input device. Lastly, ADS1115 modules are readily available, ensuring ease of procurement.

    Components Needed

    Before diving into the assembly and programming steps, let's first gather the components required for this project:

    1. Raspberry Pi Pico.
    2. ADS1115 analog-to-digital converter.
    3. Three 10K linear potentiometers.
    4. One 10K linear potentiometer with an on/off switch.
    5. Four push buttons.
    6. Three rotary encoders with push buttons.

    Wiring the Components

    Now, let's proceed with connecting the components:

    ADS1115 Setup: Begin by linking the ADS1115 to your Raspberry Pi Pico via I2C communication. The Pico has I2C pins on GPIO 0 (SCL) and GPIO 1 (SDA).

    Potentiometers: Connect the three 10K linear potentiometers to the analog inputs on the ADS1115. Wire the center pin of each potentiometer to an analog input on the ADS1115. For the remaining two pins on each potentiometer, connect one to GND and the other to the 3.3V on the Pico.

    Potentiometer with On/Off Switch: Establish connections for the potentiometer with the on/off switch in a similar manner. The on/off function will be employed to control the power state of the entire device.

    Push Buttons: Link the four push buttons to GPIO pins on the Pico. Ensure you use appropriate pull-up or pull-down resistors to prevent floating inputs.

    Rotary Encoders: Connect the three rotary encoders to GPIO pins as well. Each encoder comprises two outputs (A and B) that generate pulses during rotation. Additionally, they are equipped with a push button which can be connected to another GPIO pin.

    Programming the Raspberry Pi Pico

    Now that the hardware setup is complete, you need to program the Raspberry Pi Pico to:

    1. Read analog values from the potentiometers via the I2C interface.
    2. Interpret the potentiometer values as control inputs for your SDR software.
    3. Configure the push buttons to trigger specific actions in your SDR software, such as mode selection or preset switching.
    4. Monitor the pulse outputs of the rotary encoders to detect rotations and use push button presses to initiate additional functions. You may consider implementing a rotary encoder library to streamline this process.

    In the upcoming sections, we'll provide you with detailed code and instructions to execute each of these tasks.

    Stay tuned for the continuation of this guide, where we'll delve into the programming and software integration aspects of building your custom SDR controller with the Raspberry Pi Pico and ADS1115.

  • Search for SDR software continued

    Kaushlesh C. ( KD9VFU )7 days ago 0 comments

    As I continue to search for a SDR software that is capable, light on processing, and easy to customize, I came across this excellent work by Paul. 

    Paul has built ESP32 based controllers, and built custom software for SDR, with nice GUI. 

    Paul's SDR

    Also, PiHPSDR is another option.

  • SDR Software selection

    Kaushlesh C. ( KD9VFU )09/06/2023 at 16:55 0 comments

    I had some great feedback with Hackaday members. There was recommendation for GNU Radio. So, I wanted to do a further detailed analysis on what are the options, and pros and cons of using the software options. 

    GNU Radio Companion (GRC)

    • Pros:
      • Extremely powerful and versatile, designed for both simple and intricate signal processing tasks.
      • Modular graphical interface for drag-and-drop processing blocks.
      • Rich library of pre-built modules and functions.
      • Highly customizable and extendable with new modules.
      • Strong community support and a plethora of online tutorials and resources.
    • Cons:
      • Can be resource-intensive, which might challenge the Raspberry Pi's capabilities for complex tasks.
      • Has a steeper learning curve, especially for those unfamiliar with signal processing

    While GNU seems to be the top contender, I am also liking GQRX distribution. GQRX is very simple, and it is also opensource. And in my experiments, GQRX consumes less power. So, when the 10,000 MaH battery on the SDRDock gets low, SDR++ glitches due to lack of power, while GQRX keeps running when battery gets low.

  • 3d print, enclosure and build

    Kaushlesh C. ( KD9VFU )09/03/2023 at 19:02 0 comments

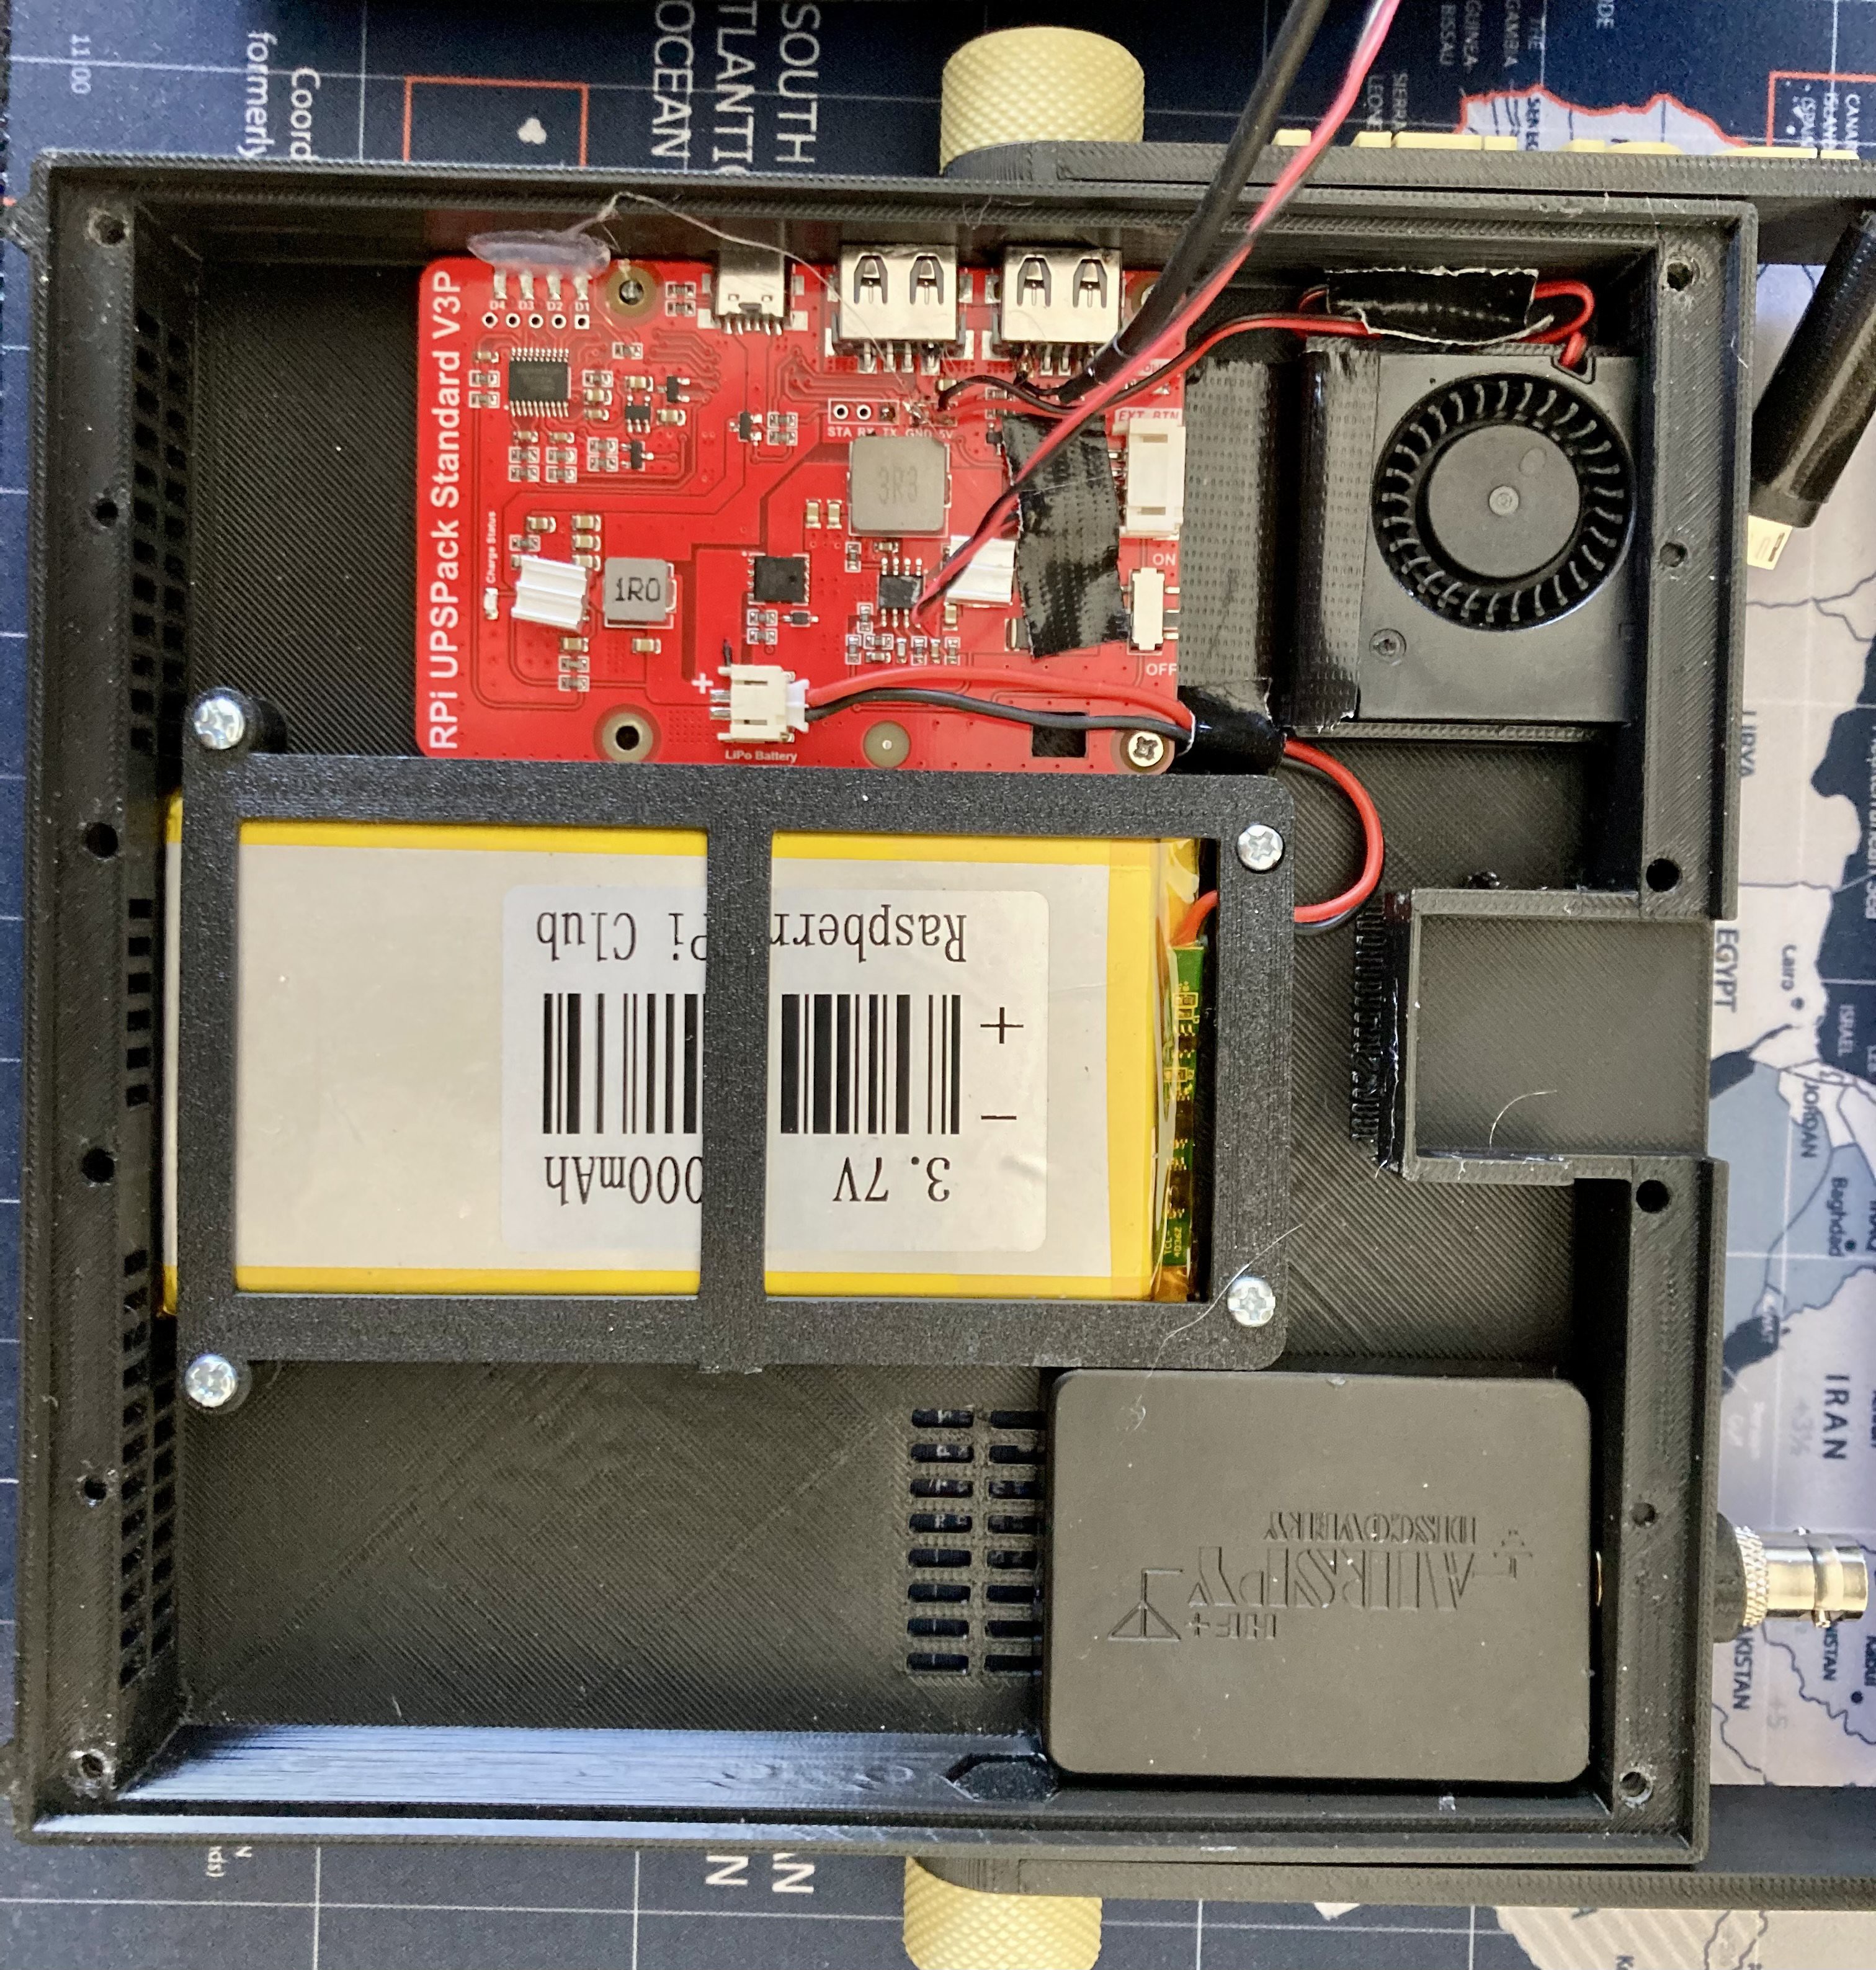
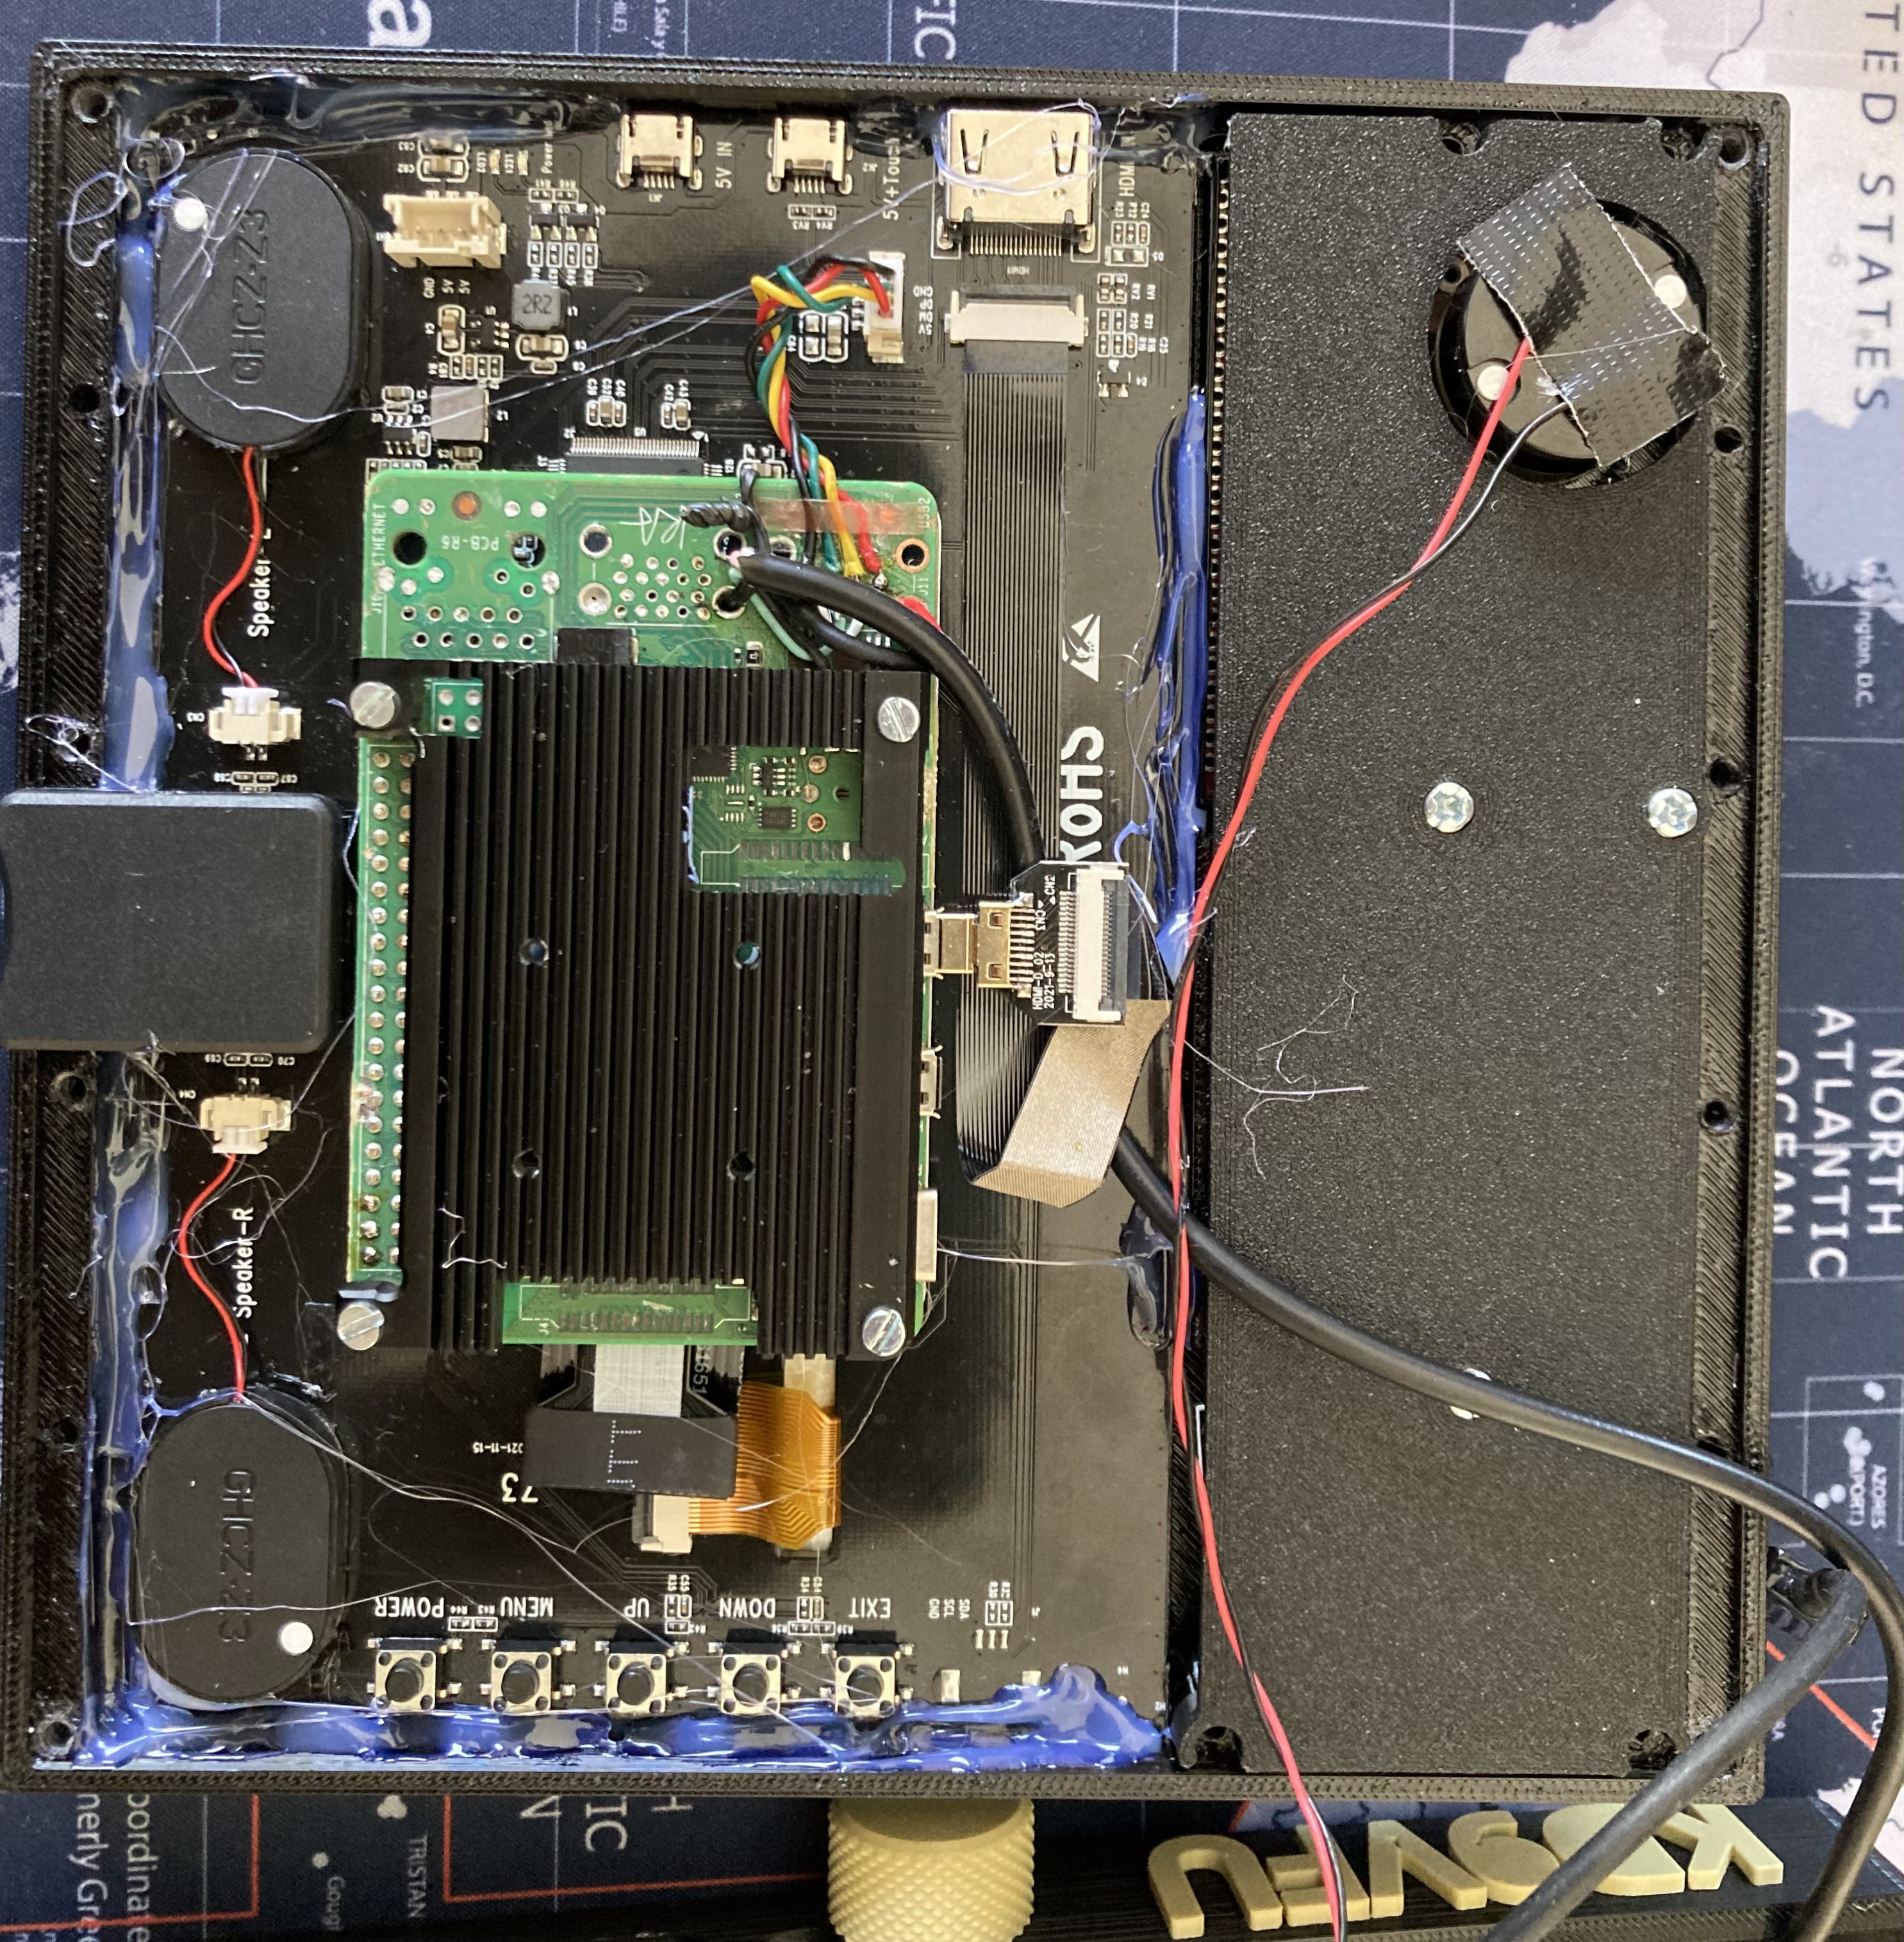
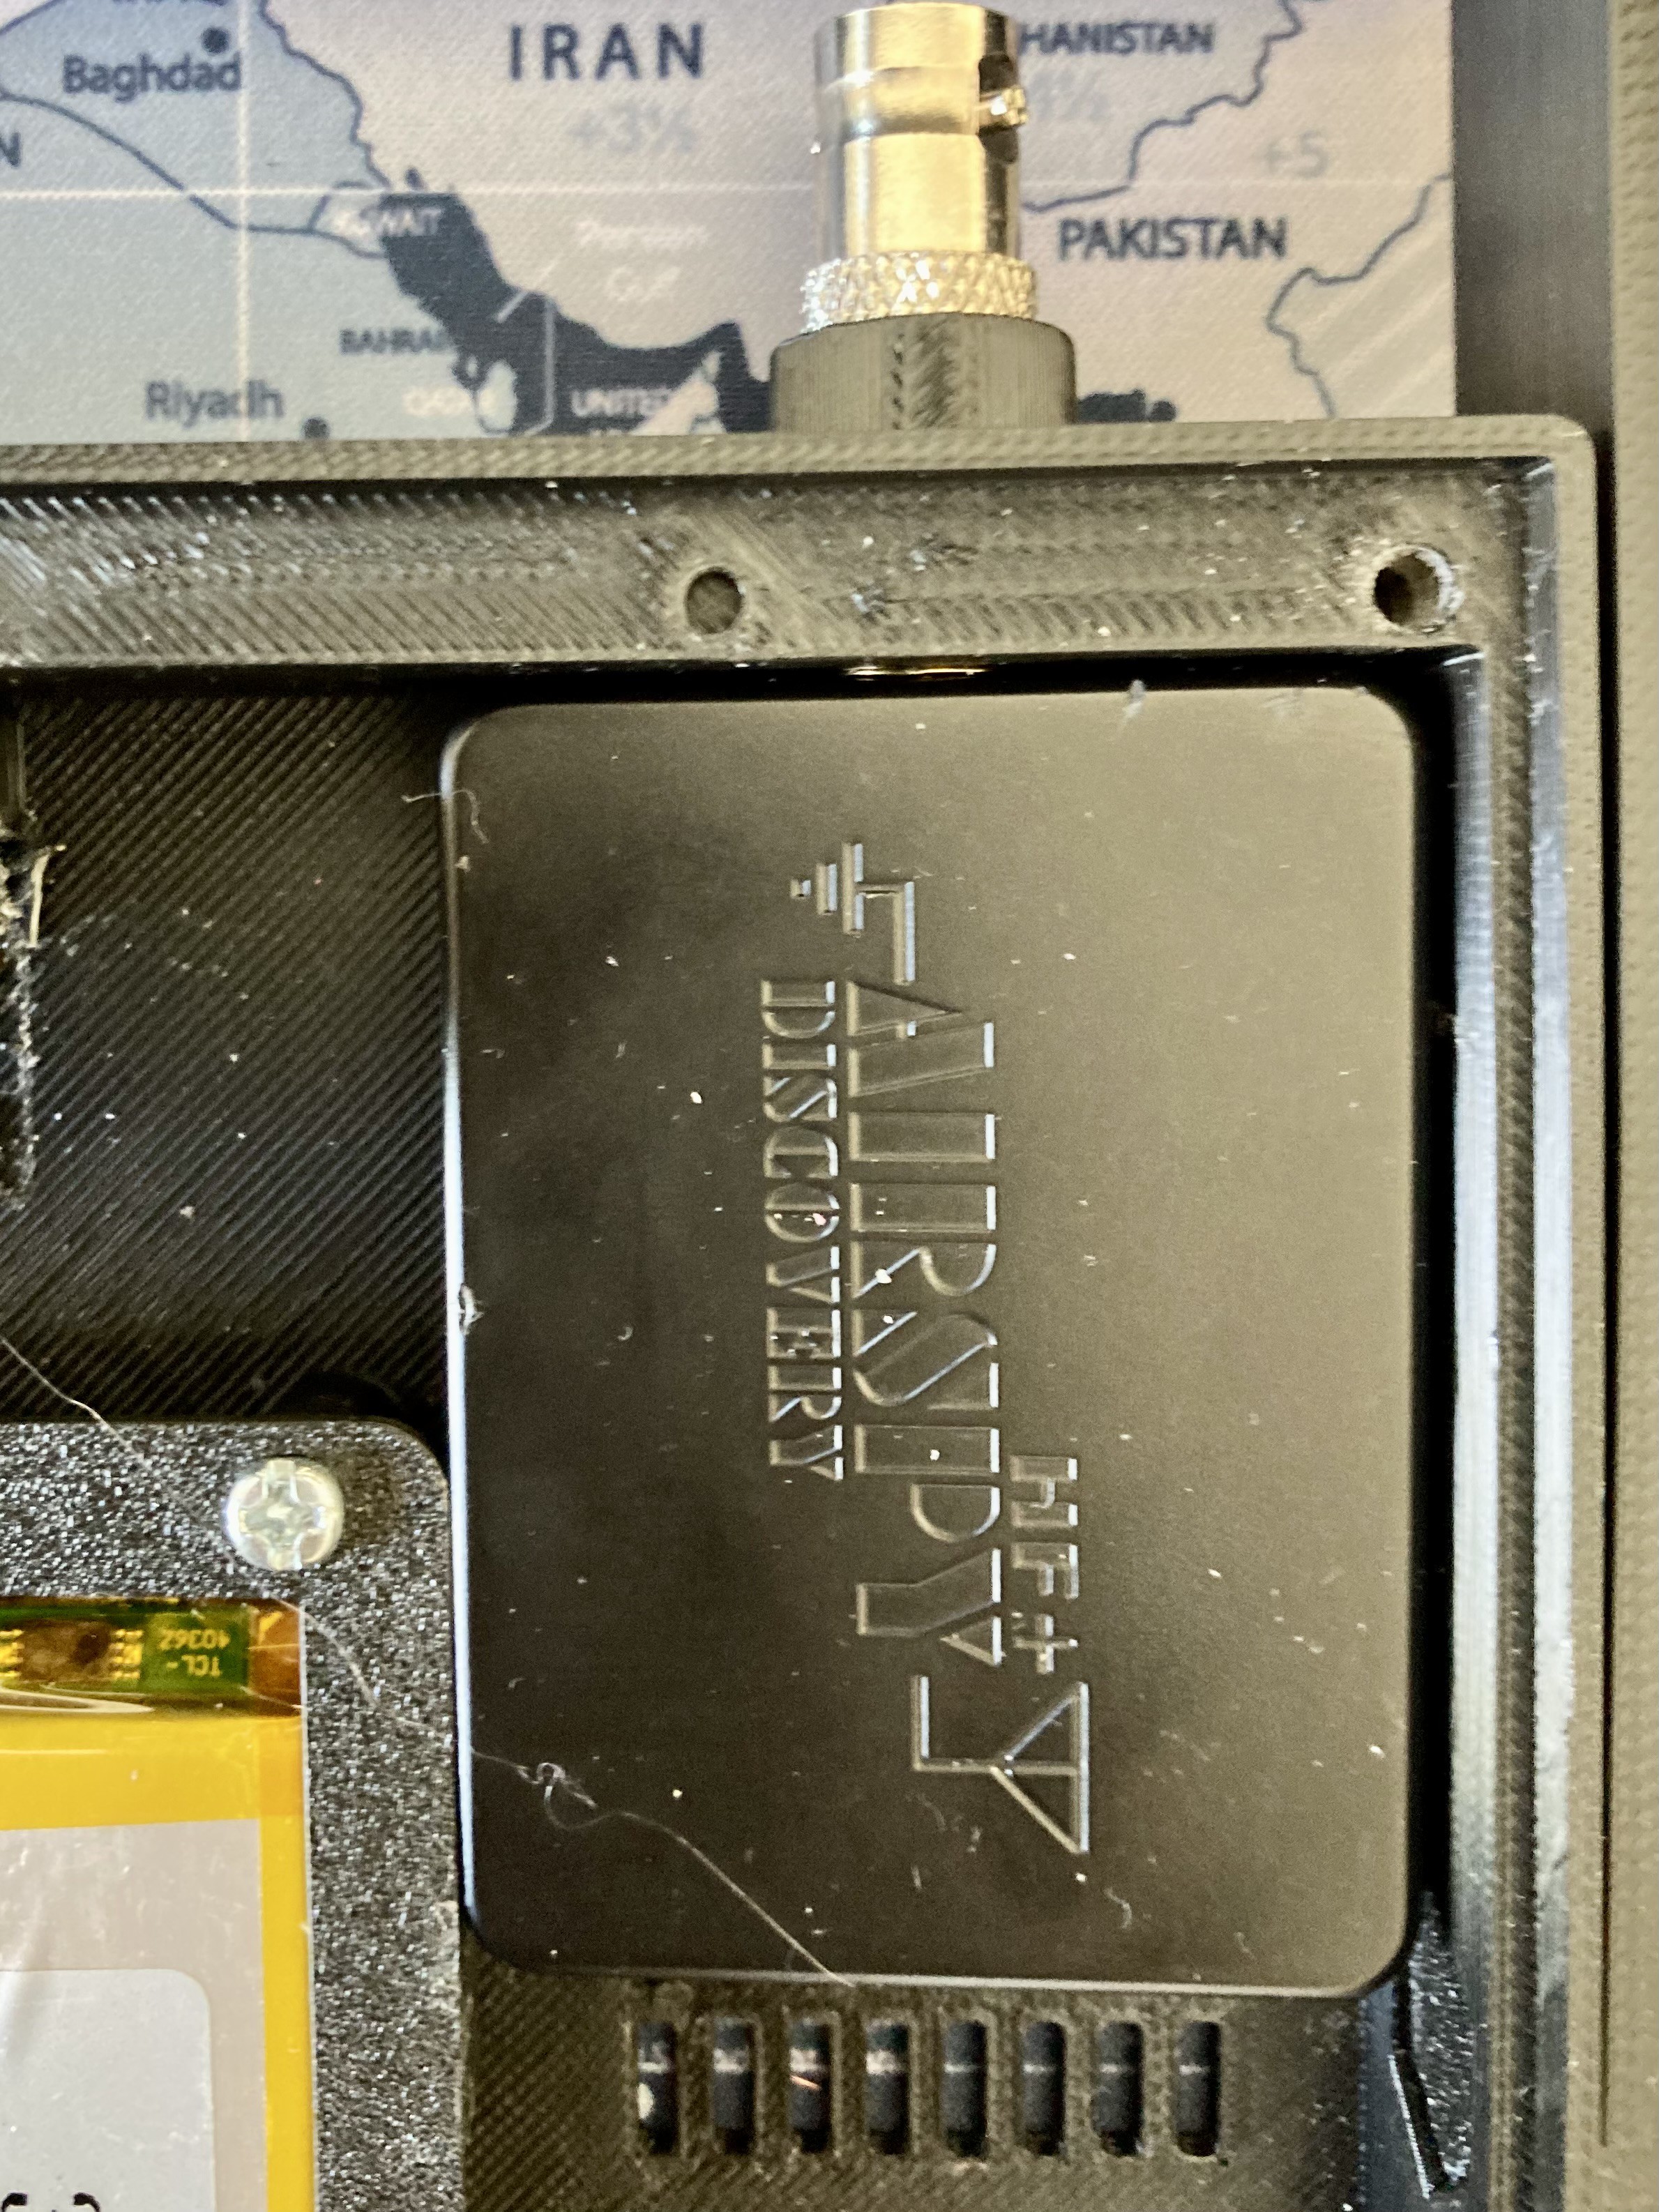
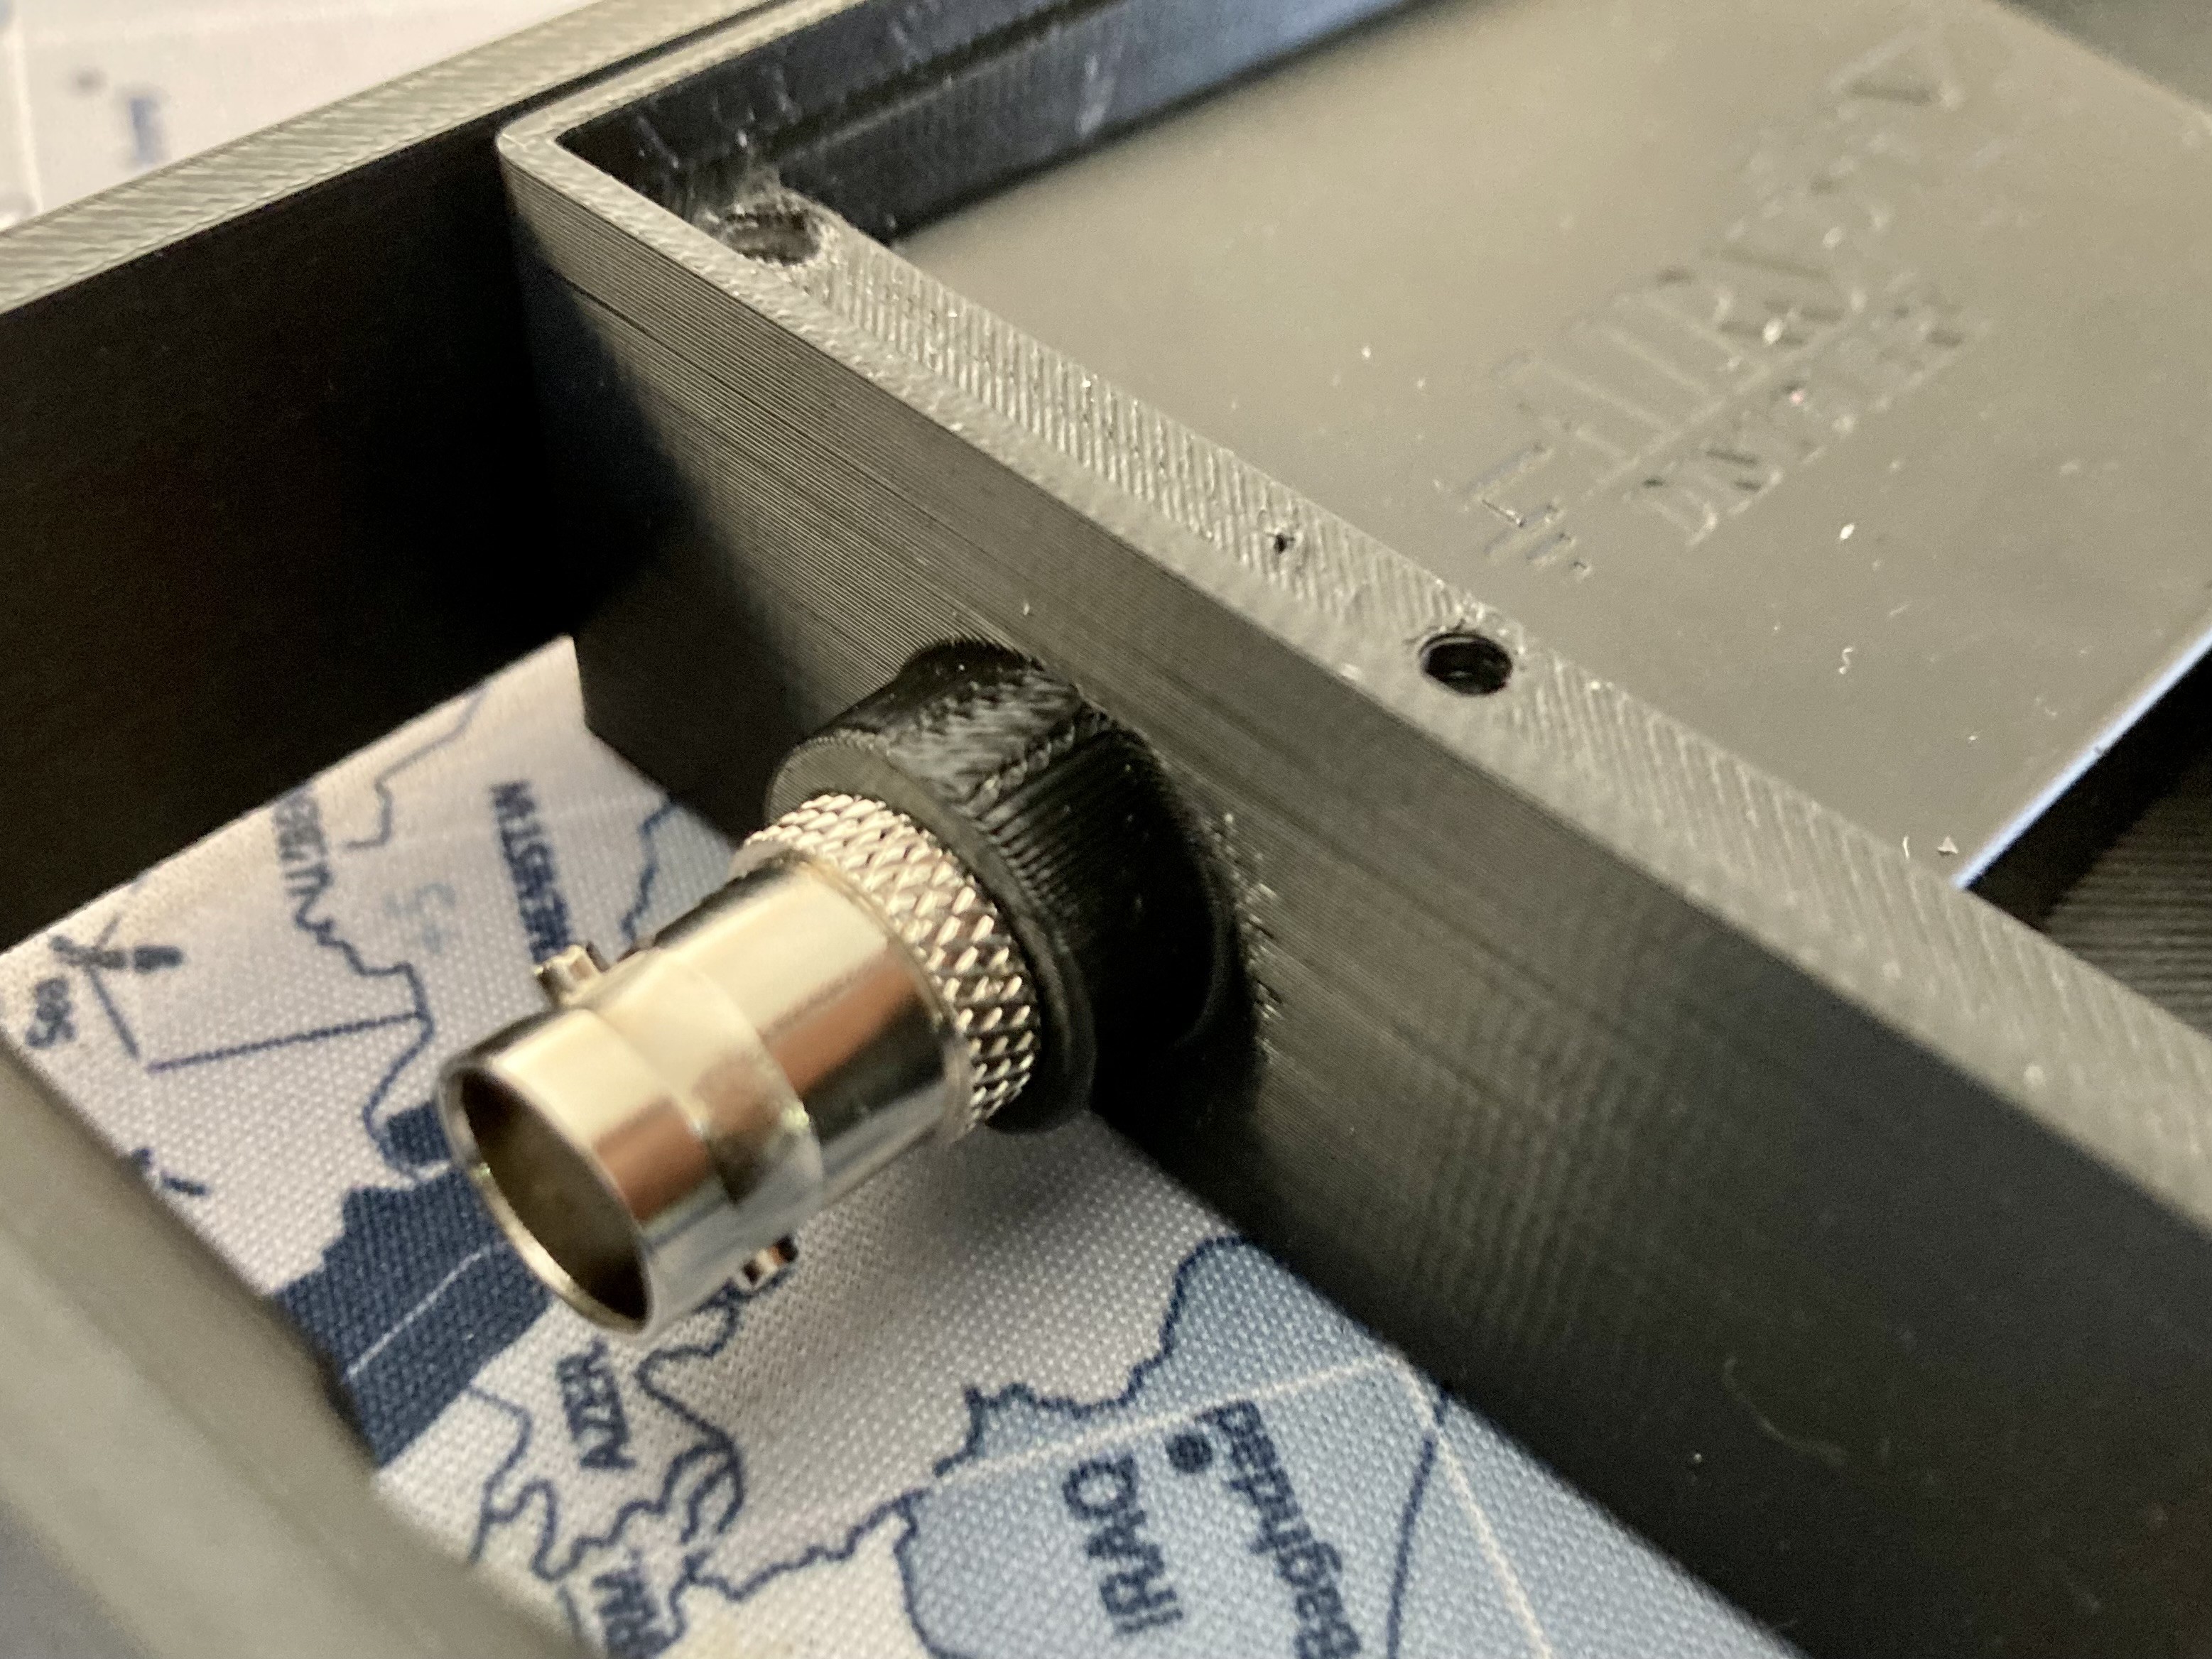
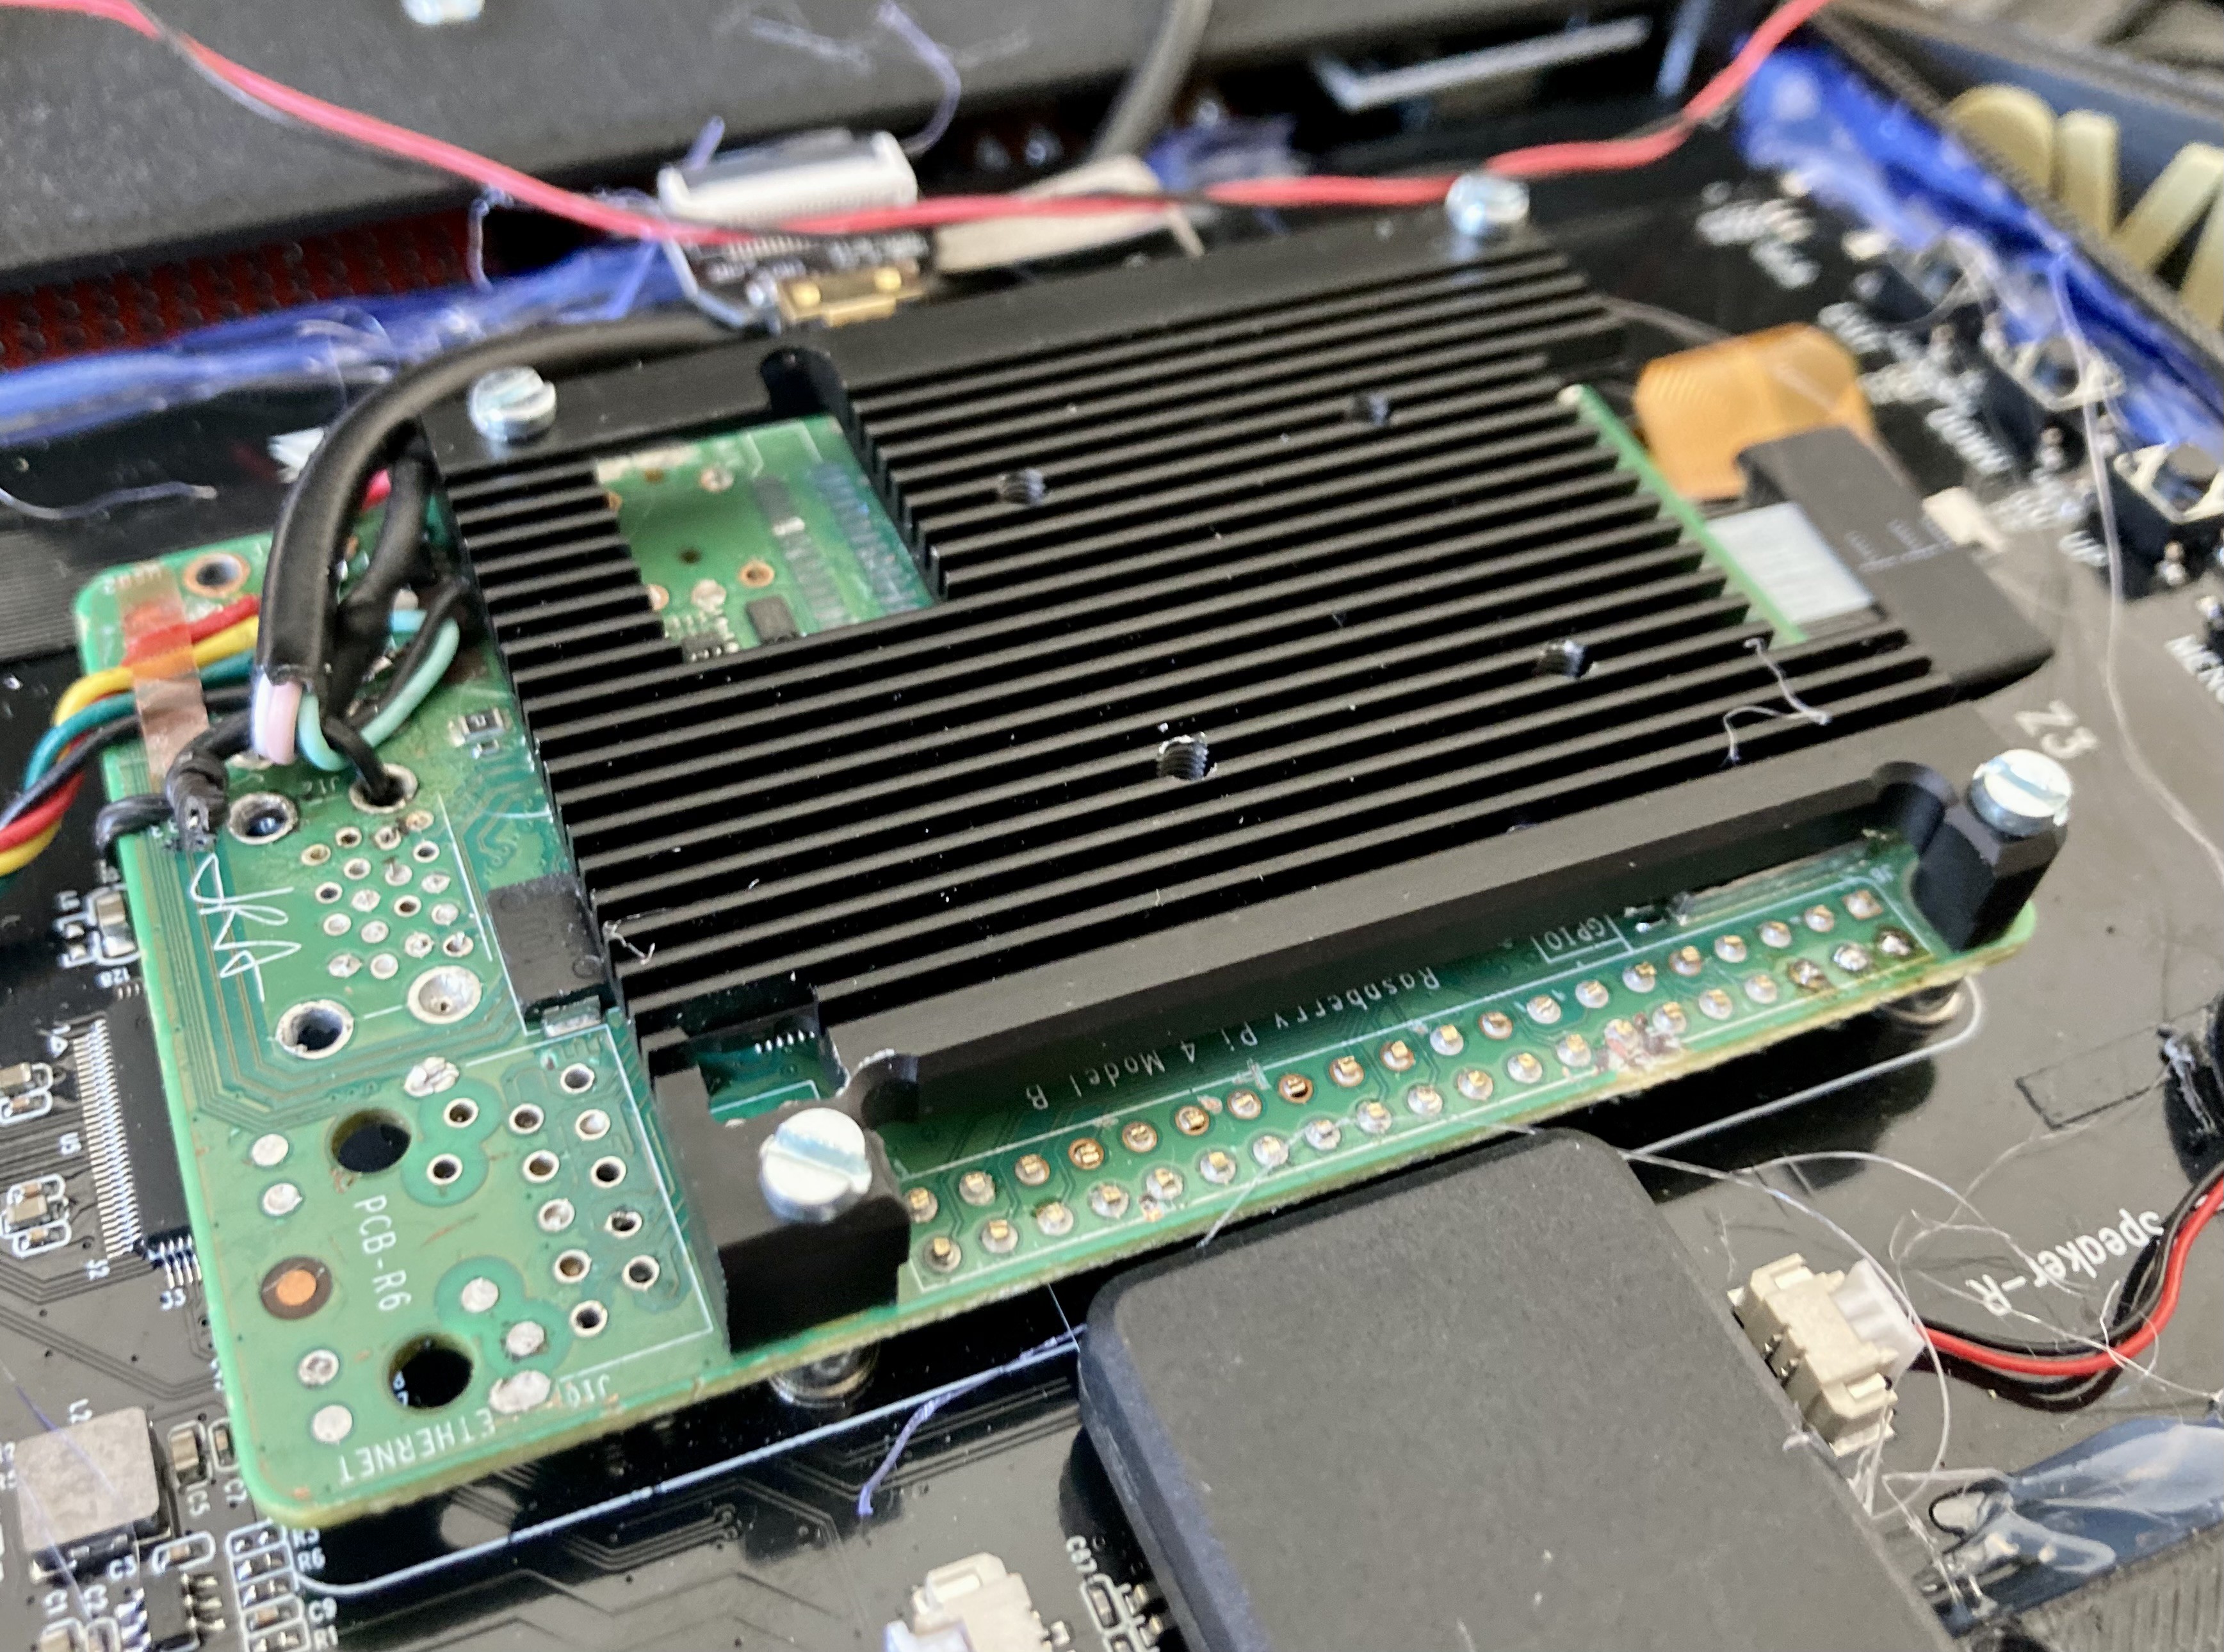
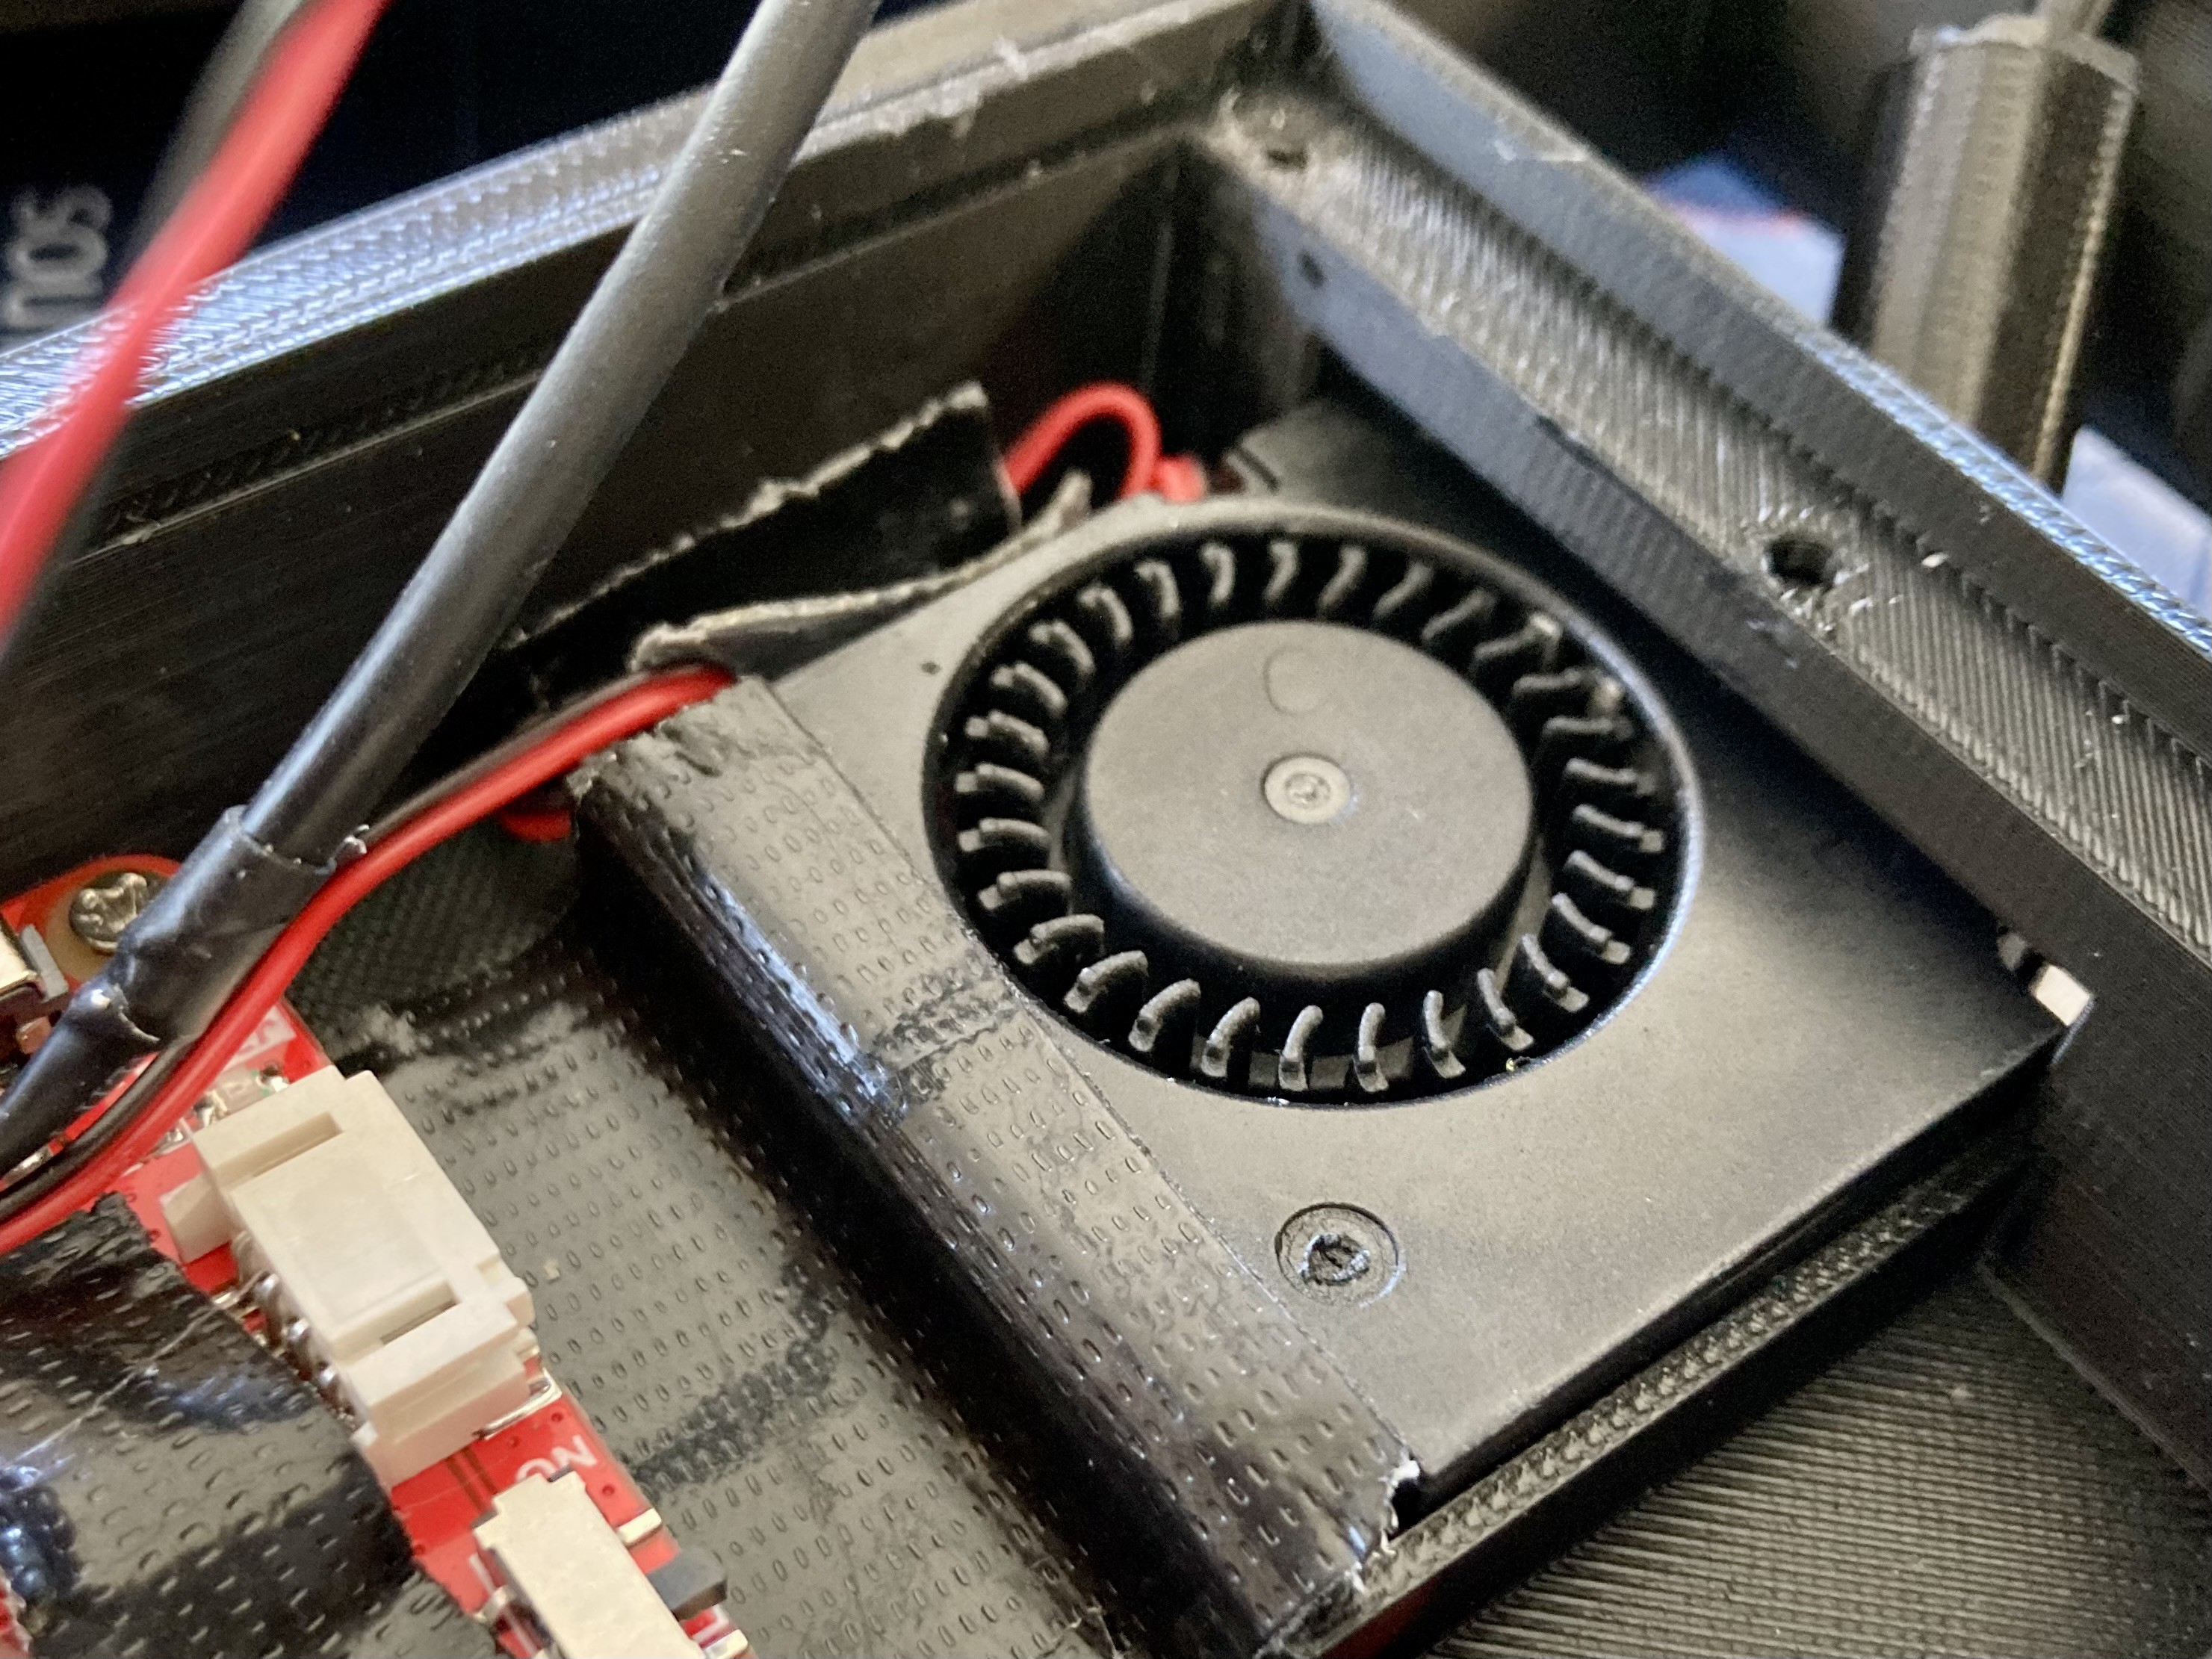
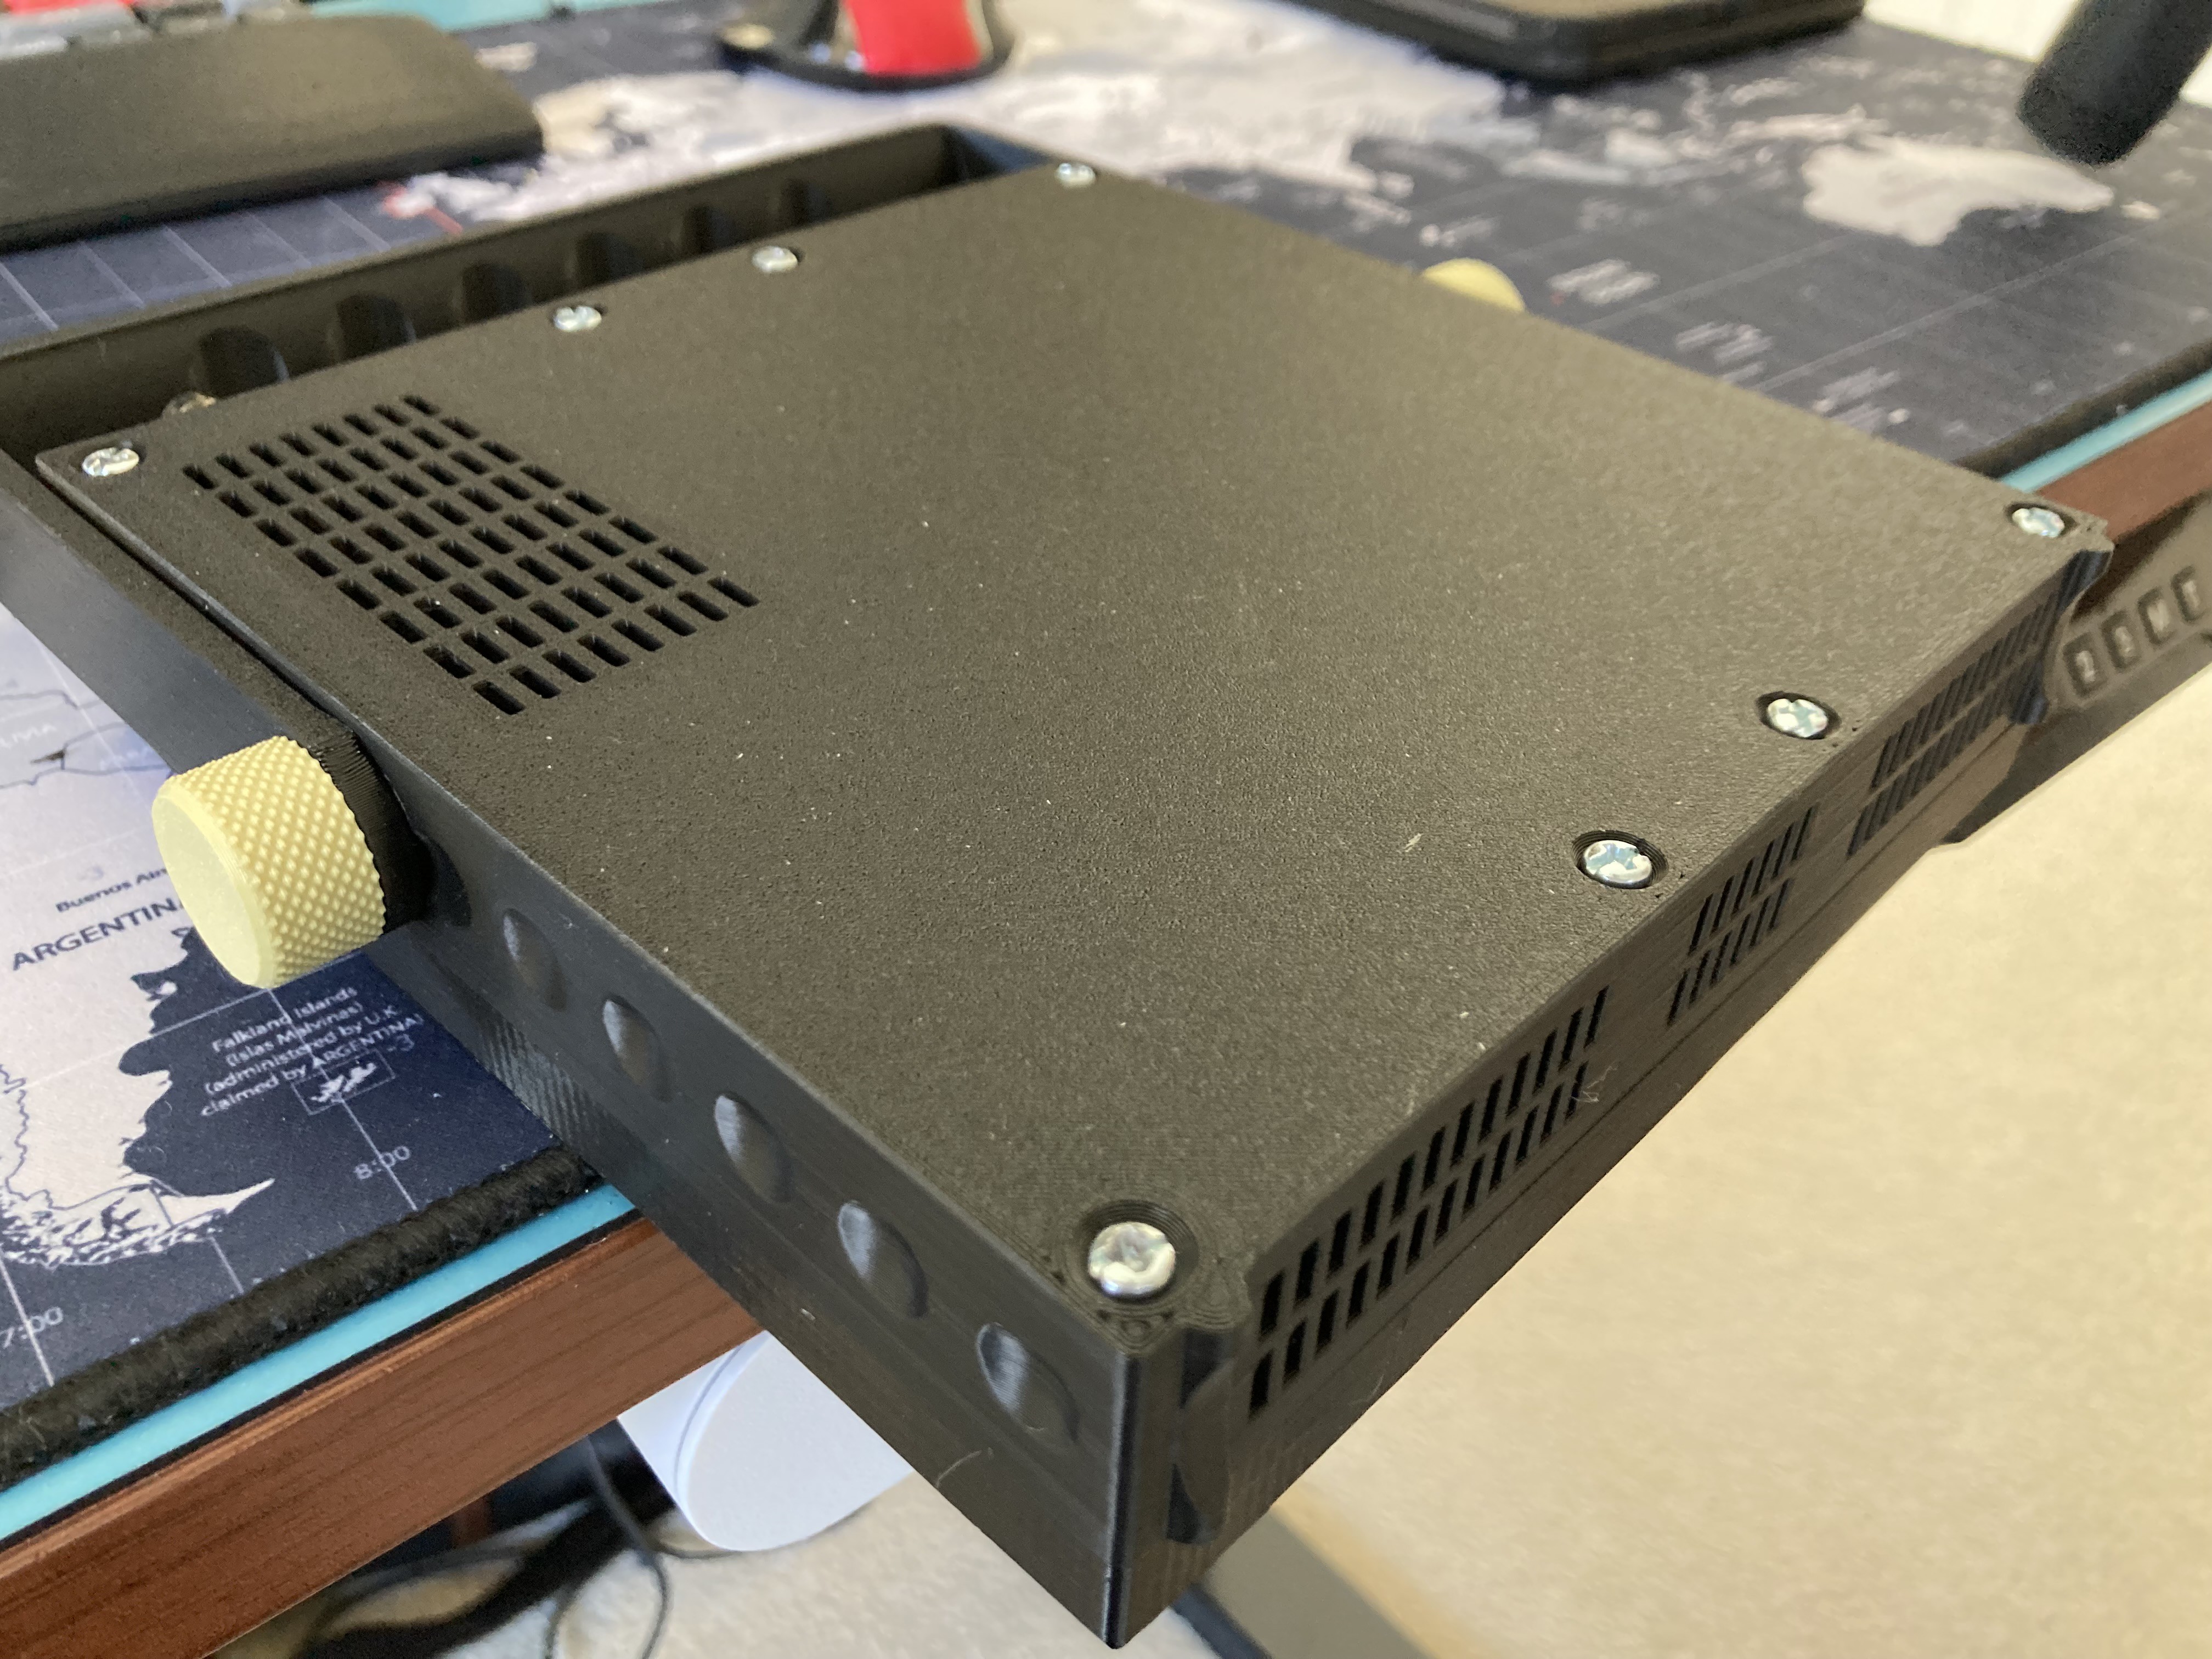
    Here are some pictures illustrating the build. I will share a video explaining each step of the build.

    The back enclosure has Airspy, Fan, battery and BMS system

    The font panel has LCD, Raspberry Pi, SD Card, and keypad controllers (Behind the black panel).

    Airspy HF+ is an excellent device to explore the HF signals. And a BNC extension, makes it easy to secure the Airspy, and to mount common antennas.

    To make the device slim, I stripped off all the extra stuff from this raspberry pi 4. But you can build without removing anything. Only thing you will need is to increase the enclosure height.

    I am using 5V fan for ventilation. TODO add PWM control to this fan. right now, its always on, and has some noise.

    Finally, enclosure is secured by some basic screws about 1.5 inch long. I would love to add some brass screw inserts

  • Step 1 : Picking the right SDR softawre

    Kaushlesh C. ( KD9VFU )08/26/2023 at 19:03 0 comments

    Goal: I want to find SDR software that supports keyboard shortcuts, and is most feature rich for raspberry pi. An option to program custom plugins will be an added advantage.


    A few of the available options for raspberry Pi.

    GQRX : GQRX is a general-purpose software-defined radio receiver that works very well on the Raspberry Pi, especially for the more powerful versions like the Raspberry Pi 4.  

    RTL-SDR: While not strictly a software, RTL-SDR is a cheap USB SDR receiver that is widely used in the hobbyist community. Software to run RTL-SDR on Raspberry Pi is plentiful, including the rtl_fm command-line tool.

    CubicSDR: CubicSDR is another software option that provides a graphical interface for SDR operations.

    SDRangel : SDRangel is an Open Source Qt5 / OpenGL 3.0+ SDR and signal analyzer frontend to various hardware. It's more geared toward advanced users and offers a wide variety of features.

    SoapySDR: SoapySDR is not an SDR application per se but serves as a SDR data manipulation library that can act as a middle layer between your SDR hardware and the software you use to process the radio signals. Many of the above-mentioned software options use SoapySDR in the backend.

    GNURadio: Although complex, but it has a lot of features, and can be customized. It might me a good choice for this use case.

    FreqShow: Its simple SDR software with options optimized for touchscreens. 

    Now, I am looking for something that I can be easily customized.


    right now GQRX and SDR++ are on top.


    do share in comments if you feel a better SDR option 

View all 5 project logs

Enjoy this project?

Share

Discussions

meetsarfrazchheena wrote a day ago point

SDRDock sounds like an exciting innovation for the software-defined radio (SDR) community, combining the power of SDR technology with user-friendly features. Here are some key points that highlight its unique features and benefits:

Integration of Essential Hardware Components: Integrating essential SDR hardware components onto a single PCB simplifies the setup process, reducing the complexity of connecting multiple components. This is especially valuable for beginners looking to get started with SDR technology.

https://www.usaudiovisuals.pk/

Raspberry Pi Platform: Utilizing the Raspberry Pi platform ensures compatibility with a wide range of software and provides a familiar environment for both hobbyists and professionals. It also opens up possibilities for customizations and software development.

3D-Printable Enclosures: The option for 3D-printable enclosures adds a level of customization and flexibility. Users can design and print enclosures tailored to their specific needs, making SDRDock adaptable to various use cases and environments.

Compatibility with Various SDR Dongles: Supporting multiple SDR dongles enhances the device's versatility. Users can choose from different SDR dongles to suit their specific frequency range and performance requirements.

Tactile Interface: The inclusion of user-friendly knobs and buttons is a significant advantage. It simplifies the interaction with SDR software, making tasks like tuning and adjusting parameters more intuitive and enjoyable.

Accessibility for All Skill Levels: Whether you're a beginner looking to explore the world of SDR or a professional with specific needs, SDRDock caters to a broad audience. Its user-friendly interface and versatility make it accessible to users with varying levels of expertise.

Engaging Experience: By turning complex SDR tasks into an engaging experience, SDRDock encourages exploration and experimentation in the radio spectrum. This could spark creativity and innovation within the SDR community.

Overall, SDRDock seems like a promising addition to the SDR landscape, offering a user-friendly and adaptable solution for SDR enthusiasts and professionals alike. It has the potential to make SDR technology more accessible and enjoyable while supporting a wide range of applications, from radio hobbyists to research and development projects.

  Are you sure? yes | no

bfsmith07 wrote 09/13/2023 at 16:12 point

This is a very cool project, well done!  Anything that visualizes the EM spectrum or audio spectrum is simply fascinating to me.

  Are you sure? yes | no

michaelrtaylor wrote 09/10/2023 at 07:00 point

I googled SDR and there is more than one meaning.  What is SDR in this application and what is a SDRDock?

  Are you sure? yes | no

Kaushlesh C. ( KD9VFU ) wrote 09/10/2023 at 13:26 point

SDR is software defined radio. This project focuses on ham radio SDR. the dock lets you monitor various Radio frequencies, like FM radio, HAM radio UHF,VFH, and HF frequencies.

  Are you sure? yes | no

drhatch wrote 09/05/2023 at 04:51 point

Great project. I have recently started a very similar project.

I am prototyping around GNURadio, as my starting point. The idea is to set up the GNURadio processing (radio) blocks and display (waterfall) blocks with the desired variables. Then control those variables via XMLRPC blocks. The idea is to have the PI 4 read the interface elements (buttons, potentiometers) in Python, and then set/control the variables via XMLRPC, via 'localhost.'

Sample code is even available on the tutorial page! Search for "Understanding XMLRPC Blocks" at wiki.gnuradio.org.

I would place other visual graphical elements (freq display digits, IF bandwidth digits, other status items) using PyQT.

Anyway, that is how I intend to proceed, because I want full control over the UI display. Pretty sure it would be easier to use GQRX or SDR++ though!

  Are you sure? yes | no

Kaushlesh C. ( KD9VFU ) wrote 09/05/2023 at 10:24 point

Thanks! Ill look into GNU as well. So far I have leant that there are only a limited things we can control on GQRX or SDR++. So, GNU might be a better choice. However I have never used GNU radio. ill look into it.

  Are you sure? yes | no

aaaaaa wrote 09/04/2023 at 17:21 point

please add keys: space, esc, tab, enter and meybe 0-9

meybe on top, meybe in other places.

meybe add solar panel (this dev is big ;-) ) and step-up-donw from any source from 1V to 24V

  Are you sure? yes | no

Kaushlesh C. ( KD9VFU ) wrote 09/04/2023 at 18:47 point

All great points. I plan to implement most SDR actions using the 4 puttons, rotary switches etc. 

There can be a few more buttons for common actions.. Esc, Space, Enter, etc. I am trying to find most suitable software for SDR. Solar panel is a great idea... there is a large back panel. It would be cool if there is a folding solar panel :)

  Are you sure? yes | no

Kaushlesh C. ( KD9VFU ) wrote 09/03/2023 at 20:32 point

thanks! That’s a fair point… I am evaluating three options… one using keyboard shortcuts, second is to use telnet rig control options and third program a plug-in or just rewrite GQRX or SDR++.


keyboard shortcuts is easiest. I can use a raspberry pi pico but it had only four analog inputs. So ESP32 S3 is best candidate to emulate keyboard. Whether you use keyboard or I2C, you can always emulate keystrokes on the raspberry pi. Most importantly what softeare supports keyboard shortcuts or telnet commands the best. Right now GQRX and SDR++ are top contenders 

  Are you sure? yes | no

mkdxdx wrote 09/03/2023 at 21:02 point

Well that what i would go anyway, however after cursory look at what Gqrx SDR and other offers for such automation, options are rather limited. But imo using Pi GPIOs to poll a controller would be even more limiting/overkill.

Good luck with that anyway!

  Are you sure? yes | no

Kaushlesh C. ( KD9VFU ) wrote 09/03/2023 at 21:14 point

Thanks for the insights. GQRX has good options to control using its remote control feature. ill have to write a script that polls the buttons, and tracks changes... and use the telnet remote control to control the SDR. SDR++ does have options to build a plugin, and its got options for other plugins like pocsag decoder, NOOA image decoding, etc. but its heavier on the battery. I am open to options. maybe support multiple SDR's to get best of each. lets see how this project comes along. 

  Are you sure? yes | no

mkdxdx wrote 09/03/2023 at 21:48 point

Atleast with emulating a macropad you get an option to switch to different control profiles right on the controller itself, if you have SDR GUI's with different control schemes.

  Are you sure? yes | no

mkdxdx wrote 09/03/2023 at 20:14 point

Neat project!


Do you plan to poll ESP32 with some kind of script in OS to get knob/slider values? 

Have you not considered using USB HID on your controller side to turn knob/button/slider motions into HID (mouse/keyboard/something else emulation). Emulating mouse/keyboard is pretty easy and requires no additional lines from Pi except one USB connection. 

The issue remains is how to transfer HID commands into SDR software controls (that is what i'm interested in for my projects also), but if you bring up your ESP32 to playback something akin to what macro pads do, if your SDR soft supports keyboard shortcuts - you will get your software controlled via knobs and sliders.

  Are you sure? yes | no

Similar Projects

Does this project spark your interest?

Become a member to follow this project and never miss any updates